When you add an email account in MS Outlook, it creates an Outlook data file in the .pst format. All the info related to that account gets stored in this file. So, if Outlook can’t acess the subsequent .pst file, it displays this message “Your Outlook data file cannot be configured.” on your screen. This indirectly means there is a corruption in the outlook data file which prohibits your access to the Outlook app.
Fix 1 – Launch Outlook in Safe Mode
Launch Microsoft Outlook in the Safe Mode (without the interference of any third-party plug ins) and test.
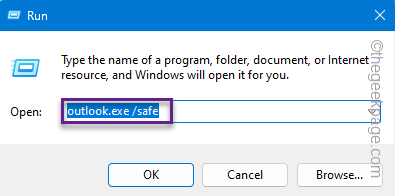
Step 1 – To open Outlook in Safe Mode, you need to press the Win+R keys, first.
Step 2 – Go ahead and paste this in the empty box.
outlook.exe /safe
Step 3 – Press the Enter key.
If a prompt appears on your screen, assert to that and open up the MS Outlook.
When the email client loads up, try to access the mail inbox. You shouldn’t further problems with the ODF (Outlook Data File) anymore.
Fix 2 – Repair the Data file
There is a strong possibility that the associated data file has got corrupted. So, repairing the data file should help.
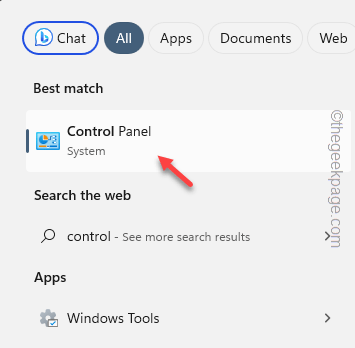
Step 1 – Search for “control” just pressing the Windows key once.
Step 2 – Open the “Control Panel“.
Step 3 – Generally, the Control Panel loads up the default set of tools.
Step 4 – So, you need to set the “View by:” pointer to “Small icons“.
Step 5 – In the listed items, open the “Mail (Outlook) (32-bit)” setting to open that up.
Step 6 – Next, just choose the “Data Files” option to get access to it.
Step 7 – Simply, switch to the “Email” tab.
Step 8 – If you have multiple email accounts, there’ll be multiple data files. Select the one that is giving your PST error message.
Step 9 – There, select the email file from the list and click “Repair“.
Step 10 – After this, visit the “Data Files” tab.
Step 11 – Select the same PST file and tap “Settings“.
As you continue to use the Outlook for email messages, the size of the file starts to increase.
Step 13 – So, use the “Compact now” button to make the pst file more compact.
This will initiate the repair operation of that specific data file.
After the data file is successfully repaired, close the setup page and the Control Panel.
Launch the Outlook client and let it load up.
If you are still seeing the error message, proceed to the next fix.
Fix 3 – Delete the data file and create a new one
If the data file has got corrupted beyond repair, you have to delete that data file and create a new one.
NOTE – Deleting one data file associated to the email ID will remove all the saved draft emails that you have. Apart from that, all the downloaded email messages, pictures may be removed in this process.
Step 1 – Go to the Control Panel.
Step 2 – Open the “Mail (Microsoft Outlook) (32-bit)” to load that up.
Step 3 – Tap “Data Files” to open the data files settings.
Step 4 – Once more, go directly to the “Data Files” tab.
Step 5 – Select the data file and click “Remove” to remove the data file from your system.
It doesn’t remove the email account from your account. This process just severes the connection between the email account and the pst file.
Step 6 – A warning message will appear. So, tap “Yes” to remove the Outlook Data File.
Step 7 – Now, while you are in the same tab, tap “Add” to add a new pst file.
A default viewfinder in the location of the Outlook Data files should open up.
Step 8 – You may find lots of data files in there. Just, select the data file that has the name of the email account and tap “Open” to add that outlook data file.
After adding this data file, close the Email Setup page and launch Outlook.
Check if you can acutally use the Outlook to read your emails or not.
Fix 4 – Remove the email account and add it again
If removing the data file exclusively doesn’t work, delete the mail account and add it again.
Step 1 – Go to the Control Panel one more time,
Step 2 – Tap the “Mail (Microsoft Outlook) (32-bit)” settings.
Step 3 – Tap the “E-mail accounts” to open that setting up.
Step 4 – Get to the “E-mail” settings tab.
Step 5 – Just select the mail account from there and tap the “Remove” button.
Ignore any prompts ro warning message.
Step 6 – Now, in the same tab, tap “New” to initiate the addition of the account.
Step 7 – Choose the account type you want to add (Automatic or Manual setting) and follow through the steps to complete the whole process.
This way, complete the account addition process using your own e-mail credentials (user ID, password).
After you have added the e-mail account, MS Outlook will automatically create a new .pst file. So, load up the Microsoft Outlook. It won’t give you any more trouble.
Fix 5 – Use a new profile
Inspite of removal and addition of your e-mail account, if the error message returns, you should consider creating a new profile and using that.
Step 1 – Just like before, search and open up the Control Panel.
Step 2 – Find and click that “Mail (Microsoft Outlook) (32-bit)” to access the Email Setup without opening Outlook.
Step 3 – This time, you have to tap the “Show Profiles” option.
Step 4 – Tap the “Add” option to start a new profile creation process in Outlook.
Step 5 – At first, you have to name the profile. So, give a distinguishable name to the Outlook profile.
Step 6 – The next step is the main account creation process. So, select either the “Manual setup or additional server types” or, the “Email account” setup.
Follow the same path and add the same email account to the new profile group that you have just created.
Step 7 – Once you are done and back in the Mail windows, you will see your profile name in there.
Step 8 – Now, this is very important. Toggle the ‘When starting Microsoft Outlook, use this profile:’ to “Always use this profile“.
Step 9 – Click the new profile that you have created.
Save these changes.
As soon as you launch the MS Outlook client, it will be visible using the new profile.
You can now use the Outlook just like before.
Fix 6 – Use the new Outlook app
Tired of getting the same data file corruption message in Outlook? Use the new Outlook app.
Step 1 – If you are using the latest version of Windows 11, search “Outlook“.
Step 2 – Then, tap “Outlook (new)” to access the app.
Step 3 – If you can’t find the Outlook client there, get it from the Microsoft Store.
You have to log in using your e-mail credentials to use the app. All the messages will be available in this refined version of Outlook.
No more of getting annoyed by the “Your Outlook data file cannot be configured.” message.


