Some programs require administrative privileges to run; however, the default settings in Windows may prevent users from running these programs. This is because standard users are prevented from running certain commands like “Run as Administrator.” When you try to run a program with admin rights, it fails.
For instance, you may need to allow other users to use your system for some reason or for official purpose and in such a case, you need to designate standard user accounts to them. This helps you to have a control on their online activities, any program installations or any if changes made to the system or app settings.
However, despite all of that, you may need to allow the standard users to have admin rights to run a program. While you can use a free 3rd party tool like the RunAs Tool, you can also create a shortcut instead for the required program for which the user needs the admin rights. Once created, you can run this shortcut without needing any user name or password.
Fortunately, there is an easy way to enable this feature. Let’s see how:
How to Normally run a Program as admins
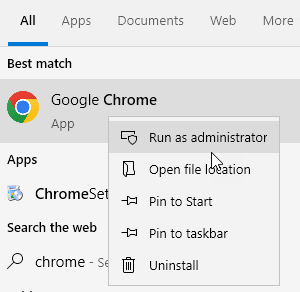
To run a program as admin, Just search the program in windows taskbar search box and right click on it and choose run as administrator

How to Allow Standard Users to Run a Program with Admin Rights by Creating a Shortcut
This method will help you create a shortcut that will allow standard users to run a program with admin rights in just a click, however, without getting access to the admin user details or password. Let’s see how to create this shortcut and we start with extracting a few details like the system name and the username of the admin account:
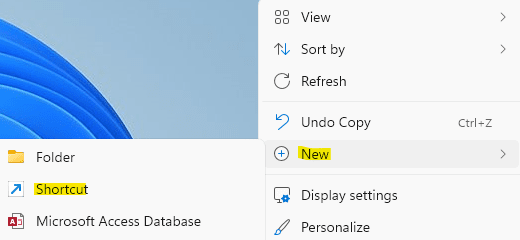
Step 1: Go to any empty section of your desktop, right-click on an empty area and select New.
Then select Shortcut.

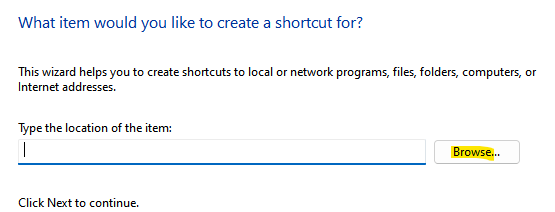
Step 2: In the Create Shortcut window that opens, click on the Browse button.

Step 3: It will open the Browse for Files and Folders dialogue box.
Here, select the program that you want to run with administrator rights and press OK.
Note, that generally installed programs will be in C:\Program Files or C:\Program Files (x86)
For example , I selected the Paint.Net app which I want my standard users to run with admin rights.

Step 8: Next, back in the Create Shortcut window, copy the below command and paste it before the path selected:
runas /user:ComputerName\Username /savecred
Please replace ComputerName with your Computername and Username with your username.
How to Know Computername and Username with Commadn Prompt
Step 9: Search cmd in windows taskbar search and then right click and run as administrator

Step 10: Now, to know the computer name run the command below
hostname
Step 11: To know the computer username run the command given below
echo %username%
Step 11: Now, run the command given below after replacing computer name and username
runas /user:ComputerName\UserName/savecred "Path of the exe"
For example in My case , The complete command looks something like below:
runas /user:DESKTOP-45EQE43\TGP /savecred "C:\Program Files\paint.net\paintdotnet.exe"
Step 12: Back in the Create Shortcut window, press Next.
Step 13: In the next screen, name the shortcut of your choice under the Type a name for this shortcut field.
Press Finish.

Step 14: Your custom shortcut is now created successfully.
Now, go to the desktop and as you double-click on it, it will ask for your admin credentials once. After that it will get stored in credential manager and it will not ask for admin password.
How to change the shortcut icon
The icon created will automatically appear in the normal mode with no icon. Therefore, if you want to change the icon, you can follow the process:
Step 1: Go to the shortcut icon on your desktop, right-click on it.
Step 2: Next, select Properties from the sub menu.

Step 3: In the Properties window, under the Shortcut tab, click on Change Icon.
Step 4: You will now see a confirmation prompt – Change Icon.
Press OK.

Step 5: In the Change Icon dialogue box, choose an icon from the Select an icon from the list below field or click on Browse to browse a downloaded icon file from the system.
Once selected, press OK to save the changes.

Step 6: Back in the Properties window, press Apply and then OK to apply the changes and exit.
Step 7: Now, go to the desktop and you should see that the new icon is applied to the shortcut file.
Double-click to run the shortcut to run the program with admin rights and you would need to enter the admin password for this only time.
Press Enter to continue.
Now, from the next time onwards, the standard user/s can simply double-click on the program shortcut to run it with administrator rights, without entering the admin password.
This is because, the savecred syntax in the command, saves the admin password to allow standard users to run the program with admin rights without needing to enter the admin password.
How to Check your Windows Credentials
You can also check your saved password in the Windows Credential Manager. For this, follow the below process:
Step 1: Press the Win + R keys simultaneously on your keyboard to launch the Rn command window.
Step 2: In the Run command search box, type control.exe and hit Enter.

Step 3: This will open the Control Panel window.
Here, navigate to the View by field and select Category from the drop-down next to it.

In the list, click on User Accounts.

Step 4: In the next window, go to the right side and click on Credential Manager.

Step 5: Now, navigate to the right side of the window.
Under the Manage your credentials section, click on Windows Credentials and here you will find the saved password.
*Note – If, any time in the future, you want to revoke the admin access for the standard user for a certain app or program, all you need to do is to delete the shortcut or simply remove the saved password from the Windows Credential Manager.
How to Run a Program with admin rights using task scheduler
1 – Search Task scheduler in taskbar search and click on it

2 – Click on Create Task

3 – Name the task
4 – Select whether user is logged on or not
5 – Select Run with highest priviledeges
6 – Click Ok

8 – Click on Action Tab
9 – Now, Make sure Start a program option is selected in Action:
Now, click on Browse and browse to the exe file. The exe file will be located in a folder located either in C:\Program Files or C:\Program Files (x86).
10 – Click Ok
11 . Click OK again
12 Enter admin password again

How to Enable Standard Users to Run a Program with Admin Rights by Changing Permissions
While creating a shortcut method is much easier to for the admin to allow standard users to run a program with admin rights, changing the permission for the target program or file also allows standard user to have admin access. However, by changing permission, the standard user has no access to edit any other system settings that may be needed for the program, for example, the registry editor.
However, the fact that it allows the standard user to only run the program with admin rights, works in favor of this method. Let’s see how to change permission for the program folder:
*Note – Before you proceed to make the changes, make sure you are logged in ass administrator.
Step 1: Right-click on the program folder and select Show more options.
Step 2: Next, select Properties from the sub-menu.
*Note – For Certain Programs, changing the security permission for the exe file works, but for ceriaon porgrams, changing the security persmission for the whole folder is required.

Step 3: In the Properties window, select the Security tab.
Click on Edit.

Step 4: In the Permissions dialogue box, click on Add.
Step 5: Add the user and Click OK.

Step 6: Give the user Full control and click on apply and OK.

*Note – You can also click on the Add button, if you want to add a new user and then Full control access.
Press Apply and then OK to save the changes and exit.