Microphone is one of the most important components of a PC and when it encounters a problem, it can be frustrating. Moreover, with the launch of all new Windows 11, many users are confused with how to troubleshoot any issues related to the microphone.
Whether you are participating in or hosting an online team meet, attending an online class, or simply connecting with a friend online, through Skype, Discord, Zoom or Microsoft Teams, you would need a good and working microphone. But when the microphone is not working properly for some reason, you may face difficulty communicating.
The Microphone may keep cutting off, create disturbances in sound quality, not detected or may stop working completely while on voice calls, video chat or while recording an audio. This issue can occur with either your system microphone, your headphone or external mic (USB), or both.
While the Windows 11 comes with a whole lot of features and an easy to use interface, you may tend to get confused with some troubleshooting process if you are not yet comfortable with the new OS. This post will guide you through on how to fin microphone problems on your Windows 11 PC. Let’s see how.
Method 1: Check for privacy settings
The apps on your system may not have access to Microphone if it’s disabled from the privacy settings. Follow the below steps to enable the microphone in privacy settings:
Step 1: Press the Win + I keys together on your keyboard to open the Settings window.
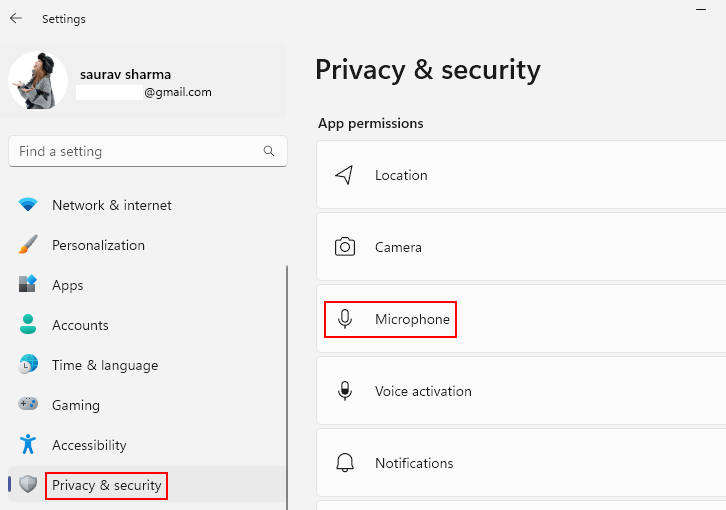
Step 2: In the Settings app, go to the left side of the pane and click on Privacy & security.
Step 3: Now, navigate to the right side, scroll down and locate App permissions.
Under it Click on Microphone

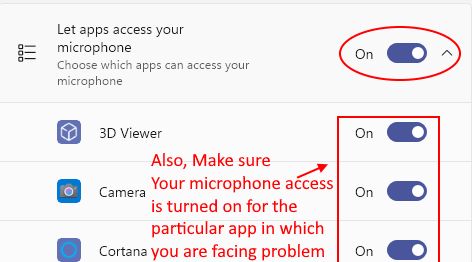
Step 4: In the next screen, on the right side, go to the Let apps access your microphone and check if it’s turned on.
If not, then move the toggle to the right to turn it on.
Step 5: Now, click on Let apps access your microphone to expand the section.
You will find a list of all the Windows apps. Find your app and enable it for microphone access if it’s not already.

*Note – The apps listed here are only the new ones and not all those installed on your system, hence, it’s suggested to enable microphone permission for all apps by-default. Follow the below step to enable Microphone access for all desktop apps:
Step 6: Scroll down and go to the option – Let desktop apps access your microphone.
Move the slider to the right to turn it on.

Now, go back to the app you were using and the microphone for the app should be working now.
Method 2: Set Microphone as Default
Sometimes, microphone issues could arise simply because it’s not set up as default. Let’s see how:
Step 1: Press the Win + R keys simultaneously on your keyboard to launch the Run command window.
Step 2: In the Run command search box, type mmsys.cpl and hit Enter to open the Sound dialogue box.

Step 3: In the Sound dialogue box, go to the Recording tab and select your correct Microphone.
Now, press the Set Default button at the bottom.

Step 4: Additionally, double-click on your Microphone to open its Properties dialogue box.
Step 5: Here, select the Levels tab and increase the Speaker volume level to the max.

Step 6: You can also increase the Microphone Boost level if available.
Press Apply and then OK to save the changes and exit.
You have now successfully set the desired Microphone as default and this should fix any microphone problems on your Windows 11 PC.
Method 3: If Others Can’t Hear You
While the first few thing you must check if the headphone is properly connected to your device and that’s not causing the issue, if that does not help, check if your headphone is selected as the input device and test your microphone. Here’s how:
Step 1: Right-click on Start and select Settings from the menu.
Step 2: In the Settings app, click on the System option on the left.
Step 3: Now, go to the right side and click on Sound.

Step 4: In the next screen, on the right side, scroll down a bit and under the Input section, go to Choose a device for speaking or recording.
Here, click on the drop-down next to it and check if your headphone is selected as the default Microphone.

*Note – If not, you can set it as default following the Steps 1 through 3 in Method 2.
Step 5: If your headphone is not yet added as the input device, click on Add device next to Pair a new input device.
Step 6: Now, click on Microphone to open its settings.
Step 7: In the next screen, on the right pane, under the General section, click on the drop-down next to Audio (Allow apps and windows to use this device for audio) and to set it to Allow.
Step 8: Now, go to Input Settings and navigate to Test your microphone.
Click on Start test button to check your microphone and speak for a minimum of 5 seconds.
Step 9: Click on Stop test once done.
This can help you fix any microphone problems on your Windows 11 PC.
Method 5: What if you are facing mic issue on Skype
Step 1: Launch Skype and on the upper left, click on the three horizontal dots (More) next to your Profile name.
Select Settings from the list.

Step 2: In the Skype settings window, click on Audio & Video option on the left.
Step 3: Now, go to the right side, scroll down and under Audio, go to Microphone.
Here, select your headphone from the drop-down next to it.

Step 4: Also select your chosen speaker or headphone in the Speaker section.
Step 5: You can also click on Test audio to check the select speaker or microphone.
You can now communicate using your Skype and other should be able to hear you.
Method 6: Run Windows Recording Audio Troubleshooter
Step 1: Press the Win + I shortcut keys on your keyboard to open the Settings app.
Step 2: In the Settings window, click on System option on the left.
Step 3: Now, trave to the right side and click on Sound.
Step 4: In the Sound screen, on the right side, scroll down to the Advanced section.
Here, under the Troubleshoot common sound problems option, click on Input devices.

Step 5: The Recording Audio troubleshooter will now start running.
Step 6: It will show you a screen where you must select the device you must troubleshoot.
Select Microphone.
Step 7: The troubleshooter will now start detecting any problems.
If it identifies any issues, it will apply the fix automatically.
Once done, close the troubleshooter and the Settings window. Restart your system and the microphone should be working fine now.
Method 7: Remove Echo from your Microphone
If there’s an echo for everything you speak on your microphone, it can be annoying. While using a headphone can fix the issue of microphone picking up your PC speaker’s sound, it may not always help. Chances are, there’s some audio setting which is turned on and causing the issue. Follow the below instructions to get rid of the echo issue:
Step 1: Press the Win + R keys together on your keyboard to open Run command.
Step 2: In the Run command window, type mmsys.cpl in the search bar and hit Enter to open the Sound window.

Step 3: In the Sound dialogue box, go to the Recording tab and double-click on your Microphone to open the Properties window.
Step 4: Now,Click on Listen tab, check if the box next to Listen to this device is unchecked.
If selected, uncheck the box and press OK to save the changes and exit.

When this field is selected, it may cause your sound to echo on microphone. Unchecking this field may help fix the microphone issue on your Windows 11 PC.
Now, listen to the sound produced on your microphone. Once done, uncheck the box and press OK to exit.
Method 8: Check if the Device Driver is Disabled
Step 1: Right-click on Start menu and select Device Manager.

Step 2: In the Device Manager window, go to the Audio inputs and outputs section and click on it to expand it.
Right-click on your Microphone and locate Enable device option. If you can see Enable device option in the menu, it implies that your mic is disabled.
Just Click on Enable device

Once done, close the Device Manager window, reboot your PC and the microphone problem should be fixed.
Method 9: Update Device Drivers
Step 1: Press the Win + R hotkeys to open the Run command window.
Step 2: In the Run command search bar, type devmgmt.msc and hit Enter to open the Device Manager window.
Step 3: In the Device Manager window, click to expand the Audio inputs and outputs section.
Right-click on Microphone and select Update driver from the right-click menu.

Step 4: In the Update Drivers window, click on Search automatically for drivers option.

Now, Windows will start detecting any available update for the driver. If available, it will automatically update it to the latest version.
Once done, exit the Device Manager window and restart your PC. Now, check if the Microphone problem is fixed.
If the problem is with the Xbox microphone, then go to Settings > Gaming > Captures > Capture audio when recording a game > disable.
If this doesn’t work then you must check if the audio hardware is working fine. For instance, if you are using an external microphone, like a USB microphone, then remove it from the port and plug it in a different port to check if it’s working now. It’s recommended to plug the USB mic directly to the your device ports and not use an extender. Make sure that mics are not loosely connected, cords or cables are not damaged, microphone is closer to your mouth or if the physical mute of the mic is not turned on.
Alternatively, you can also try recording your voice to double-check of there is indeed a problem with the microphone or there’s some other issue. If the problem with the microphone is only while playing a game or discord, Zoom or other similar apps, then troubleshoot the microphone issue with the specific apps.
Moreover, it may sound obvious, but make sure there’s no loose connection.