Internet Connection Sharing (ICS) is a feature using which one can share the computer’s internet with multiple other computers on a Local Area Network (LAN). So if this feature is enabled, any computer or device connected to the host computer can use the network without installing any additional software. A few of you might want to disable the internet connection sharing feature. And this article tells you a few methods of how to disable it. Let us start!
Method 1: Disable Internet Connection Sharing Using Control Panel
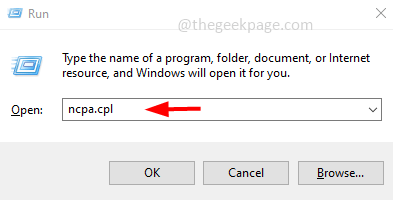
Step 1: Open run prompt using Windows + R keys together. Type ncpa.cpl and hit enter
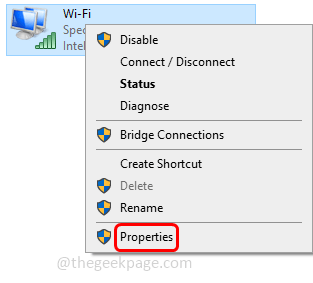
Step 2: In the opened window, Right-click on the adapter or your internet connection and click on Properties
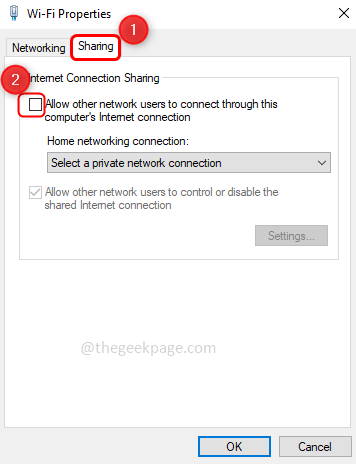
Step 3: In the properties, window click on Sharing tab
Step 4: Make sure to uncheck the box beside “Allow other network users to connect through this computer’s internet connection”
Step 5: Click on OK. Now you have disabled internet connection sharing
Method 2: Disable Internet Connection Sharing Through Windows Services
Step 1: Open run prompt using Windows + R keys together. Type services.msc and hit enter
Step 2: In the services window scroll down to find Internet Connection Sharing (ICS). If the status of service is running, then right-click on that service and click on Stop
Step 3: Double click on the ICS service and in the startup type dropdown select Disabled
Step 4: Click on OK and the Internet Connection Sharing is disabled
Method 3: Use the Group Policy Editor
Step 1: Open run prompt using Windows + R keys together. Type gpedit.msc and hit enter
Step 2: This will open the local group policy editor window, under computer configuration click on the Administrative Templates drop down
Step 3: Click on the Network dropdown and select Network Connections
Step 4: On the right side, double click on “Prohibit use of Internet Connection Sharing on your DNS domain network”
Step 5: Click on the radio button beside Enabled. If you enable this setting, ICS cannot be enabled or configured by administrators, and the ICS service cannot run on the computer
Step 6: To save the changes click on Apply and then click on OK
That’s it! I hope this article is helpful. Thank you!!


