Let’s say you have a PowerPoint document that has huge lots of confidential information. And your colleagues use your system for some of their work. Obviously, you wouldn’t want them to have access to the confidential information you have in your PowerPoint document. Or let’s say you are in college and you have a surprise PowerPoint presentation planned for the freshers’ day. If someone sees it before the actual day, then it’s going to spoil the surprise for sure.
Whatever be your reason, if you are looking for ways to password protect your PowerPoint document without the help of any external application, we can’t be happier for you as you have come to the right place. Read on, to learn how you can quickly and easily set a password to your PowerPoint document such that every time it is attempted to be opened, a password prompt blocks the way! Hope you enjoy reading!
Section 1: How to Protect your PowerPoint Document with a Password
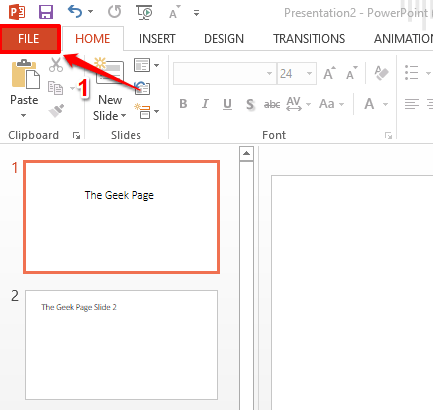
Step 1: Open the PowerPoint document that you want to protect with a password.
Once the document is opened, click on the FILE tab from the top ribbon.
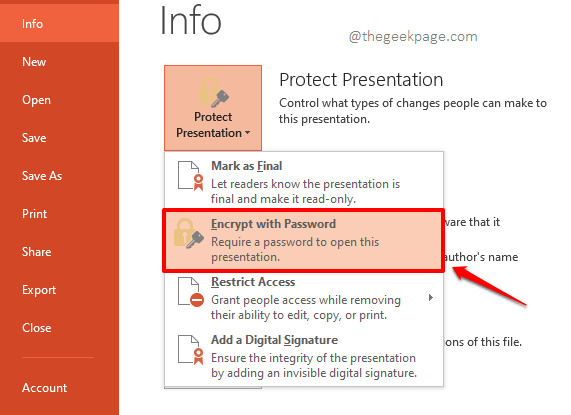
Step 2: Now on the left pane of the window, click on the Info tab.
The Info tab options would now be listed on the right side of the window. Click on the dropdown button named Protect Presentation.
Step 3: From the list of options that get expanded out, click on the one that says Encrypt with Password.
Step 4: Now a window named Encrypt Document would be open. Under the Password field, type in any password as per your choice.
Once done, hit the OK button to proceed.
Step 5: When the Confirm Password window opens up after that, retype the password that you typed in the previous step under the section Reenter password.
Once the password is reentered, simply hit the OK button.
Step 6: Against the Protect Presentation dropdown button, you will now be able to see a message saying that a password is now required to open the presentation.
Let’s close the document now. Make sure you Save the document before you proceed to hit the Close button at the top right corner of the PowerPoint window.
Step 7: Now if you launch the document again, you will be prompted with a Password window that asks for the password using which the document was encrypted. You have to type in the exact same password that you typed in at Step 4 to open the document.
Once the password is typed in, you can hit the OK button.
Step 8: That’s it. Your document would now open, and it is well protected with a password.
Note: If you enter the wrong password to open the file, you would get a message saying that the password you entered is not correct.
Section 2: How to Remove the Password from a Protected PowerPoint Document
Definitely, you might have a change of mind and would want to remove the password that you set for your PowerPoint document. Let’s see how the password can be removed in the following steps.
Step 1: Once again, open the document and then click on the FILE tab at the top.
Note: To remove the password from a password-protected document, you should know the password using which the document is encrypted. Otherwise, you will not be able to click on the FILE tab as the document wouldn’t even open without entering the password.
Step 2: Now, click on the Info tab from the left ribbon.
As next, click on the Protect Presentation dropdown button and then click on the Encrypt with Password option once again.
Step 3: This time, delete the contents in the Password field and leave it empty.
Once you are all done, hit the OK button.
Step 4: Don’t forget to hit the Save button before you close the presentation.
That’s it. You can try opening the document and this time the document would open easily, without prompting for a password. Enjoy!
Do tell us in the comments section if you are stuck at any of the steps, we are always just a comment away!
Please do come back as there are a lot more articles on the way, all on your favorite topics and queries!


