When an application runs in the background, your system tends to work a little slower as the background application takes up a lot of your system resources like RAM space, CPU power etc. Also, if you are on a limited data pack, background applications using the Internet without your knowledge is definitely not desirable.
Windows 11 is designed for new machines. Hence, if you have it installed in an old machine, bypassing the security and system requirement checks, it is highly likely that the problems faced by you because of applications running in the background are going to be of higher magnitude.
Read on, to learn how you can stop applications from running in the background to save your resources and to improve your system performance.
Method 1: Through Apps and Features Settings
Step 1: Launch Settings app by pressing the WIN + I keys together.
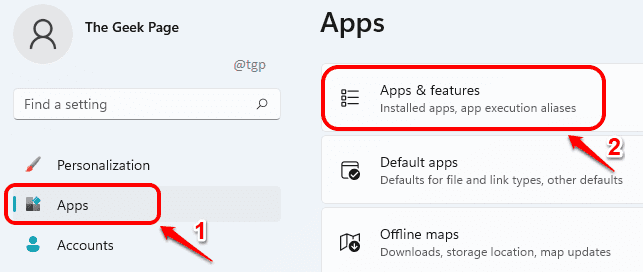
In the left window pane, click on Apps tab and in the right window pane, click on Apps & features.
Step 2: In the Apps & features window, scroll down to find the list of all the apps installed in your machine.
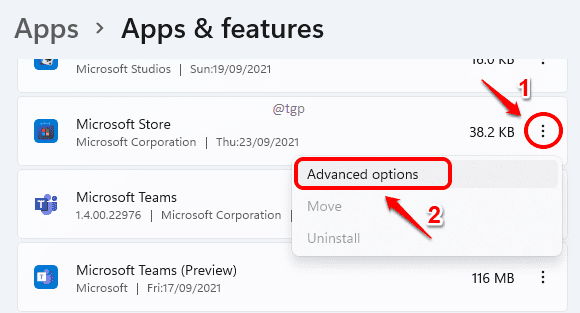
Find the app that you want to stop the background activity for, click on the 3 vertical dots icon associated with it and then click on Advanced options.
Note: If you do not see the Advanced options entry in the menu, it means that managing background activity is not supported for the application you selected.
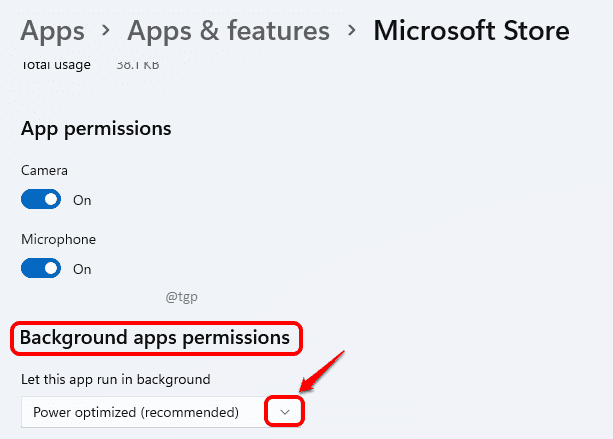
Step 3: As next, locate the section Background apps permissions. Click on the drop down arrow associated with the option Let this app run in background.
Step 4: As next, choose Never from the drop down list.
That’s it. The app you selected will not run in the background from now on.
Method 2: Through Power and Battery Settings
Step 1: Open Settings by pressing WIN and I keys at the same time.
Click on System tab in the left window pane and in the right window pane, click on Power & battery option.
Step 2: Scroll down and click on Battery usage next.
Step 3: Under Battery usage, click on the 3 vertical dots icon of the app that you want to turn off background activity for and then click on the option Manage background activity.
Note: If you do not see the Manage background activity option in the menu, it means that the background activity of application you selected cannot be managed.
Step 4: As next, click on the drop down arrow associated with the option Let this app run in background under the section Background apps permissions.
Step 4: Choose the Never option from the drop down menu.
That’s it. You have successfully restricted the app from running in the background.
Method 3: Through Local Group Policy Editor
Step 1: Press WIN + R keys together to open the Run window. Type in gpedit.msc and hit Enter key.
This will launch the Local Group Policy Editor window.
Step 2: Now you have to navigate to the following path. Just click on the down arrow associated with each section to expand it.
Computer Configuration –> Administrative Templates –> Windows Components –> App Privacy
Once you are at App privacy, in the right window pane, find the Setting named Let Windows apps run in the background. Double click on this entry.
Step 3: When Let Windows apps run in the background window opens up, choose the radio button for Disabled. Once done, hit Apply button and then OK button.
Apps running in the background issue is not going to bother you anymore. Hope you found the article useful.


