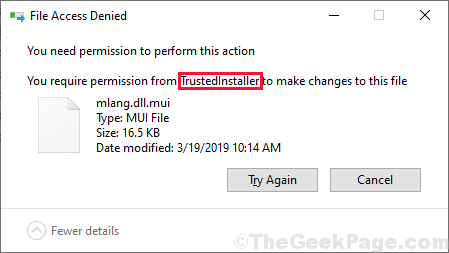
Is TrustedInstaller hindering you from deleting a particular system file or folder on your computer? Don’t worry. After going through these fixes in this article you will be able to delete that file or folder. In majority of the cases, user account is not included in the ownership of the particular file or folder and it is the reason the user aren’t able to delete that particular file or folder.

Fix-1 Clean the disk with Disk Cleanup-
Disk Cleanup cleans up temporary files and folder (such as error report files, cache storage, files stored in Recycle Bin etc). Running Disk Cleanup can be fruitful to you-
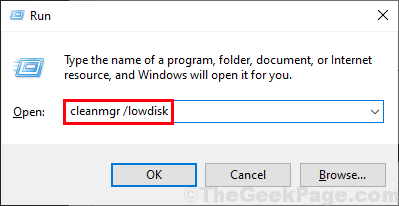
1. Press Windows+R to launch Run. Now, copy-paste this command “cleanmgr /lowdisk” in Run and hit Enter. Disk Cleanup window will be opened.

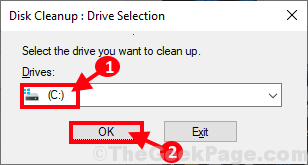
2. In Disk Cleanup window,in drop-down option “Drives:” select the drive where you have installed Windows.

3. Now, in the “Files to delete:” option, check every options in the list. Finally, click on “OK” to start the cleaning process on your computer.

Disk Cleanup process will take a few minutes to clean up the junk file from your system.
After the cleanup process is completed, reboot your computer. Check if the file/ folder is deleted or not.
Fix-2 Take Ownership of a file using Registry script-
You can run a registry script which is going to lend you ownership of the file/folder you want to delete.
1. Right click on the desktop window and then click on “New” and then choose “Text Document“. A new, blank text document will be created in the Desktop. Double click on that text document. Notepad window will be opened.

2.Copy and paste these following lines in Notepad window.
Windows Registry Editor Version 5.00

[-HKEY_CLASSES_ROOT\*\shell\runas]

[HKEY_CLASSES_ROOT\*\shell\runas]
@="Take Ownership"
"HasLUAShield"=""
"NoWorkingDirectory"=""
"Position"="middle"

[HKEY_CLASSES_ROOT\*\shell\runas\command]
@="cmd.exe /c takeown /f \"%1\" && icacls \"%1\" /grant administrators:F /c /l & pause"
"IsolatedCommand"="cmd.exe /c takeown /f \"%1\" && icacls \"%1\" /grant administrators:F /c /l & pause"

[-HKEY_CLASSES_ROOT\Directory\shell\runas]

[HKEY_CLASSES_ROOT\Directory\shell\runas]
@="Take Ownership"
"HasLUAShield"=""
"NoWorkingDirectory"=""
"Position"="middle"

[HKEY_CLASSES_ROOT\Directory\shell\runas\command]
@="cmd.exe /c takeown /f \"%1\" /r /d y && icacls \"%1\" /grant administrators:F /t /c /l /q & pause"
"IsolatedCommand"="cmd.exe /c takeown /f \"%1\" /r /d y && icacls \"%1\" /grant administrators:F /t /c /l /q & pause"

[-HKEY_CLASSES_ROOT\dllfile\shell\runas]

[HKEY_CLASSES_ROOT\dllfile\shell\runas]
@="Take Ownership"
"HasLUAShield"=""
"NoWorkingDirectory"=""
"Position"="middle"

[HKEY_CLASSES_ROOT\dllfile\shell\runas\command]
@="cmd.exe /c takeown /f \"%1\" && icacls \"%1\" /grant administrators:F /c /l & pause"
"IsolatedCommand"="cmd.exe /c takeown /f \"%1\" && icacls \"%1\" /grant administrators:F /c /l & pause"

[-HKEY_CLASSES_ROOT\Drive\shell\runas]

[HKEY_CLASSES_ROOT\Drive\shell\runas]
@="Take Ownership"
"HasLUAShield"=""
"NoWorkingDirectory"=""
"Position"="middle"

[HKEY_CLASSES_ROOT\Drive\shell\runas\command]
@="cmd.exe /c takeown /f \"%1\" /r /d y && icacls \"%1\" /grant administrators:F /t /c /l /q & pause"
"IsolatedCommand"="cmd.exe /c takeown /f \"%1\" /r /d y && icacls \"%1\" /grant administrators:F /t /c /l /q & pause"

[-HKEY_CLASSES_ROOT\exefile\shell\runas]

[HKEY_CLASSES_ROOT\exefile\shell\runas]
"HasLUAShield"=""

[HKEY_CLASSES_ROOT\exefile\shell\runas\command]
@="\"%1\" %*"
"IsolatedCommand"="\"%1\" %*"
Now, click on “File” on the menu bar and then click on “Save As…“.

3. In Save As window, choose a favorable location to save the script. Name the file as “Regfix.reg” in the option “File name:“. Choose “All Files” from the drop down. Finally, click on “Save” to save the script.

4. Now, go to the location where you have saved script. Right click on “Regfix” and then click on “Merge” to run the script. Just click on “Yes” to permit the User Account Control.

5. If an warning message appears on your screen, simply click on “Yes” to finally run the script on your computer.

Reboot your computer to save the changes to your system.
After rebooting you should be able to take ownership of the problematic file.
a. Go to the location of the file.
b. Right click on the file and then click on “Take ownership” option.

Important-
TrustedInstaller is an user account used by Windows Modules Installer to safeguard crucial system files from any threats. We strongly suggest to redo the changes to your computer as soon as your job is done (i.e. once you have deleted the problematic file). Go through the below mentioned note to delete the script.
NOTE:-
You can uninstall the registry script by repeating the same procedure from Step-1 to Step-5 but with the following text in Notepad–
Windows Registry Editor Version 5.00

[-HKEY_CLASSES_ROOT\*\shell\runas]
[-HKEY_CLASSES_ROOT\Directory\shell\runas]
[-HKEY_CLASSES_ROOT\dllfile\shell\runas]
[-HKEY_CLASSES_ROOT\Drive\shell\runas]
[-HKEY_CLASSES_ROOT\exefile\shell\runas]
[HKEY_CLASSES_ROOT\exefile\shell\runas]
"HasLUAShield"=""

[HKEY_CLASSES_ROOT\exefile\shell\runas\command]
@="\"%1\" %*"
"IsolatedCommand"="\"%1\" %*"
Save this file as “UninstallRegfix.reg” and run it on your computer.
Reboot your computer to save the changes.
Fix-3 Manually take ownership of the file/ folder-
Manually taking ownership of the file/ folder will solve your problem. Follow these steps minutely to include your account as the owner of the file.
1. Go to the file location in File Explorer. Now, right click on that file /folder and then click on “Properties“.

2. Now go to the “Security” tab and then click on the “Advanced” option in the lower portion of the Properties window.

3. In Advanced Security Settings window click on the “Change” beside “Owner:”. Simply click on “Yes” if you are prompted by User Account Control for permission.

4. In Select User or Groups window, click on “Advanced” option.

5. Click on the “Find Now” tab and in the list of groups and users, look for your administrative account. Select your account name and then click on “OK“.

6. Your account should be seen in the section “Enter the object name to select:“. Click on “OK” to save the changes on your computer.

7. In Advanced Sharing Settings window, check both of the options “Replace owner on subcontainers and objects” and then check the option “Replace all child object permission entries with inheritable permissions entries from this object“. Finally click on “Apply” and “OK” to save the changes on your computer.

8. Again, in Properties window, go to the “Security” tab and then click on the “Advanced” option.

9. In Advanced Sharing Settings window, click on “Add” to enter and select a principle for the folder.

10. In Permissions Entry window, click on “Select a principal” to add control parameters to the account.

11. In Select User or Groups window, click on “Advanced” option.

12. Click on the “Find Now” tab and look for your user name. Select the name and click on “OK“.

13. Your account should be seen in the section “Enter the object name to select:“. Click on “OK” to save the changes on your computer.

14. Coming back to the Permissions Entry window, check “Full control” in ‘Basic Permissions:‘ tab. Then check “Only apply these permissions to objects and/or containers within this container“. Finally click on “OK” to save the changes on your computer.

If you receive an warning message, simply overrule it by clicking on “Yes“.
15. At the last step, in Advanced Sharing Settings click on “Apply” and “OK” to save the changes on your computer.

Reboot your computer to save the changes on your computer.
After rebooting you should be able to take ownership of the problematic this way-
a. Go to the location of the file/ folder.
b. Right click on the file and then click on “Take ownership” option.

You have owned the file/ folder on your computer. You can now easily edit or delete the file/ folder from your system.
If you are still unable to delete the file/ folder you may consider using a third party application to do it for you.
Fix-4 Use a third party application to delete the file/ folder:
Using a third party application you can take the ownership of the problematic file or folder. Download Ownership 0.1.1.120 to take ownership of the file or folder.
1. Download “Ownership 0.1.1.120”. Ownership_120.zip will be downloaded on your computer. Extract it in a favorable location of your choice on your computer.

2. Go to the extracted location. Open “ownsership_120” folder in File Explorer window. Now, double click on “Ownership64Bit” (or you can double click on “Ownership” if you are using a 32-bit system) to launch it. Click on “Yes” if you are prompted for permission by User Account Control.

3. In the installation window, click on “Install” to start the installation process on your computer.

Minimize Ownership window.
4. Go to the file location on File Explorer. Now, right click on that file/ folder and then click on “Take ownership“. Click on “Yes” when you are asked for permission by User Account Control.

Reboot your computer. After taking the ownership of the file/ folder, you can easily delete or edit the file on your computer.
NOTE- Once your work is done, you can remove this feature easily.
1. Open “Ownership64Bit” again following the same process (Step-2).
2. In Ownership64Bit window, click on “Uninstall” to uninstall the feature from your computer.

Reboot your computer.