A few people may have come across a scenario where you have to send the same message over and over again. This is a repeated task that is time-consuming. Why not give it a try to do it automatically? That’s where the Quick Parts option in Outlook helps. It is an option where you can reuse the content and insert it into the email messages. It is not only restricted to text messages but you can also insert pictures, graphics, and a few others. Microsoft calls it “Building Blocks”. Isn’t it interesting? In this article let us learn how to create the Quick Parts, insert them in the email message and use it.
Create Quick Parts In Outlook
Step 1: Open Microsoft Outlook
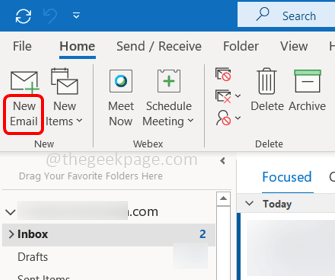
Step 2: From the Home tab, click on New Email to open a new email message.
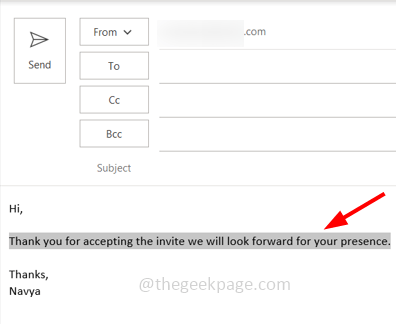
Step 3: Type the message in the new email that you want to save as a quick part and select it.
Step 4: Click on the Insert tab
Step 5: From the text group which is on the right, click on the Quick Parts dropdown. From the list select Save Selection to Quick Part Gallery
Note: If you do not select the text, Save Selection to Quick Part Gallery option will not be enabled.
Step 6: It will open Create New Building Block window. Give a name to the quick part in the Name section.
Step 7: Check whether other information like Gallery, Category, etc are appropriate as per your requirement else you can click on the dropdown beside them and select the needed one. Then click on OK.
Step 8: The text you selected in Step 3 has now been saved.
Step 9: Whenever you want to reuse the text in a new email or replies/forwards, click on the Insert tab at the top.
Step 10: Click the Quick parts option and click on the box where there is saved text.
Step 11: This will automatically insert the text in the email message.
Step 12: You can also Organize the message, Edit the text, Delete it, etc by clicking on the Quick parts option then right-click on the box where the text is saved. There appears a list of operations that you can use as per your need. Suppose you want to delete the added text/quick part click on Organize and Delete option from the list.
Step 13: Select the added text then click on Delete. A pop-up will appear asking for confirmation click on yes.
Step 14: Close the window by clicking on the Close button.
That’s it! I hope this article is easy to follow and helpful. Thank you!!


