We have been lately observing that many windows users are complaining that their webcam is not working or more precisely their webcam does not work with a particular app. We gave a lot of thought to it and found out that there is no problem with the webcam for most of the users and it is working perfectly fine, instead the webcam has been used by some other application on the windows system.
Once the users close/ end the application that is using the webcam on the system, it releases the webcam device and then any other application can use it then onwards. But first, the user has to know which app currently the webcam is been utilized.
If you also want to check which app is currently your webcam then we have come up with 2 methods which can help the user on how to do it in this post.
Method 1 – Using the Settings app
Step 1: First of all, you should open the Settings app by simply pressing together the Windows + I keys on your keyboard.
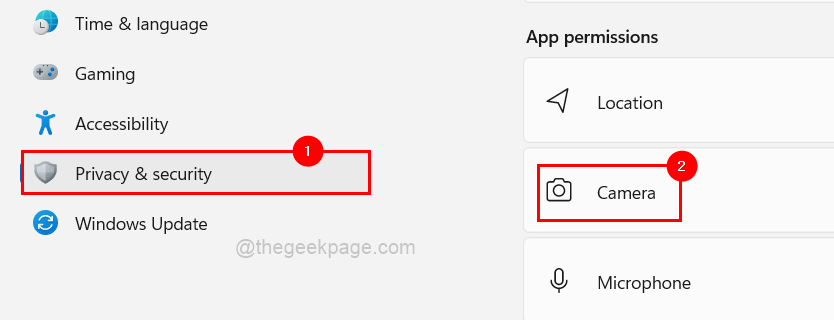
Step 2: Click the Privacy & Security option from the left side menu of the Settings app.
Step 3: Then on the right side, scroll down the page and select the Camera option which is under the App permissions section at the bottom as shown in the below screenshot.

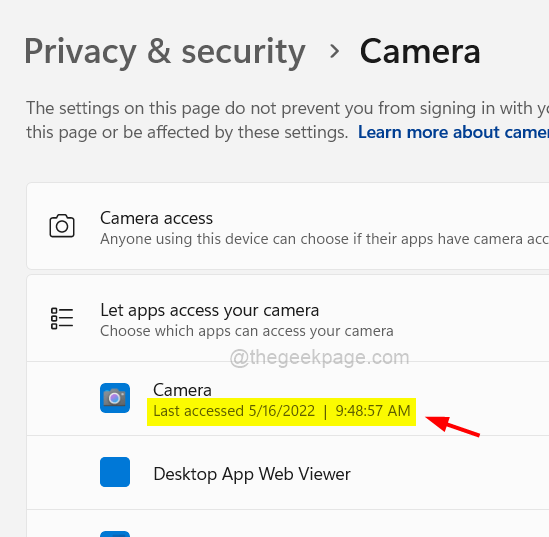
Step 4: Now under the Let apps access your camera section, you will get to see when was the last time the Camera was accessed as shown below.

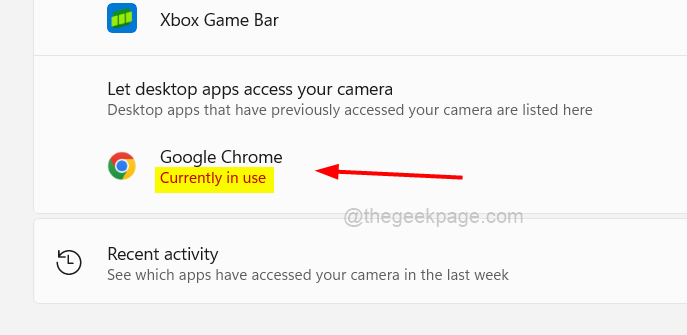
Step 5: It also shows which app is currently using the webcam on your system from the list of apps shown which you can see in the below-given image.

Method 2 – Using the Process Explorer app
Step 1: If the Process explorer app is not installed on your system, then please visit this page and download the app as shown below.

Step 2: Then after the process explorer gets downloaded, go to the downloads folder and then extract the processexplorer zip folder.
Step 3: After it has been extracted, open the folder and right-click on the procexp application and select Run as administrator from the context menu as shown below.

Step 4: Accept the UAC prompt on the screen by clicking Yes to continue.
Step 5: Now the Process Explorer window opens up.
Step 6: To find out the process which is using the webcam on your system, we need to find the device name of the webcam.
Step 7: To do so, first open the Device Manager window by pressing the Windows + X keys together and then hitting the M key on the keyboard.
Step 8: Once the Device Manager window opens, double-click on the Cameras option from the list of devices.
Step 9: Then double-click on Integrated Camera to open its properties window.

Step 10: After the properties window opens, you need to click on the Details tab and select the Physical Device Object name from the dropdown menu of Property.
Step 11: As soon as you select the Property, the value gets populated in the Value section just below that.
Step 12: Now right-click on that value and click Copy from the context menu and then save it into the notepad or any other editor app as shown below.
Step 13: After that, click OK or Cancel to close the Properties window and then close the Device Manager window.

Step 14: Now go back to the Process Explorer window.
Step 15: Now press the CTRL + SHIFT + F keys together on your keyboard.
Step 16: Copy the value of the physical device object name that we got from the device manager and paste it into the search box as shown below.
Step 17: After pasting, click the Search button which then starts to search for the process that is using this device (webcam) on your system as shown below.

Step 18: After the search is done, it displays the process which is using this device.
Step 19: Just click on the process and it will direct you to the Process Explorer main window where this process is present.

Step 20: Right-click on the process and select Kill Process from the context menu if you want to terminate the process as shown in the below image.

Step 21: After that, close the Process Explorer window.