Are you seeing the “Element not found.” error message showing up on your screen while you try to open the File Explorer? There are many possible reasons that can result in this error message. But usually misconfigured extensions or a wrong Windows Update. Whatever may be causing this issue, go for these solutions to find a quick fix for this error message.
Workarounds
Before you jump on to the main solutions, make sure that you have tried these initial workarounds.
1. Restart your system. If this is a one-time occurrence, it will be solved with a simple reboot.
2. If you are using any antivirus, disable it and further try to open the File Explorer again.
Fix 1 – Restart the Explorer task
You are seeing this error message trying to access the File Explorer. Force-restarting it may solve this issue.
1. Just press the Windows key+E key combinations together to try to open the File Explorer.
It will show you the error message again. But, don’t close the error message.
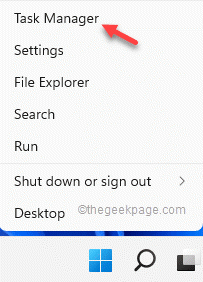
2. Instead, go ahead and right-tap the Windows icon and further click on “Task Manager“.
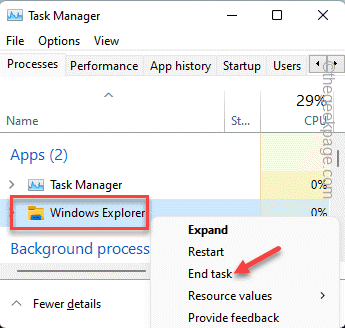
3. Once you are in the Task Manager, look for the “File Explorer” process.
4. So, right-tap that and click again on “End task“.
Your whole screen and the desktop background will become unresponsive. Don’t worry.
5. You have to re-open the File Explorer from the Task Manager.
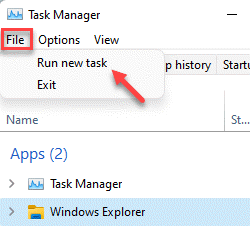
6. To do that, just click on the “File” from the menu bar and tap “Run new task“.
7. Now, just type this in the box and hit the Enter key on your keyboard.
explorer.exe
This will now open an instance of File Explorer. This should stop the error message from appearing on your system.
Fix 2 – Uninstall the updates
If the recent updates are the root cause of this issue, you may have to uninstall it.
1. At first, press the Windows key+R keys together.
2. Write down this and click “OK“.
appwiz.cpl
3. On the left-hand pane, tap “View installed updates“.
4. You will see all the installed Windows updates as a list with detailed dates. Look at the most recent installed update.
5. Then, right-click on it and click on “Uninstall“.
This will uninstall the update from your computer. Your computer will be restarted and this whole uninstallation process may take a while.
Check if this solves your problem.
Fix 3 – Remove particular softwares
Many users have reported Lenovo CapOSD or OneKey Theater app to be the main culprit for this issue.
1. You are going to uninstall those apps. So, press the Win key+X key combinations.
2. Then, tap “Apps and Features“.
3. This will present you with the list of apps installed on your system.
4. Now, just go down slowly through the list until you reach the “Lenovo CapOSD” app.
5. Just, tap on the three-dot icon [⋮] and click “Uninstall“.
6. Again, click on “Uninstall” to confirm the action.
Once you have uninstalled the Lenovo CapOSD app, look whether the “OneKey Theater” app is there or not. If it is installed on your system, uninstall it the same way.
After doing this, close the Settings page and restart your computer once.
Fix 4 – Change the association of the file types
You have to alter the association of the file types. Example – Suppose the default image viewer is set to use the Photos app on the system. Try altering that and test.
1. Just, press the Windows key+I keys together to open the Settings.
2. Then, tap the “Apps” from the left-hand pane.
3. After that, you will find several app settings. Choose the “Default apps” option from the right pane.
4. On the same side, you will find several file associations. Go all the way down to the ‘Related settings’ zone. Tap “Choose defaults by file type“.
5. Look carefully for the “.png” extension. You will notice that it is set to the Photos app.
6. Then, just click on it to choose a different application.
7. So, just choose any image processing application (like Windows Photo Viewer or Paint) and click “OK” to set it to that.
Now, just scroll down through the other extensions and check whether any file association is set to a wrong/misconfigured app. If that’s the case, change it also.
Once you are done, close the Settings app. Try launching the File Explorer once more.
Fix 5 – Use system file scans
Windows has some system file checking scans to test and fix any system file corruption.
1. Just, press the Win key+R key combination to open the Run terminal.
2. Then, type “cmd” in the Run panel and press Ctrl+Shift+Enter keys together to access the terminal with administrative rights.

3. Now, just paste this line and hit the Enter key on your keyboard to initiate an SFC scan.
sfc /scannow
Windows will verify the system files and you can track the progression directly on the terminal.
4. Once you have finished running the SFC scan, you can run the DISM tool check with just a single code.
Just, right down this line in the terminal and hit Enter.
DISM.exe /Online /Cleanup-image /Restorehealth
Wait for Windows to finish the DISM check as well.
Once the scanning process reaches 100%, close the Command Prompt and reboot your system.
Fix 6 – Run the Windows Update check
Check whether the Windows Update is pending or not.
1. Open the Settings and tap the last option on the left pane “Windows Update“.
2. Then, on the right option on the left pane, tap “Check for updates“.
Allow Windows a while to detect and download the update packages for your device.
3. Windows usually automatically downloads the update package and install it. Otherwise, tap “Download now” to download the update package.
Windows will download the pending updates and install them.
Once Windows has finished downloading the pending updates and install them on your system.
4. Tap on “Restart now” to reboot the system.
After the system restarts, try to access the File Explorer once more and test if it works out.
Fix 7 – Use alternative file processors
If the regular File Explorer is still failing you, you can use the alternative file processors.
There are a lot of free file processors available online. We have tested these file processors and they have turned out to be a very good alternative to the original File Explorer.
a. Explorer++
One of the best File Explorer replacements for your system. Download and install the package.
Another good tool to organize your files.
This won’t solve the issue but may offer to be a lifesaver in the time of need.
Fix 8 – Refresh the PC
If you can’t use fix the File Explorer at all, you can use the refresh function to get it back.
NOTE –
This ‘Refresh your PC’ option removes all the Store apps and settings changes that you have made on your system. You will get a list of apps that you will be removed from the settings during the process itself.
1. Open the Settings window on your system.
2. Then, click on the first menu on the list “System“.
3. Next, just tap the “Recovery” option.
4. You will find several recovery options. Tap the “Reset PC” option.
5. After this, you will see two distinct options. Just tap the “Keep my files” option to select it.
5. Click on the “Local reinstall” to proceed further.
Now, just leave everything else to Windows as it will automatically reset the system.
Once the whole thing is done and your system is restarted, try to open the File Explorer. It won’t show you the error message again.


