Downloading an application using Google Play Store is a piece of cake, really. You just have to search for the app and install it. But if you move to a country where your required application is restricted, things can get a little tricky.
Changing the country in your Android device can be a tiresome process at times. And changing the country becomes inevitable too, as some applications are restricted in some countries. So is there an easy and quick way using which you can change your Android device’s country preferences? Well, definitely, and we are here to walk you through it today.
Read on, to learn how you can quickly change the country preferences of your Android devices easily using Google Play Store payment profiles. Hope you find the article useful.
Solution 1: Change Country from Google Play Store Payment Profile
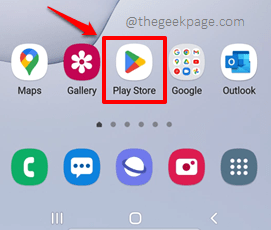
Step 1: Firstly, launch the Play Store application by clicking on its icon.
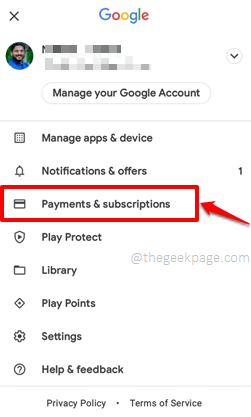
Step 2: When the Play Store application launches open, click on the Profile icon at the top right corner of the screen.
Step 3: As next, click on the Payments & subscriptions option as shown below.
Step 4: On the Payments & subscriptions screen, click on the Payment methods option.
Step 5: As next, on the Payment methods screen, click on the More payment settings option.
Step 6: On the screen that follows, there are 3 possibilities as follows.
- If you haven’t already added a payment method, you will have to add a payment method.
- If you have already added a payment method and everything is fine with it, then you will have to modify it.
- If you have already added a payment method and something is wrong with it, you will have to fix it. In the example screenshot below, I have already added a payment method and it has expired. So I have to hit the Fix button.
Step 7: Now on the Update your payment method screen, click on the Billing address field to change the country.
Step 8: When you click on the Billing address field, the current country will be visible.
Step 9: Clicking on it again will expand the country dropdown menu, using which you can choose the new country.
Step 10: Once the country is successfully set, you can hit the Update button and this will update the country preferences in your Android device. Enjoy!
Solution 2: Connect to Internet Through a VPN Application
If you are unable to change the country settings following the method above, you always have the option to install a free VPN software and then connect to the Internet through the VPN from a different country. This solves the issue of you being in a different country where the app you are trying to download and install is banned.
Please tell us in the comments section if you could successfully change the country preferences in your Android device following the steps in our article.
Stay tuned for more amazing and useful technical articles! Happy Geeking!


