One of the coolest feature on Play Store is that you can set the Play Store apps to auto-update whenever they gets a new one. But, sometimes everything doesn’t go smooth as the way they should and the Play Store doesn’t auto-update the apps. If you find yourself in such situation, don’t worry. These are the solutions you should try to fix this auto-update issue on your phone.
Fix 1 – Make sure Play Store is correctly set
Before you look anywhere else, make sure you are using the correct settings in the Play Store.
Step 1 – Launch the Play Store.
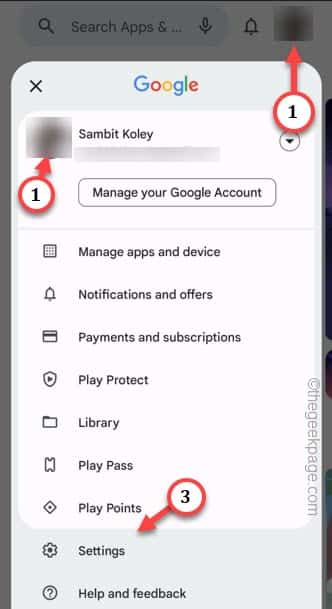
Step 2 – After that, you need to tap your profile icon and further tap the “Settings” to open that.
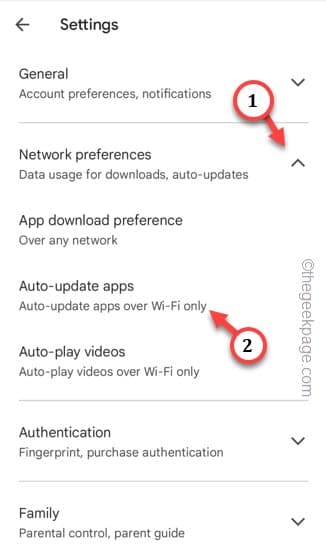
Step 3 – Expand the “Network preferences” settings. After this, tap the “Auto-update apps” to toggle that.
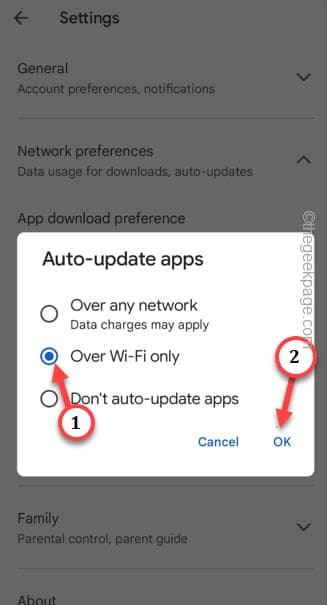
Step 4 – Here you have two choices. You can choose the “Over Wi-Fi only” so that Play Store does auto-update the apps only when the phone is connected to the WiFi.
Otherwise, you can select the “Over any network” option as well. But, remember that this will involve your precious mobile data as well. Tap “OK“.
Quit the Play Store window.
Now, connect your phone to the WiFi and see the magic. All the apps will auto-update without any more issues.
Fix 2 – WIFI is a must
WiFi should be your choice to update the apps. So, make sure to connect your phone to the WiFi and wait for the Play Store to auto-update the apps. As this task runs in the backyard, you won’t even have to think.
Hope this works!
Fix 3 – Turn off battery restrictions on Play Store
Battery restrictions play a huge role in obstructing the auto-update feature as this is background task.
Step 1 – Hold the Play Store icon until you see the hovering menu.
Step 2 – Tap the small “i” icon.
Step 3 – Upon reaching the Play Store information page, open up the “Battery” page.
Step 4 – There are three-modes in Samsung One UI. Just make sure to set it to the “Unrestricted” mode.
On other devices, you may set it to “Not optimized” mode.
This will make sure Play Store doesn’t get restricted by battery limiters. This should definitely help.
Fix 4 – Check the background permissions
If Play Store is not allowed to process in the background, apps on your phone won’t get auto-updated.
Step 1 – Just as the same as before, touch the Play Store icon and tap the “ⓘ” icon.
Step 2 – Now, you have to open “Mobile data“.
Step 3 – Just make sure to tweak the “Allow background data usage” to “On” mode.
Quit the Phone settings after this.
Restart your phone once. Connect your phone to the WiFi once the device get restarted and see the effects yourself.
Fix 5 – Turn off the Battery Saver mode
The Power Saving mode or Battery Saver is built to obstruct background network usage. Make sure to turn it off.
Step 1 – Just drag-down to see all the icons. Look for the “Power Saving” or “Battery saver” to open that up. Hold that icon once.
Step 2 – Make sure to turn that “Off“.
Turning off the power saving mode should make sure the Play Store doesn’t get held back by battery limiters
Fix 6 – Wipe out the Play Store cache
If turning off the battery saver also doesn’t make things right for you, try wiping out the Play Store cache.


