Recently, users have reported high memory consumption by Microsoft Teams application on their Windows PC. Microsoft Teams starts up automatically with the system by default and is always active in the background. When Teams is used, it makes an effort to utilize the resources on the computer to give the user the best video streams. This leads to high memory usage on systems with low RAM and CPU capacity.
Read this article to know how you can fix this high memory usage by Microsoft Teams.
Fix 1 – Logout from Microsoft Teams
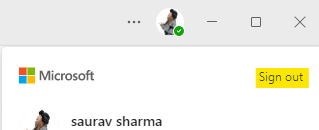
1 -Open Microsoft Teams.
2 -Now, Click on your Profile icon at top right and then Sin out from your Microsoft teams account.

Fix 2 – Disable GPU Hardware Acceleration
1. Open the Microsoft Teams application.
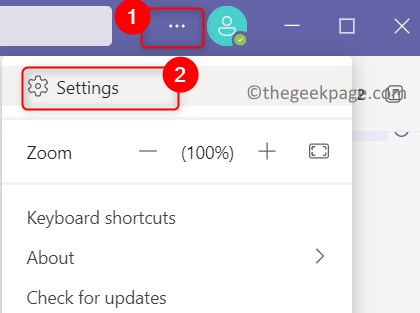
2. Click on the three horizontal dots next to the profile icon and choose Settings.
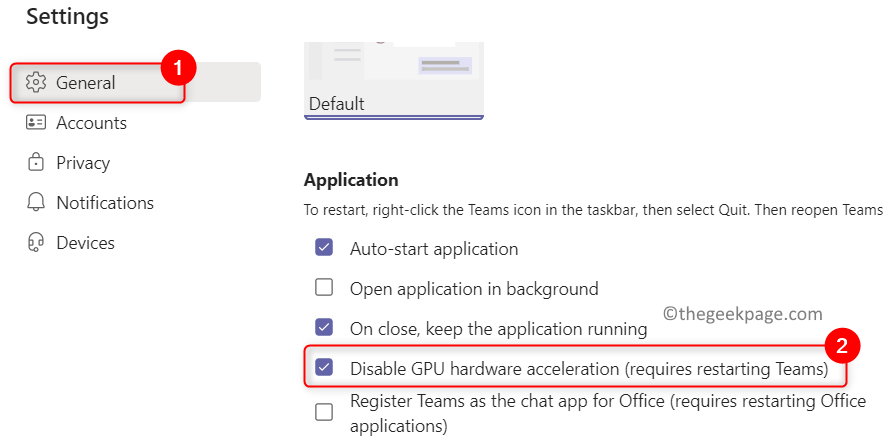
3. In the Settings window, select the General tab on the left.
4. On the right, check the box associated with Disable GPU hardware acceleration (requires restarting Teams) option under Application.
5. Close the application completely. Right-click on the Microsoft Teams icon in the Taskbar and select Quit.
6. Launch Microsoft Teams and check if the issue is fixed.
Fix 3 – Clear Microsoft Teams Cache
Step 1: End Microsoft Teams Processes
1. Close Microsoft Teams. Click on the hidden icons on your taskbar.
2. Right-click on the Microsoft Teams icon and click on Quit to log out from Microsoft Teams.
3. Press Ctrl + Shift + Esc to open Task Manager.
4. In the Task Manager, scroll down to locate Microsoft Teams processes.
5. Right-click on each Microsoft Teams process one by one and choose End Task. This way, kill all the Microsoft Teams processes on your PC.
Step 2: Clear Teams Cache Folders
1. Open Run dialog using the Windows and R key combination.
2. Type C:\Users\%username%\AppData\Roaming\Microsoft\Teams and hit Enter.
3. Double-click on the Cache folder.
4. Select all the files and folders using Ctrl + A.
5. Now click on the Delete icon to remove all the files and folders present here.
6. Repeat Steps 3 – 5 for the folders mentioned below in the Teams folder.
- blob_storage
- databases
- GPUCache
- IndexedDB
- Local Storage
7. Close File Explorer. Launch Microsoft Teams and check if the problem still exists.
Fix 4 – Disable Read Receipts
1. Choose Settings after clicking on the three horizontal dots next to the profile icon.
2. Go to the Privacy tab.
3. On the right side, turn off the toggle associated with the option Read Receipts.
4. Check whether this has helped fix the issue.
Fix 5 -Tweak Visual effects
1 -Press Windows and R key together from laptop keyboard to open run command box.
2 -Write SYSDM.CPL in it and click OK.

3 – Click on Advanced tab and click on Settings button located in Performance.

4 – Click on Visual Effects tab and choose Adjust for best performance option.

Thanks for reading.
The fixes above must have helped to resolve the high memory usage in Microsoft Teams. Comment and let us know the fix that worked for you.

