“High Disk Usage by Modern Setup Host” error on Windows 10 or the “Modern Setup Host has Stopped Working” is a common error reported by the users these days and this occurs while you are installing Windows updates on your system. In such a scenario, it is recommended to wait for a minimum of 3 to 4 hours allowing the Modern Setup host to run before you end the process.
But, if the problem still persists, you can try the below fixes. Let’s see how.
Method 1: Through the Settings App
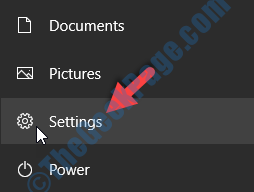
Step 1: Navigate to Start, click on it and select Settings (gear icon) from the context menu.

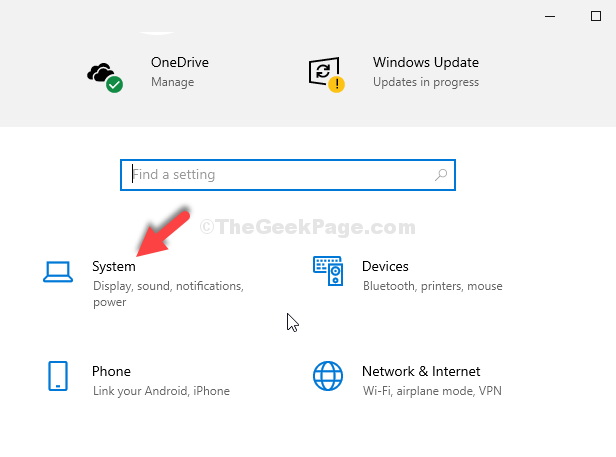
Step 2: In the Settings window, click on System.

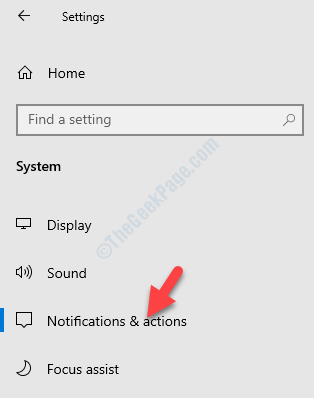
Step 3: Next, in the System window, on the left side of the pane, click on Notifications & actions.

Step 4: On the right side of the pane, under the Get notifications from apps and other senders section, go to Get tips, tricks and suggestions as you use Windows and uncheck the box next to it.

Step 5: Now, go back to Settings home and click on Personalization.

Step 6: On the left side of the pane, click on Start.

Step 7: Now, on the right side of the pane, go to Show suggestions occasionally in Start options and turn it off.

Step 8: Now, go back again to Settings home and select Privacy.

Step 9: In the next window, on the left side of the pane, find and click on Background apps.

Step 10: On the right side of the pane, under Select which apps run in the background apps, turn off the apps that you do not use at all.

Now, close the settings window and restart your computer. You should not see the error anymore. But, if you are still seeing the error, follow the 2nd method.
11. Close the Settings window.
12. Then, press the Windows key+Q keys together.
13. Further, type “Windows Security” in the box.
14. Next, click on the “Windows Security” in the search results.

15. Once the Windows Security opens up, click on the “App & browser control” settings.

16. Then, click on the “Reputation-based protection settings“.

17. Further, toggle the “SmartScreen for Microsoft Edge” and the “Smartscreen for Microsoft Store apps” setting to “Off“.

Now, close the Windows Security settings window.
[
Warning –
These settings protect your computer from potential threats caused by malicious Windows Store apps. We suggest you turn these Windows Security settings ‘On‘ before you download any app from Windows Store.
]
Now, follow these steps to rectify the index settings.
1. Press the Windows key+S and type “Indexing Options“.
2. Then, click on the “Indexing Options” in the search result.

3. Once the Indexing Options window, click on the “Modify“.

4. Then, uncheck all the options in the ‘Change selected location’ panel.
5. Finally, click on “OK“.

This will stop the settings turned ‘ON’ automatically.
Check if this works.
Fix 2 – Run the Windows Update troubleshooter
You can run the Windows Update troubleshooter to fix the issue.
1. First of all, press the Windows key along with the I key.
2. After the Settings window opens up, click on the “Update & Security” settings.

3. On the left-hand pane, you need to click on “Troubleshoot“.
4. After that simply click on “Additional Troubleshooters“.

5. Next to that, click on “Windows Update“.
6. After that, click on “Run the Troubleshooter“.

Let the Windows Update troubleshooter will now detect if there is any problem with the Windows Update process.
Once Troubleshooter fixes the issue on your computer, simply reboot your computer to apply the fix.
Fix 3 – Delete the contents in the SoftwareDistribution folder
You have to delete all the contents of the SoftwareDistribution folder.
1. Right-click on the Windows icon and click on the “Run“.
2. Then, type “softwaredistribution” and hit Enter.

3. When the SoftwareDistribution folder opens up, select all the contents in the folder.
4. Then, press the “Delete” key from the keyboard to empty the folder.

After that, close the File Explorer.
Fix 4 – Run DISM scans
Run these DISM scans to fix the problem.
1. Click on the search box and start to write “cmd“.
2. Further, right-click on the “Command Prompt” and click on “Run as administrators“.

3. Paste this code into the terminal. Thereafter, hit Enter to run the scan.
sfc /scannow

SFC scan will commence.
4. Following the SFC scan, write these commands one by one in the CMD terminal and then hit Enter.
DISM.exe /Online /Cleanup-image /Scanhealth

DISM.exe /Online /Cleanup-image /Checkhealth

DISM.exe /Online /Cleanup-image /Restorehealth

Close the terminal once the scans are over. Check if this works out.
Fix 5 -Boot into clean mode
Clean booting your computer may solve the issue with the modern setup host.
1. Press the Windows key+R keys together.
2. Write this code in the Run terminal. Then, hit Enter.
msconfig

3. Simply go to the “General” tab.
4. In the second step, click on the radio button beside the “Selective startup” option.
5. After that step you have to tick the box beside the “Load system services“.

6. Just go to the “Services” section.
7. Next what you have to do is check the “Hide all Microsoft services“.
8. To disable the third-party services, click on “Disable all“.

Step 9: Go to the Startup tab and click on the Open Task Manager link to open the Task Manager window.

Step 10: In the Task Manager window you are taken straight to the Start-up window.
Now, select each of the services one by one, right-click and select Disable.

Step 11: Close the Task Manager and return to the System Configuration window.
Press Apply and then OK to save the changes and exit.

You will now be prompted to Restart your PC.
Press the Restart now button to restart your computer in clean boot mode.
You should now be able to install the Windows updates without seeing the “Modern Setup Host has Stopped Working” error again.
You will notice has appeared asking for a restart. Click on “Restart now” to restart your computer in clean boot mode.
Fix 6 – Disable the Windows Update service
You can temporarily disable the Windows Update service.
1. Just right-click on the Windows key and click on the “Run“.
2. When the Run windows appear, type this and hit Enter.
services.msc

3. Once the Services appears, scroll down to find the “Windows Update“.
4. Then, double click on the services.

5. Now, set the startup type to “Disabled“.
6. Further, click on the “Stop” to stop the Windows Update.

7. After that, go to the “Recovery” tab.
8. Next, click on the drop-down beside the ‘First failure‘ and then select the “Take No Action“.

9. Then, click on “Apply” and “OK“.

Then, close the Services screen.
This will stop the problem temporarily.
[
NOTE –
You should not stop the Windows Update service for a prolonged time period. Your device may miss some important security and new feature updates which may lead to other errors. So, remember to set the Windows Update to “Automatic” startup type and start it up by tapping on the “Start“, following the steps we have discussed above.
]
Fix 7 – Set the system language
Check if the system is using the correct language.
1. Press the Windows key+R keys together.
2. Then, type this and hit Enter.
intl.cpl

3. When the Region setting opens up, go to the “Formats” section.
4. Now, make sure that the ‘Format:’ is set to the “Match Windows display language (recommended)” setting.

[
If you want to know what is your system language, just click on the “Language Preferences“.

The settings window will open up. You can see the system language in the “Windows Display language“.

]
5. Finally, click on “Apply” and “OK” to save the settings.

This should have fixed your problem.
Method 8: Through Indexing Options
Step 1: Right-click on Start and select Run from the context menu.

Step 2: In the Run command box, type control.exe srchadmin.dll and hit Enter.

Step 3: It opens the Indexing Options window. Click on Modify.

Step 4: Next, in the Indexed Locations dialogue box, under the Change selected locations sections, uncheck all the options.
Press OK to save the changes and exit.

*Note – Make a note of it so that you can turn the options back ON at a later date if need arises.
Now, simply restart your system and the error should be gone from your Windows 10 system.
Fix 9: Make Sure You Are Using Your the Default System Language
You can also come across the “High Disk Usage by Modern Setup Host” error error on your system while installing the Windows 10 updates when the default system user-interface language does not match your PC’s system language. It can also affect the Modern Setup Host by forcing it to slow down, freeze or collapse altogether. Here’s how to possibly fix the issue:
Step 1: Press the Win + R keys together on your keyboard to open the Run command box.
Step 2: In the Run command search field, type control.exe and press OK to open the Control Panel window.

Step 3: In the Control Panel window, go to the View by field on the top right and set it to Category.
Next, click on the Clock and Region option in the list.

Step 4: In the next window (Clock and Region), go to the right side and click on Region.

Step 5: It will open the Region dialogue box.
Under the Formats tab, go to the Format field and check if it’s set to the same language as your system’s default user-interface language.

*Note – To check your system’s default user-interface language, click on the Language preferences link.

It will open the Language page in the Settings window.
Go to the right side and click on the Language & region section.

Now, on the right side, under the Windows display language, check the selected default language

Step 6: Return to the Region window and set the Format field to the same language as your system’s default user-interface language.
Press Apply and then OK to save the changes and exit.

Reboot your PC for the changes to be effective and you should be able to finish installing the pending Windows update without the error showing up.