Wondering why reverse scroll the mouse and not in the default way? Well, there are a set of users who do prefer reverse scrolling the mouse and the touchpad in their Windows 10 system, quite naturally. Turning on the reverse scrolling feature was once a easy process as Windows 10 discontinued the option to enable the feature through Mouse & Trackpad option in Settings. Although the reverse scrolling feature is not as smooth as earlier for your latest Windows 10 build, you still have a couple of options to reverse the scroll of mouse and touch in your Windows 10 PC. Let’s see how.
Method 1: By Editing the Registry Editor Settings (Mouse Only)
If you want to enable the reverse scrolling feature for only the mouse, follow the below steps.
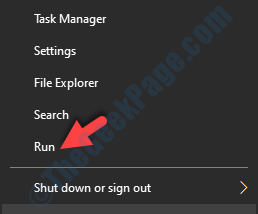
Step 1: Right-click on Start and select Run to open the Run command.

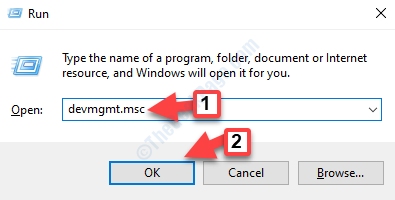
Step 2: In the Run command search field, type devmgmt.msc and press OK to open the Device Manager window.

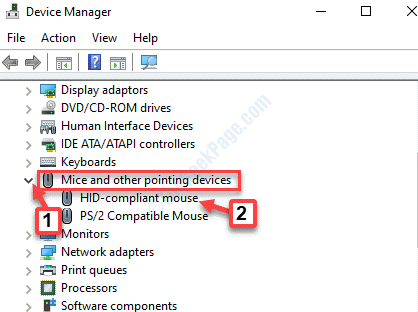
Step 3: In the Device Manager window, expand the Mice and other pointing devices section.
Now, double-click on HID compliant mouse below it.

Step 4: Next, in the HID compliant mouse Properties dialogue box, go to the Details tab and click on the drop-down under Property.
Select Device instance path from the drop-down.

Step 5: Now, go to the Value section and copy the path.
Press OK to exit the Properties window and then exit the Device Manager window.

*Note – Paste the path in a Notepad so that you don’t lose what you copied.
Step 6: Now, press Win + R keys together on your keyboard to open the Run command.
Step 7: Type regedit in the Run command search box and hit Enter to open the Registry Editor window.

*Note – Before you make any changes to the Registry Editor settings, make sure that you create a backup of the registry data, so that in case of any data loss, you can recover the same.
Step 8: Copy and paste the below path in the Registry Editor window and hit Enter:
HKEY_LOCAL_MACHINE \ SYSTEM \ CurrentControlSet \ Enum \ HID
Now, on the left side of the pane, under the HID folder, match the registry key with what you copied in Step 5 from Device Manager.

Step 9: Now, expand the matched registry key and then again click to expand the sub-key.
Select Device Parameters and then on the right side of the pane, double-click on FlipFlopWheel.

Step 10: In the Edit DWORD (32-bit) Value dialogue box, set the base to Hexadecimal and in the Value data field type 1.
Press OK to save the changes and exit.

Now, restart your PC for the changes to be effective.
*Note – To go back to the usual way of scrolling, change the Value data field of FlipFlopWheel to 0 and press OK.
You can now scroll in the reverse way using your mouse.
Method 2: Using a Macro Script for Mouse and Touchpad
This method uses software that has the ability to set up macro scripts and the most trusted way of doing this till now is using the AutoHotKey. It’s a 100% free software and also easy to use. Let’s see how to reverse the scrolling of your Mouse and Touchpad using this sotware.
Step 1: Visit the below link and click on the Download button to start the download. Once done, complete the installation.

Step 2: Now, go to your desktop, right-click on an empty space, select New and then select Text Document.

Step 3: Then, copy and paste the below commands in the newly created Text Document:
WheelUp::
Send {WheelDown}
Return
WheelDown::
Send {WheelUp}
Return
Step 4: Go to the File tab on the upper left side of the document and click on Save As.

Step 5: Now, save the file on desktop. Select Desktop as location and go to the File name field.
Name the file anything as per your convenience, and add .ahk in the end instead of .txt.
Set the Save as type field to All Files.
Click on Save.

Step 6: You will now see the text file saved with an H icon on your desktop, which means, that the file is saved as an AutoHotkey file.
Double-click on the file to run the hotkey and activate the reverse scrolling of your touchpad and mouse.

Step 7: If you want to deactivate the reverse scrolling feature and revert to the natural way of scrolling, right-click on the Taskbar and select Task Manager.

Step 8: Now, in the Task Manager window, under the Processes tab, find AutoHotkey Unicode under Background Processes.
Right-click on AutoHotkey Unicode and select End Task.
*Note – Every time you restart or shut down your PC, you have to run the script each time.