Sometimes, you might have noticed that Windows PowerShell causes high CPU usage in the system. One can see that the system becomes really slow and when the Task Manager is opened, you see that multiple PowerShell processes show up and disappear. Also, at times, a single PowerShell process shoots the CPU usage really high.
Potential reasons for this kind of behavior are :
- Windows System is not updated for a very long time
- Some Applications are interfering with the operation of Windows Power Shell. For example, NativeDesktopMediaService
- Malware like Eternal Blue and crypto miners
However, if you see this issue in your system, we advise you to try the general fixes listed below before trying the specific ones. At times, some bug might cause this behavior and simple fixes might solve the problem.
- Restart the System
- End the PowerShell Task from the Task Manager
If you see that CPU usage is still high and the above fixes did not help, try the specific fixes below.
Fix 1: Run SFC and DISM commands
1 – Search cmd in taskbar search
2 -Now, right click and click run as admin.
3 -Now, run the commands given below one by one in command prompt window.
sfc/ scannow
dism /online /cleanup-image /restorehealth
Now, close the command prompt window after both commands get executed fuklly and completely.
Fix 2: Ensure that Windows is Updated
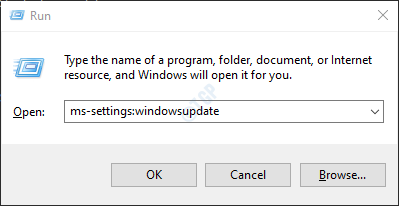
Step 1: Open the Run Dialog using Win Key and R combination.
Step 2: Type ms-settings:windowsupdate and hit Enter.

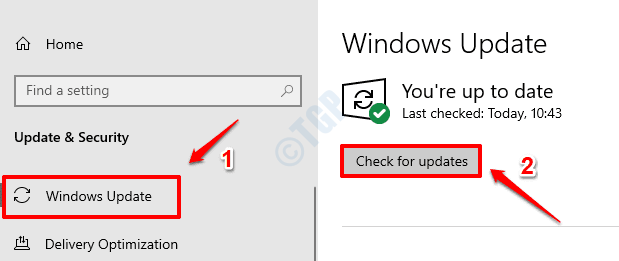
Step 3: In the window that opens, click on Check for updates.
Step 4: Windows will now check for any new updates. If any new updates are found, those will be downloaded and installed.
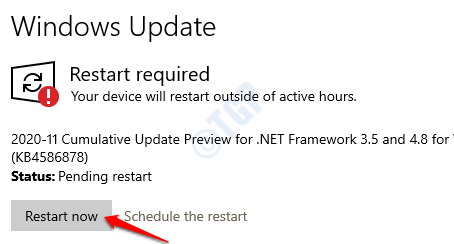
Step 4: Click on the Restart now button to see the changes. Check if your problem is resolved or not once the system restarts.
Fix 3: Perform a Clean Boot
Certain applications interfere with the Windows PowerShell and cause this issue. By performing a clean boot, we will be able to know which application is causing the issue.
Step 1: Open the Run Command. Press the keys Windows+R.
Step 2: Type msconfig and hit Enter

Step 3: In the General tab, choose Selective startup
Step 4: Ensure that Load system services and Load startup items are checked.

Step 5: Now, go to the Services tab
Step 6: Tick on Hide all Microsoft services and then click on Disable All button
Step 7: Click on Apply and then click on OK

Now restart your computer.
Step 8: Go to the Startup tab, and click on Open Task Manager

Step 9: Right-Click on the application that you feel is causing the issue and Disable it. Also, there will be a column called Startup Impact, if the application has a High Impact, disable that application.
Repeat this for all the applications that you feel are causing the issue and have a high impact value.
NOTE: Screenpresso is used just for demonstration purposes only.

Step 8: Now, Restart the computer. Check if the issue exists.
Step 9: If you see that the high CPU Usage issue has resolved now, this means that one of the applications/services that have been disabled caused the issue. Enable one application/service at a time and check which application/service is the culprit. Once, the application is identified, you can Uninstall that application from your system
Fix 4: Repair Upgrade Windows 10 / 11
Step 1: Visit this page and download the Windows 10 Installation Media tool from the link

Step 2: Once the download is complete, right-click on the file and choose Run as Administrator

Step 3: You will see a Windows 10 Setup Window.
Step 4: In the appearing window, you will see a license agreement, click on the Accept button

Step 5: In the window, where you are asked What do you want to do, tick on Upgrade this PC now and click on the Next button

Step 6: Follow the onscreen instructions in the upcoming wizards
Step 7: In the Ready to install window, click on the Change what to keep the option

Step 8: Tick on the Keep personal files and apps and press the Next button

Step 9: Finally, in the upcoming wizard window, click on the Install button and complete the Upgrade process
Step 10: Restart the system
Fix 4: Scan and Remove the Malware from the System
Step 1: Open the Run Dialog using Win Key and R combination.
Step 2: Type powershell and hit Ctrl+Shift+Enter. This opens the PowerShell in Admin mode.

Step 3: In the User Access Control prompt that opens asking for permission, click on Yes
Step 4: In the PowerShell window that opens, paste the below command and press Enter
while ($true) {Get-Process PowerShell | Where-Object {$_.ID -notcontains $PID} | Stop-Process -Force}
Step 5: Open the Explorer window using Windows+E, from the left-hand side menu, click on This PC
Step 6: In the search bar located at the top-right corner of the window, copy-paste the following and hit Enter
*ps1

Step 7: From the list of ps1 files, delete the ones that you feel are not necessary
Step 8: Open the Run terminal again
Step 9: Type Taskschd.msc and press the keys Ctrl+Shift+Enter. This will open Task Scheduler with Admin rights.

Step 10: In the task scheduler window that opens, from the top menu, click on View
Step 11: Ensure that Show Hidden Tasks is tick marked.

Step 12: Check if any Scheduled task or Active task is causing the issue. Check for the names Funs task or GatherNetworkInfo task. Tasks with these names are known to be triggered by Blue Eternal. If found, delete them immediately.
Step 13: Scan for the Malware in the System. Take necessary steps to mitigate them.
Step 14: As a precautionary measure it is better to scan the system from two antivirus software (maybe Anti-virus and Anti-malware). Once, you are sure that is no more malware in the system, Check if the Hight CPU usage is resolved.
Alternate way if the above method seems difficult:
Step 1: Remove unwanted data and backup the data that is necessary
Step 2: Format the Storage Drive
Step 3: Re-install the Windows
Step 4: Scan the System for any malware.
Step 5: Copy the Data back to the system.
That’s All
We hope this article has been informative. Thank you for Reading.
Kindly comment and let us know which of the above fix helped you solve the High CPU usage issue in the system.

