Windows 10 comes with built-in Location feature and many Windows apps may have access to the location . However, Windows allows you to customize the location settings for apps and users. In the latest Windows build, you can allow or prevent apps from accessing location on your Windows 10 PC. When allowed, all your Windows apps can use your location details.
The location feature in the Settings app came into force from Windows 10 build 17063 and beyond. Along with the Location access permissions, control usage permissions for calendar, library, microphone and user account info also got introduced. The new settings update allows you to completely disable location access for individual apps or even for the OS.
Disabling location access for the entire OS will automatically disable location access for all apps and when you enable it back, you will be able to prevent individual apps from accessing location on your Windows 10 PC. Since, a lot Windows services and apps have access to your location data (for example, the weather app to display weather of your country or the local news that generates news notification based on your region), you may be worried about your privacy and that’s legit, especially, if it’s a 3rd party app.
So, if you want to turn off the location access for all apps or specific apps, here’s how you can:
Method 1: Prevent Apps to Access Location Through the Settings App
The Windows Settings app is a lot like the Control Panel, but a little more advanced and with improved categorization, that helps you to make changes and configure the way your operating system works. Changing the Location settings through Privacy is one of the many settings options that you can configure. Let’s see how to do it for the device, for all apps and for individual apps.
How to Disable access to location for all apps?
However, if you want to keep the location access turned on for the device (Windows 10 operating system), but disable only for all apps, you can follow the below steps:
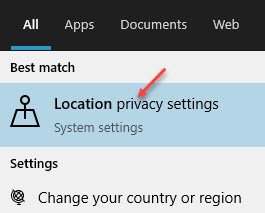
Step 1: Go to Start and type Location in the Windows search bar.
Step 2: Click on the result (Location privacy settings) to reach the location settings window in the Settings app.

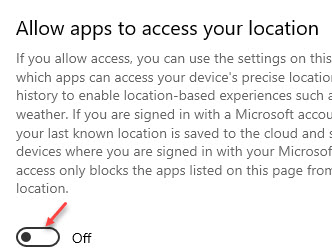
Step 3: Now, on the right side of the pane, under the Allow apps to access your location section, slide the toggle to the left to disable it.

You have successfully disabled the location access for all apps.
*Note – You can also set a default location, by click on the set default button in the Default location section.
Additionally, you can also go to the Location history section and press the Clear button to clear the location history.
How to Disable access to location for individual apps?
Some of you may want the location access on for the device and for all apps, because they may want the weather and news updates based on their country, and also for some Microsoft Store apps or Windows features. So, if you want to block location for specific apps, for instance, only for Skype or Camera, follow the below instructions:
Step 1: Press the Win + I keys together on your keyboard to launch the Settings app.
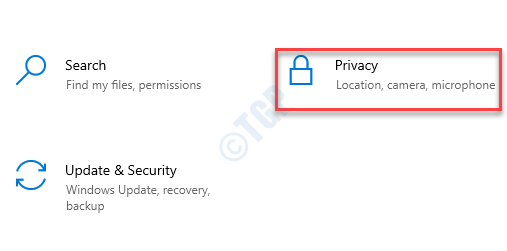
Step 2: In the Settings window, select the Privacy option.

Step 3: In the next window, on the left side of the pane, scroll down and under App permissions, click on Location.

Step 4: Next, navigate to the right side of the window, scroll down and go to Choose which apps can access your precise location section.
Here, find the app for which you want to disable location access (for instance, we wanted to prevent Skype from having location access) and turn the toggle off.

Now, exit the Settings app and the Skype app should no more have access to your location.
For Windows 11 Users
1 – Open Settings by pressing Windows key and I key at once
2 – Now, Click on Privacy & Security from left menu
3 – Now, in the right side , just make sure Loaction services and Let apps access your location option both are turned ON
4 – Now, turn off, the location setting for the particular app from the list below

Method 2: Disable App Access to Location Using the Group Policy Editor
The Local Group Policy Editor allows you to make changes to the settings of your operating system and hence, is a perfect alternative, when the changes made to the Settings app fail to work.
Step 1: Press the Win + R keys together on your keyboard to open the Run command window.
Step 2: In the Run command search box, type gpedit.msc and hit Enter to open the Group Policy Editor.

Step 3: In the Group Policy Editor window, navigate to the App Privacy folder, by following the below path:
Computer Configuration > Administrative Templates > Windows Components

Step 4: Now, select the App Privacy folder and on the right side of the pane, you will see a list of settings under the Settings field.
Here, double-click on the Let Windows apps access location setting.
Step 5: In the Let Windows apps access location window, select the Enabled option.

Step 6: Next, go to the Options field and here you can set any of the three options as Default for all apps.
So, for instance, you can set it to either User in control, Force deny or Force allow.
Step 7: However, if you want to set these these three options for an individual app/s, for instance, if you want to Force deny the Skype app, you need to enter the Package Family Name or Names for that app.
*Note – Here’s how you can check the PFN (Package Family Name) of an app:
1: Press the Win + R keys simultaneously to open the Run command window.
2: In the search bar, type PowerShell to open the Windows PowerShell (Admin).

3: Copy and paste the below command in the Windows PowerShell (Admin) window:
Get-AppxPackage -AllUsers | Select Name, PackageFullName

This is a format, to help you pull up the package names for all the apps.
4: Now, look for the name of the app under the Name field.
For instance, if you want to disable location access for Skype, note down its package full name written to the right of package name.

5: Now, to copy its Package Family Name, just select the package full name using your mouse and right click. It will be copied
Note down the PackageFamilyName from the details generated and enter this PFN in the Force deny these specific apps field.
Microsoft.SkypeApp_15.92.3401.0_x86__kzf8qxf38zg5c
You can also add more PFNs for other apps that you want don’t want to have access to your location.

Method 3: Turn Off Location Access for Apps Using Registry Editor
If you d not have access to the Group Policy Editor, you can try modifying the location settings using the Registry Editor. However, to make changes through the Registry Editor, you must create any keys/values that are not present for the location settings. Let’s see how to make the changes:
*Note – Before you proceed to make any changes to the Registry Editor, make sure that you create a backup of the registry settings, so that in case of any data loss, you can recover the data easily.
Step 1: Press the Win + R shortcut keys to launch the Run command window.
Step 2: In the Run command window, type regedit in the search field and hit Enter to open the Registry Editor.

Step 3: In the Registry Editor window, navigate to the below path:
HKEY_LOCAL_MACHINE\Software\Policies\Microsoft\Windows\AppPrivacy
*Note – If the AppPrivacy key is missing, create it using the below instructions:
1: Select the Windows key, right-click on it, click on New and then on Key.

2: Rename the key as AppPrivacy.

Step 4: Now, go to the right side of the window and right-click on a clear space.
Now, select New and then select DWORD (32-bit Value).

Step 5: Rename the new DWORD (32-bit Value) as LetAppsAccessLocation.
Double-click on it to open the Edit DWORD (32-bit Value) dialogue box.

Step 6: In the Edit DWORD (32-bit Value) dialogue box, set the Value data field to 2.
Press Apply and then OK to save the changes and exit.

*Note – The value that you set in Step 6 will now be the default value for applications. You can change the value to 0 for user in control, can change it to 1 to force allow, and to 2 for force deny.
If you have access to Group Policy Editor
Additionally, you can create three different values that will appear as boxes in the Group Policy Editor for certain applications.
Step 1: So, go to the right side of the pane, right-click on a blank area, then select New > Multi-String Value.

Step 2: Now, rename this new Multi-String Value as LetAppsAccessLocation_UserInControlOfTheseApps for user in control value.

Step 3: In the same way, create two more Multi-String Values and rename them as LetAppsAccessLocation_ForceAllowTheseApps for force allow and as LetAppsAccessLocation_ForceDenyTheseApps for force deny, respectively.

Step 4: Now, for an individual setting, double-click to open any of the three values and add the PFNs or the Package Family Names (Refer to the below note to learn how to find PFN of an app) in their Value data field.
Press OK to save the changes and exit.

Close the Registry Editor and restart your PC for the changes to be effective.
Note down the Package Family Name of Skype.
Now, you can use this PFN in the Registry Editor method to force allow, force deny or as the user in control value.
*Note – Refer to Method 2 to check how to find out the Package Family Name of a specific app.