Are the hard disk drives not showing up on your computer properly? Starting from unallocated space to faulty drive partitions, there can be almost anything behind this issue. If this is the problem that you are facing, you have to solve it yourself to view your old hard drive partitions again in File Explorer. Try these quick workarounds to get a quick resolution, otherwise, head on to the main solution for a more permanent solution.
Workarounds –
1. A simple system restart should fix this drive partition issue. After restarting the system, open File Explorer check again.
2. If you are facing this issue with an external HDD, eject it and replug it again. It may fix this issue.
Fix 1 – Change Drive letter and paths
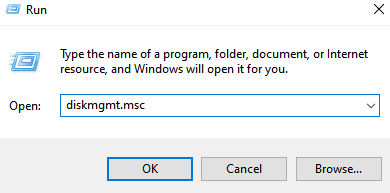
1 – Open RUN by pressing Windows and R key
2 -Now, Type diskmgmt.msc in it and click OK

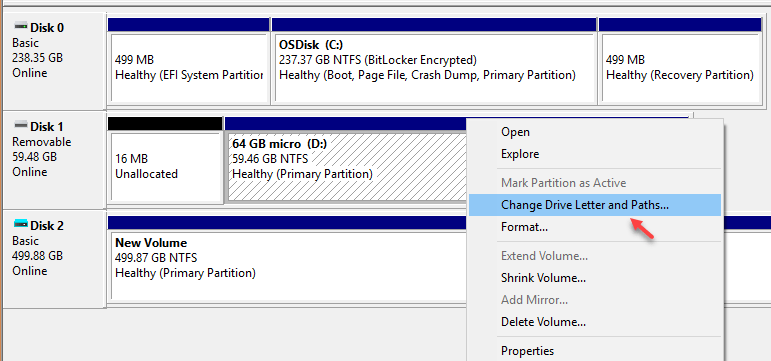
3 – Now, Locate the partition which is not showing letters
4 – Right click on it and choose Change drive letter and paths…

5 – Now, follow On screen instructions to assign a drive letter
Fix 2 – Initialize disk
1 – Open RUN command box by pressing Windows and R key
2 -Now, Type diskmgmt.msc in it and click OK

3 – Now, Locate that partition which is not showing letters and right click on it
4 – Now, click on Initialize disk

5 – Select either MBR or GPT partition style for your disk
6 – Now, again go to disk management and then, right-click on the unallocated disk space and select New Simple Volume
Fix 3 – Format and assign a new drive
In the majority of cases, it can be a simple case of an unformatted drive.
1. Right-click on the Windows icon and tap on “Disk Management“.
2. When the Disk Management opens up, carefully notice the drives.
3. If there is a drive that shows “RAW” in the File System.
4. Then, just right-click on that drive and tap on “Format…“.
5. Set the ‘Volume label:’ and ‘File system:’ according to your need.
6. Then, tap on “OK” to format the drive.
7. When the prompt appears, tap on “OK” to confirm your action.
This will format the drive. You can further find the drive again in the File Explorer.
OPTIONAL STEPS –
Additionally, you can add a drive letter to this newly formatted drive. These are the steps to do so –
1. Open Disk Management.
2. Here, right-click on the new formatted drive and tap on “Change Drive Letter and Paths…“.
3. Now, tap on “Add…” to add a new drive letter to the drive.
4. Further, switch to the “Assign the following drive letter:” option.
5. You can choose any of the available drive letters.
6. Next, tap on “OK“.
This will designate that particular drive letter to the drive. You may close the Disk Management window.
Fix 4 – Create a new partition
If you can see an unallocated space for a particular drive, you can create a new partition with it.
1. Pressing the Windows key and the R keys together will bring up Run.
2. Next, type “diskmgmt.msc” and click on “OK“.
3. When the Disk Management utility appears, check for any unallocated space.
4. Then, right-click on it and tap on “New Simple Volume…“.
5. In the New Simple Volume Wizard window, tap on “Next>“.
6. At the next step, choose the “Assign the following drive letter:” to “E” (or any other drive letter you prefer).
7. Then, tap on “Next>” to proceed.
8. At the next step, choose “NTFS” and set the ‘Allocation unit size’ to “Default“.
9. Then, tap on “Next” to proceed.
10. Finally, tap on “Finish” to start the formatting process.
Once it is done, you can close the Disk Management window.
Fix 5 – Delete a value in the registry
Sometimes a user can hide a particular drive with just a registry value. Removing the registry value should make it visible again.
1. After pressing the Windows key once, type “regedit“.
2. Next, just tap “Registry Editor” once in the search results.
NOTE –
Registry edits are dangerous for your system which may lead to a fatal error. You should create always create a registry backup before you perform a registry edit. Just follow these steps –
a. After opening the Registry Editor, tap on “File” in the menu bar and then, click on the “Export…” option.
b. Now, just save this backup in a secure location.

3. Once you have opened the Registry Editor, expand the left pane this way –
Computer\HKEY_LOCAL_MACHINE\SOFTWARE\Microsoft\Windows\CurrentVersion\Explorer
4. Now, on the right-hand side, look if you can find any value named “NoViewOnDrive” or “NoDrives“.
5. If you can notice any one of these values, right-click on the value and tap on “Delete” to remove the key.
6. To finally confirm the action, tap on “Yes“.
After deleting the value, close the Registry Editor. Then, restart the system.
Once you have signed in, open the File Explorer and check whether you can see the drive portions or not.
Fix 6 – Initialize the disk
The disk drive may be offline. You have to initialize the disk or make it online once again to make it work again.
1. First of all press the Windows key+X keys together.
2. Next, click on “Disk Management” to access it.
3. Once the Disk Management appears on your screen, check which disk is appearing to be offline. It will bear a small red down arrow sign.
4. Just right-tap on the disk and tap on “Online“.
This will make the disk drive online once more. Check if this solves your issue.