Many Windows users have reported that all of a sudden, their audio devices have stopped working or they are not able to hear any audio from the system and the device manager is throwing an error code 52 on screen saying no audio devices are installed on your system.
This can happen to anyone and for some of the users after restarting their system, it got solved. Therefore, restarting the system can be a workaround for resolving this issue. If it is not, then we have listed a few solutions in this post below which might help the users in fixing this error code.
Fix 1: Try and Remove All the External Devices and check again
Sometimes there might be a faulty external device that is connected to your system and most probably you are not aware of it. Therefore, it can be one of the cause for audio driver error code 52 on your system. So Please follow the below simple steps:
- Remove / Disconnect all the external devices such as USB, etc. from your system.
- After removing, also disconnect any bluetooth device and turn the bluetooth off on your system.
- Then, Shut down the system and unplug the power cable from the system and wait for 2 mins.
- Plug the power cable and start your system and check if the audio device and sound is working fine.
Hope this fixes the issue.
Fix 2: Try updating Audio Driver on your system
For any device to run smoothly, it needs the latest version of the software. Same goes true for the drivers installed on your system. Therefore, updating the audio driver might solve this problem and get the audio running on the system again. For updating the audio driver, please follow the given below easy steps using device manager:
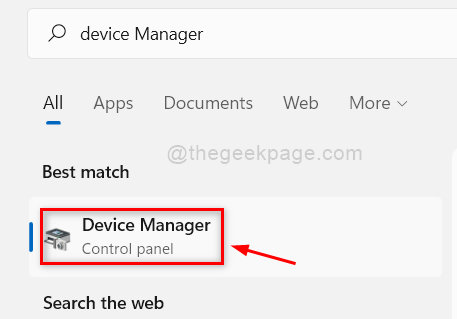
Step 1: Open Device Manager by pressing Windows key and typing device manager.
Step 2: Select Device Manager from the search results as shown in the below screenshot.

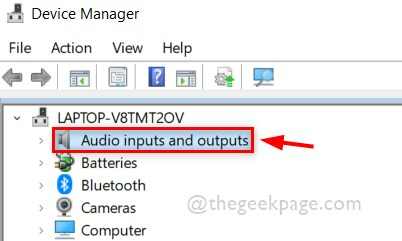
Step 3: In the Device Manager window, Double click on Audio inputs and outputs to expand it.

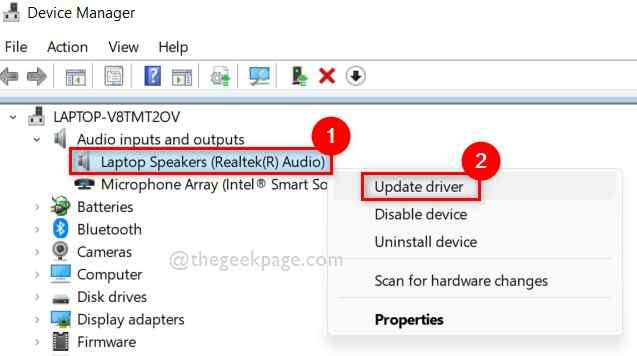
Step 4: Then, right click on the Audio device from the list of devices.
Step 5: Select Update driver from the context menu as shown below.

Step 6: Perform the onscreen instructions given to update the audio driver.
Step 7: Check if the audio device is working properly. If not, then right click on the Audio device in device manager and select Uninstall device from the context menu as shown below.

Step 8: Then, Restart your system and while system is booting, Window will reinstall the audio device driver again.
Step 9: After the system starts up, Check again if the audio device is working fine and you are able to hear the sound from your device.
That’s it.
Hope this solved the problem.
Fix 3: Perform Playing Audio Troubleshooter and Hardware and devices Troubleshooter
For Playing Audio Troubleshooter
For detecting any problems that can be caused by anything on any device, performing troubleshooter is the best way to fix this issue. So please follow the below steps on how to do it.
Step 1: Press Windows + I keys together to open Settings app on your system.
Step 2: Then, Make sure System is selected on the left menu of Settings app.
Step 3: Scroll the right side of Settings app window and click Troubleshoot as shown below.

Step 4: Select Other troubleshooters option in the Troubleshoot page as shown below.

Step 5: In the Other troubleshooters page, Click Run button of Playing audio option as shown in the below screenshot.

Step 6: Perform the on screen instructions to troubleshoot the audio problems.
Step 7: Once done, check if the audio is working fine on your system.
For Hardware and devices troubleshooter
Step 1: Press Windows + R keys together to open Run command box.
Step 2: Type msdt.exe -id DeviceDiagnostic in the run box and hit the Enter key on your keyboard.

Step 3: This will open up the Hardware and devices troubleshooter window.
Step 4: Perform the onscreen instructions and it starts troubleshooting any hardware related problems on your system.
Step 4: Please wait till it finishes the troubleshooting and do the needful to fix this issue.
Step 5: Then, check again if the audio is working fine.
That’s it.
Hope this solved the issue.
Fix 4: Remove / Delete LowerFilters and UpperFilters registry key using Registry Editor
Step 1: Press Windows key and type registry editor.
Step 2: Then, Select Registry Editor from the search results as shown below.
Step 3: Click Yes on the UAC prompt to continue.

Step 4: Copy and paste the below given path in the empty address bar and press the Enter key.
HKEY_LOCAL_MACHINE\SYSTEM\CurrentControlSet\Control\Class\{4d36e967-e325-11ce-bfc1-08002be10318}
Step 5: Then, Make sure {4d36e967-e325-11ce-bfc1-08002be10318} is selected on the left panel of registry editor.
Step 6: Next, on the right side, select LowerFilters and UpperFilters multi string values by clicking on both while press and hold CTRL key on your keyboard.

Step 7: Press Delete key on your keyboard and Click Yes on the confirm delete window as shown below.

Step 8: Once done, close the registry editor and restart your system.
After the system boots up, check if the audio is working smoothly as before.
Hope this fixed the problem.
That’s all guys! Hope this was informative and helped in solving the issue!
Thank you!