Google Play Store is one of the most important applications when it comes to any Android device. It is through this very application that you install the applications, you need on your device. It is obvious that you’ll be hugely frustrated if something is to happen to this app. Unfortunately, Google Play Store has stopped is one such frustrating error that can put anyone off. Some potential causes why you might be getting this error are a corrupted Google Play Store cache, lack of internal memory, corrupted Google account, network issues, etc. Whatever be the reason, you can blindly follow the solutions listed in our article one by one and we are sure you are not going to leave this page disappointed!
Read on, to learn how you can easily and quickly fix the issue of Unfortunately, Google Play Store has stopped with the help of some simple solutions.
Note: Based on your phone’s model and Android OS version, the pictures and steps used in this article might slightly vary. Please do let us know in the comments section if you are finding it difficult to figure out your phone’s settings options.
Solution 1: Perform Basic Troubleshooting Steps
Before we head onto the major solutions, let’s just try some quick fixes.
- The very first solution, obviously, would be to try and restart your Android device.
- Check if your Internet connection is working fine or not. If you are on a Wi-Fi network, try switching to a different network or to cellular data and vice versa.
- Make sure you have at least 1 GB of internal storage available.
- Make sure your Android device is having the latest software updates.
If none of the basic troubleshooting tips fix your issue, let’s go ahead and try out the methods listed here one by one.
Solution 2: Clear Google Play Store App Data and Cache
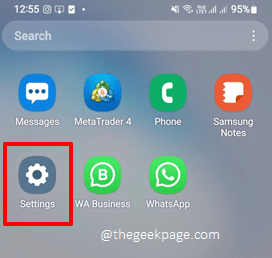
Step 1: Launch the Settings application.
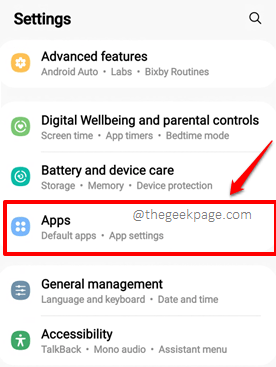
Step 2: On the Settings screen, click on the Apps option.
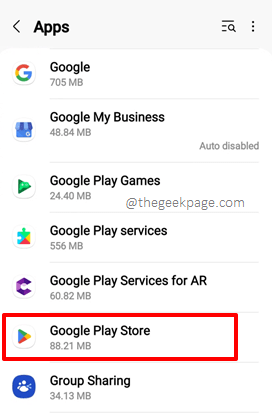
Step 3: Now scroll through the list of apps and click on Google Play Store.
Step 4: On the App info screen, click on the Storage option.
Step 5: Now on the Storage screen, at the bottom, click on the buttons Clear data and Clear cache to clear off the app data and app cache respectively.
Check if your issue is resolved or not. If not, please try restarting your device and check for the issue.
Solution 3: Uninstall and Reinstall Google Play Store Updates
Sometimes the issue could be caused because of corrupted Play Store updates. In this method, let’s uninstall the Play Store updates and then restore your Play Store to the latest version available.
Step 1: Once again, click on the Settings app to launch it.
Step 2: Click on the tile named Apps.
Step 3: On the Apps screen, scroll down, locate and click on Google Play Store.
Step 4: On the App info screen of Google Play Store, at the top right corner of the screen, click on the 3 vertical dots icon.
Step 5: From the little menu that expands out, click on the Uninstall updates option.
Step 6: You will now get a little popup message asking whether to go ahead with the updates uninstallation or not. Click on the OK button to proceed.
Step 7: Now, get back to the app drawer and click on the Play Store icon to launch the application.
Step 8: When Play Store launches open, at the top right corner of the screen, click on your profile icon.
Step 9: As next, click on the Settings option.
Step 10: On the Settings screen, at the bottom, click on the down arrow button associated with the About option to expand it.
Step 11: Now under the section Play Store version, click on the Update Play Store link to update your Play Store to the latest version available. This should readily fix your issue.
Solution 4: Remove and Re-add your Google Account
If the issue is still not resolved, let’s remove your Google account and try adding it back once.
Step 1: Click on the Settings app icon from the apps drawer.
Step 2: From the Settings options, click on the one that says Accounts and backup.
Step 3: On the Accounts and backup screen, click on the Manage accounts option.
Step 4: Now click on the Google account for which you are getting the Unfortunately Google Play Store has Stopped error. We are going to remove this account and re-add it.
Step 5: On the screen that follows, click on the Remove account button and then click on the back button at the top.
Step 6: You will now be back at the Manage accounts screen once again. At the bottom of the screen, click on the Add account option.
Step 7: From the type of accounts available, click on the one that says Google.
Now you can follow the on-screen instructions to add the Google account you removed. You can even add a different account altogether. Once the account is completely added, check if your issue is resolved.
Please do tell us in the comments section which method fixed the issue for you.
Hope you enjoyed reading the article. Stay tuned and happy geeking!


