NVIDIA GeForce Experience offers a cool in-app sharing feature that allows users to record and share their gameplay footage directly to streaming platforms, YouTube, Twitch, Mixer, etc. But after recording awesome gameplay what happens if you notice that the Share feature isn’t opening in the Geforce Experience app at all? Well, don’t worry. Just enact these fixes one-by-one on your system and you will be sharing your gameplay clips, screenshots once again!
Fix 1 – Make the NVIDIA Share run as an admin
You have to make sure that the NVIDIA Share runs as an administrator.
Step 1
1. At first, press the Windows key+E keys together.
2. When the File Explorer opens up, go to this location –
C:/Program Files (x86)/NVIDIA Corporation/NVIDIA GeForce Experience
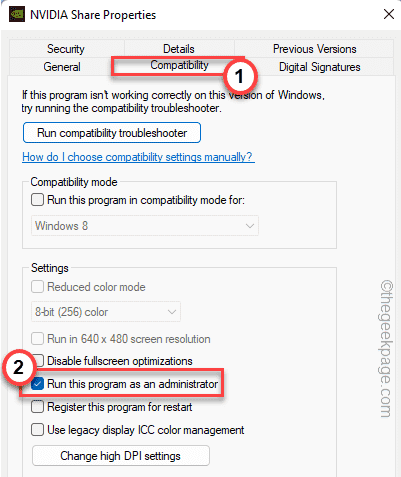
3. After that, right-click on the “NVIDIA Share” app and tap on “Properties“.
4. Then, tap on the “Compatibility” tab.
5. After that, check the “Run this program as an administrator” box.
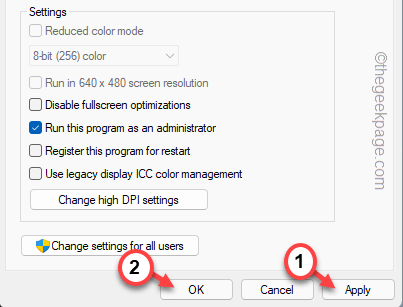
6. Finally, when you are done, tap on “Apply” and “OK” to save these changes.
After doing this, minimize the File Explorer.
Step 2
1. Now, right-click on the Windows icon and tap on “Task Manager“.
2. When the Task Manager opens up, look for all the NVIDIA-related processes.
3. Now, tap on the first NVIDIA process in the list and tap on “End task” to kill it.
4. Just like that, kill all the NVIDIA-related processes in the Task Manager window.
After that, close Task Manager.
Now, wait for a minute before you proceed to the next step.
Step 3
1. Now, maximize the File Explorer window again.
2. You will find the “NVIDIA Share” app in the folder.
3. Now, right-tap on it and tap on “Run as administrator”.
This will launch the NVIDIA Share app in the background. Again wait for a whole minute to make sure the Share app has started.
Then, reboot your system. Do NOT SHUT DOWN the system.
It will be fruitless if you shut down your machine instead of restarting it.
4. After restarting the system, open the File Explorer.
5. Then, go to this location –
C:/Program Files (x86)/NVIDIA Corporation/NVIDIA GeForce Experience
6. Now, right-click on the “NVIDIA Share” app once more and tap on “Run as administrator“.
When you are done, run the GeForce Experience app. Now, you can use the in-game overlay and share feature once again.
Fix 2 – Run the nvspcaps64.exe directly
There is another quick resolution of this issue where you have to directly run the nvspcaps64 app as an administrator.
1. At first, open the File Explorer.
2. Then, navigate to this section on your system –
C:/Program Files/NVIDIA Corporation/Shadowplay
3. After that, tap on the “nvspcaps64” app and tap on “Properties“.
4. Then, click on the “Compatibility” tab.
5. After that, check the “Run this program as an administrator“.
6. Finally, tap on “Apply” and “OK” to complete the process.
Once you are done, close the File Explorer.
Launch the Geforce Experience and check you can use the Share feature or not.
Fix 3 – Update the driver
Sometimes updating the driver may fix your issue.
1. At first, launch the GeForce Experience app.
2. Then, go to the “DRIVERS” section.
3. After that, tap on “Download” to download the latest version of the driver.
Wait for a while as your system downloads the latest version of the driver.
4. Once it is done, tap on “Express installation“.
This will express install the driver. You just have to wait.
Once you are done, try to use the share feature again. It will work just fine.
Fix 4 – Uninstall and reinstall GeForce Experience
You have to uninstall and reinstall GeForce Experience.
1. At first, press the Windows key+R keys together.
2. Then, type “appwiz.cpl” and click on “OK” to open the Programs & Features window.
3. You will notice the list of installed apps on your system.
4. Now, right-click on the “GeForce Experience” app and tap on “Uninstall“.
Now, just follow the on-screen instructions to complete the uninstallation process.
After that, close the Programs & Features window.
5. Then, go to the NVIDIA official website.
6. Once it opens up, tap on “Download” to download the latest version of the app.
Allow a little while to complete the downloading process.
7. After downloading the setup file, double click on the “Geforce_Experience” to run it.
Just follow the on-screen instructions to complete the installation process.
After installing the latest version of the GeForce Experience app, you may have to restart the system.
After restarting, you can easily use the share feature from the GeForce Experience.


