If you are seeing an error message on your computer, saying “Your PC will automatically restart in one minute, Windows ran into a problem and needs to restart, You should close this message now and save your work.“, there is no need to worry. Sometimes, this message is shown to the users to complete the usual Windows Update process (as it requires a reboot of your computer to complete the upgradation process). But, if this message is shown to you repeatedly and your computer keeps rebooting continuously in an one minute reboot loop, then you should be concern about the problem. Attempt these solutions on your computer and your problem will be solved in no time. But, before moving ahead to the main solutions, we suggest you to go through these workarounds to try out some simpler solutions for your problem.
Workarounds–
1. Reboot your computer manually. If the problem was caused by any temporary files, the problem should be solved by a simple reboot.
2. Disable the antivirus and firewall on your computer temporarily. Reboot your computer and after rebooting check if your computer is still restarting in one minute loop.
If any of these workarounds didn’t work out for you, go for these following solutions-
Fix-1 Clean Boot your computer-
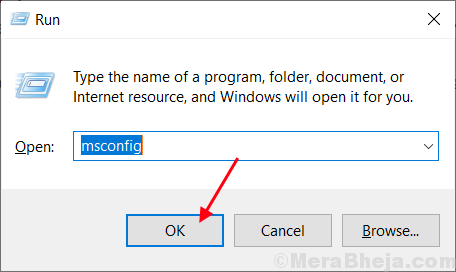
1. Press Windows Key+R to launch Run. Type “msconfig” in Run and click on “OK“. System Configuration window will be opened.

2.Now, in the System Configuration window, go to the “General” tab and then uncheck the box beside the “Load startup items“. Make sure the “Load system services” option is checked.

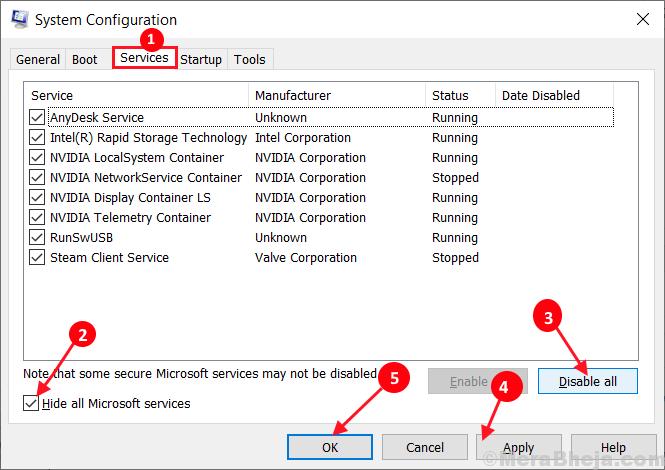
3.Now, click on the “Services” tab. Then check the “Hide all Microsoft services” option. Click on the “Disable all” . Now, click on “Apply” and “OK” to save the changes on your computer.

4. Reboot your computer, it will be booted in clean mode.
In clean mode your problem should be solved. Otherwise, go for the next solution.
Fix-2 Check for Windows Update-
1. Press Windows key+I to open Settings. Now, scroll down and click on “Update & Security“.

2. Now, under Update & Security settings, click on “Windows Update” on the left pane. Now, check the status of update procedure-
a. If you see the Windows Updates are being downloaded- let the Windows download the updates and install them on your device.
b. If you see the Updates are installed- There is a chance you opted for the “Restart outside of the active hours“. Restart your computer and complete the upgrade process.
c. If you see no updates are being downloaded- Click on “Check for Updates” on the right side of the Settings window.

After updating, check if you are still facing the restart in one-minute loop problem on your device.
Fix-3 Run System File Checker and DISM tool –
1. Press Windows key+R to launch Run, and then type “cmd” and then press Ctrl+Shift+Enter. Now, click on “Yes” to grant access to the User Account Control (UAC). Command Prompt window will be opened with Administrative rights.

2. Now, copy and paste this command in Command Prompt window, and then hit Enter to execute it.
Sfc /scannow

Now, if the above command cause any error on your computer, copy and paste this command and hit Enter to execute it.
sfc /scannow /offbootdir=c:\ /offwindir=c:\windows

Wait for a while as the SFC scan may take a while to complete.
Once the process is complete, reboot your computer.
3. Now, again press Windows key+R to launch Run, and then type “cmd” and then press Ctrl+Shift+Enter. Now, click on “Yes” to grant access to the User Account Control (UAC) to open Command Prompt window with Administrative rights.

4. Now, in Command Prompt window, copy and paste these commands one by one in Command Prompt and then hit Enter after each of them to execute them.
Dism /Online /Cleanup-Image /CheckHealth
Dism /Online /Cleanup-Image /ScanHealth
Dism /Online /Cleanup-Image /RestoreHealth

Wait for a while as DISM process may take a while.
Reboot your computer to complete the process. After rebooting, your problem regarding restart in one-minute loop problem should be solved.
Fix-4 Clean the Software Distribution folder-
Software Distribution folder usually contains the files which are required for Windows 10 Update. If some files in Software Distribution folder are corrupted or damaged, you may face this issue of ‘one-minute restart loop’ on your device. Emptying it may solve your problem-
1. Press Windows key +R to launch Run, and type “cmd” and hit Ctrl+Shift+Enter. Click on “Yes” if you are prompted by User Account Control. Command Prompt window will be opened with Administrative rights.

2. Now, copy and paste these commands one by one in Command Prompt window, and press Enter after each command to execute them. This will temporarily stall the necessary components of Windows Update service. Minimize the Command Prompt window.
net stop wuauserv
net stop cryptSvc
net stop bits
net stop msiserver

3. Press Windows key+R to launch Run, and then copy-paste this line and hit Enter. Download folder will be opened in File Explorer window.
C:\Windows\SoftwareDistribution\Download
Note- Replace “C:” with the drive letter of your Windows installation drive.

4. Now, press Ctrl+A to select all the folders and press “Delete” to empty the SoftwareDistribution folder. Close File Explorer window.

5. Maximize the Command Prompt window. Now, you have to start the necessary Windows Update services again. In order to do so copy and paste these following commands one by one in Command Prompt window and hit Enter after each command to execute them-
net start wuauserv
net start cryptSvc
net start bits
net start msiserver

Now, reboot your computer. After rebooting, your problem should be solved.
Fix- 5 Run System Restore-
Running System Restore from a former restore point can solve this issue for you.
NOTE–
Running System Restore on your computer will set your device back to an old date. In simpler sense, some of the files/ folders, settings which you might have changed recently will be missing on your devise after the system is restored. So, take a backup of the important things and store it in an external drive. After the restoration process, you can just copy-paste them back to their original location.
1. Press Windows Key+R and type “sysdm.cpl“, and hit Enter.

2. Go to “System Protection” tab and then click on “System Restore” . Then click on “Choose a different restore point” option. Now, click on “Next“.

3. In the System Restore window, click on the System Restore point of your choice ( Choose the most recent one ). Now, click on the “Next” option.

6. Now, click on “Finish” to initialize the restoration process.

Now, your system will be restarted and the restoration process will kick in. You may have to wait for a while as this process will take some time. As your system reboots, check if the computer is still restarting in one minute loop.
Fix-6 Attempt Automatic Repair-
To try this fix on your device, you will need a bootable installation media (or the original Windows 10 DVD from which you had installed the Windows 10 on your device). If you don’t have one, you have to create a bootable installation media. After you have created the bootable installation media for your device, go for this fix-
1. Now, insert the installation media you have created (or the Windows 10 installation DVD). Now, restart your computer.
2. Now, when you are prompted with “Press any key to boot from CD or DVD“, just hit a key to reboot your computer from the DVD/ installation media.
3. Set your language preferences and click on “Next“.

4. Now, click on “Repair your computer” on the bottom left corner of the screen. Windows Recovery Enviroment (RE) will be started.

5. In the Windows Recovery Environment, click on “Troubleshoot” to start the troubleshooting process.

6. In Troubleshoot window, click on “Advanced options“.

7. Now, in the Advanced Options window, click on “Automatic Repair” to start the Automatic Repair process.
Reboot your computer and your problem should be solved.
If you encounter any problem stating that, “Automatic Repair couldn’t repair your PC” then you follow this guide to solve your issue.
Fix-7 Reset or Refresh your computer with Windows RE-
Resetting or refreshing your computer is the last option which will solve your problem definitely.
Start the Windows Recovery Environment following step 1 to 4 from the previous fix (Fix-6).
1. In the Windows Recovery Environment, click on “Troubleshoot” to start the troubleshooting process.

1. Click on “Troubleshoot” and click on “Reset this PC“.

2. Now, you will have two options-
a. Refresh your PC– Refreshing your PC will make sure that all the personal files on your computer is kept secure.
b. Reset your PC– Resetting your PC will remove all of your files and settings of your computer completely.
Choose any of these options according to your choice.

3. Follow the on-screen instructions to complete the process of refreshing or resetting your computer.
Your computer will be reset/ refreshed and after rebooting your problem should be solved.
Fix-8 Reset your PC without Windows RE-
NOTE-
You should create a backup of the Windows 10 installation drive. Resetting that drive will remove every files from that drive. So create a backup of the important files and store it in another location.
1. Press Windows key+I to open Settings. Now, scroll down and click on “Update & Security“.

2. Now, under Update & Security settings, click on “Recovery” on the left pane. In the right pane, under Recovery option, in “Reset this PC“, click on “Get started“.

3. In Rest this PC window, choose “Keep my files” option.

4. Insert the Windows 10 installation drive.
5. Now, in the next window, choose “Only the drive where Windows is installed” and then click on “Just remove my files” in the next window.
6. Click on “Reset” to start the resetting process. Follow the on-screen instructions to reset your device.