Some Windows 10 users are complaining about a fatal error which is causing BSOD (Blue Screen of Death) error on their computer and restarting their devices. According to them, their computer is suddenly stalling with a blue screen and an error message is shown to them, stating, “Your PC ran into a problem and needs to restart… error: CRITICAL_STRUCTURE_CORRUPTION“. This problem usually happens when an existing hardware goes out of order, or when an existing driver tweaks the kernel data. If you are witnessing the same situation at your end, there is no need to worry. Just follow these fixes minutely and your problem will solved in no time.But before going ahead for the main solutions, follow these workarounds initially to try out some simpler solution to your problem.
Workarounds–
1. If this problem is happening for the first time on your device, a manual reboot may solve your problem.
2. Check if Windows is updated or not. Many driver updates are rolled out to the users with Windows Updates. If your Windows is not updated, wait for the Windows to download the updates and install them on your computer. Reboot your computer to complete the process.
3. Eject any unnecessary peripherals (external drives, extra speakers ) from your computer. After ejecting them out from your computer, restart your computer.
4 Check your power connection (mainly the PSU) for any fault.
If these workarounds didn’t work out for you, attempt these solutions.
But before moving ahead for the solutions, it is better to create a System Restore point on your computer. If anything goes wrong, you can restore the previous state of your computer from the restore point.
Fix-1 Clean boot your computer-
Clean booting your computer ensures that the computer will be booted only with the necessary drivers. Follow these steps to clean boot your computer.
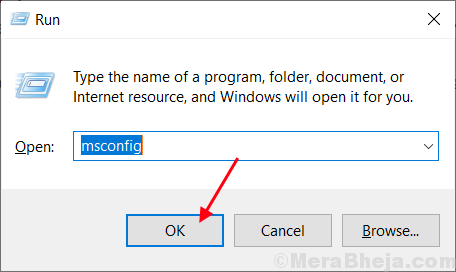
1. Press Windows Key+R to launch Run. Type “msconfig” in Run and click on “OK“. System Configuration window will be opened.

2.Now, in the System Configuration window, go to the “General” tab and then uncheck the box beside the “Load startup items“. Make sure the “Load system services” option is checked.

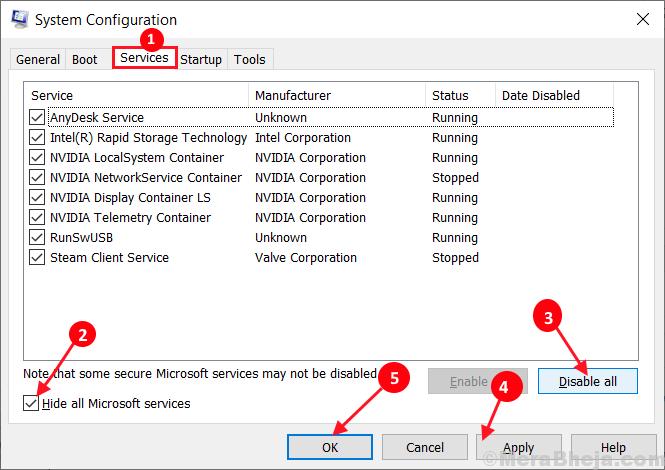
3.Now, go to the “Services” tab. Next, check the “Hide all Microsoft services” option. Click on the “Disable all” . Now, click on “Apply” and “OK” to save the changes on your computer.

4. Reboot your computer, it will be booted in clean mode.
In clean boot mode, the problem should be solved.
Fix-2 Uninstall the display driver-
Uninstalling display driver and then rebooting their computer has solved this issue for many Windows 10 users.
1. Press Windows key+X and then click on “Device Manager” in the elevated window to open Device Manager window.

2. Now, in the Device Manager window, find “Display adapters” from the list, click on it to expand it. Now, from the drop-down right click on the graphics driver you are using, click on “Uninstall device“.

3. Now, after the uninstallation process is complete, close the Device Manager window.
Reboot your device to save the changes. As the computer reboots, the display driver should re-installed. Your problem should be solved.
Fix-3 Uninstall few programs-
Some Windows users are claiming to solve their problem just by uninstalling few programs from their system. We have given a list of programs, uninstall them from your computer and you problem may be solved.
1. Press Windows key+R to launch Run and then type “appwiz.cpl” and then hit Enter. Programs and Features window will be opened.

2. In Programs and Features window, scroll through the list of installed applications and then try to find any of the below-mentioned applications, and double click on each of the applications to uninstall them one by one.
List of applications-
Intel Hardware Accelerated Execution Manager
Alcohol 120%
Android Emulator
Bluestacks
Virtualbox
Deamon Tools

Uninstallation process may take a while depending on the application size and type.
3. After uninstalling the applications, close Program and Features window. Reboot your computer to save the changes on your system.
After rebooting, your issue should be solved.
Fix-4 Run SFC scan on your computer-
SFC (System File Checker) tool will scan your computer for any system error due to corrupted files and will try to fix them with the cached copy of that file. This may solve your issue-
1. Click on search box beside Windows icon, and type “cmd” and then right click on “Command Prompt” and then click on “Run as administrator“. Now, click on “Yes” to grant access to the User Account Control (UAC). Command Prompt window will be opened with Administrative rights.

2. Now, copy and paste this command in Command Prompt window, and then hit Enter to execute it.
sfc /scannow

Now, if the above command cause any error on your computer, copy and paste this command and hit Enter to execute it.
sfc /scannow /offbootdir=c:\ /offwindir=c:\windows

Wait for a while as the SFC scan may take a while to complete.
Once the process is complete, restart your computer.
3. Now, again press Windows key+R to launch Run, and then type “cmd” and then press Ctrl+Shift+Enter. Now, click on “Yes” to grant access to the User Account Control (UAC) to open Command Prompt window with Administrative rights.

4. Now, in Command Prompt window, copy and paste these commands one by one in Command Prompt and then hit Enter after each of them to execute them.
Dism /Online /Cleanup-Image /CheckHealth
Dism /Online /Cleanup-Image /ScanHealth
Dism /Online /Cleanup-Image /RestoreHealth

Wait for a while as DISM process may take a while.
Reboot your computer to complete the process. After rebooting check if the problem is still bothering you or not.
Fix-5 Check your hard disk for errors-
Faults in the hard disk can lead you to this error. Check your hard disk just by running a command from Command Prompt window.
1. Press Windows Key+R to launch Run. Type “cmd” and press Ctrl+Shift+Enter. Click on “Yes” to grant access to the User Account Control. This will open Command prompt with Administrative rights.

2. Type “CHKDSK /r C:” in Command Prompt window and and hit Enter. Press “Y“. The disk checkup will be done at the time of next reboot of your computer.
Note- Replace “C:” with the drive letter of Windows installation directory.

Wait for a while as this process may take while to be complete.
Close Command Prompt window. Reboot your computer. After rebooting, check if you are still facing the same problem on your computer.
Fix-6 Run Windows Memory Diagnostic tool-
CRITICAL_STRUCTURE_CORRUPTION can be caused due to a corrupted memory problem on your computer. Run Windows Memory Diagnostic tool to analyze the faults during reboot-
1. Press Windows key+R to launch Run, and then type “mdsched.exe” and hit Enter. Windows Memory Diagnostic tool will be opened.

2. In Windows Memory Diagnostic window, click on “Restart now and check for problems (recommended)“.

Your computer will be restarted and at the time of booting up, Windows Memory Diagnostic tool will check for any errors in the memory and will fix it.
Fix- 6 Check Event Viewer log –
Even Viewer Log is the application which logs the faults and failure in your computer time to time. Giving it a close look, you can identify the problem-
1. Press Windows key+R to launch Run, and then type “eventvwr. msc” and hit Enter. Event Viewer Log window will be opened.

2. In Event Viewer Log window, on the left pane “Windows Logs” to expand it. Click on “System“. Now, wait for a while as the computer updates the error log in the right pane under System settings.

3. In the System window, look for any error which can cause “CRITICAL_STRUCTURE_CORRUPTION” error on your computer. Also check the list of the programs which were running before the system crashed.
Many of the users have complained about these type of 3rd party softwares which have caused this problem for them-
Antivirus softwares
Virtual Drive softwares
Automatic Driver Updaters
GPU and CPU over-clocking applications.
4. Uninstall the 3rd party programs which were running just before the BSOD error happened on your computer. (Follow the Fix-3).
Reboot your computer after uninstallation process is complete. After rebooting your issue with the “CRITICAL_STRUCTURE_CORRUPTION” error should be solved.
Fix-7 Run Driver Verifier on your computer-
Driver Verifier can identify and fix any driver issues on your computer, which is causing the BSOD error.
Before moving ahead, you need to enable minidump (DMP) file. Follow these steps to enable them-
1. Press Windows key+R to launch Run, and then type “sysdm.cpl” and hit Enter.System Properties window will be opened.

2. In System Properties window, go to the “Advanced” tab. Under, Startup and Recovery option, click on “Settings“.

3. In Startup and Recovery window, uncheck the “Automatically restart” option and then under ‘Write debugging information‘ section, click on drop-down “Small memory dump (256 KB)” option.
Now, copy and paste “%SystemRoot%\Minidump” in ‘Small dump directory:‘ section. Now, click on “OK” to save the changes.

4. Restart your computer.
After rebooting your computer, Run Driver Verifier on your computer and your problem should be the solved.