Some Windows 10 & 11 users are reporting about a problem they are facing during the installation of .NET Framework 3.5 in their computers. The installation is failing on their computers, stating an error message saying, “Windows couldn’t complete the requested changes“. If you are facing the same issue on your computer, don’t worry. This problem may be happening because of some corrupted files on your computer. Attempt these easy fixes on your computer to solve the problem. But, before that, don’t forget to go through these workarounds to solve your problem with minimal efforts.
Workarounds–
1. Try rebooting your computer and check the internet connection of your computer. After rebooting, try to install the feature again.
2. Make sure your Windows is up to date. If any Windows Update is pending, install the update and after installing the update, reboot your computer and try to install the feature again.
If any of these initial workarounds haven’t worked out for you, go for these fixes-
Fix-1 Enable .NET Framework 3.5-
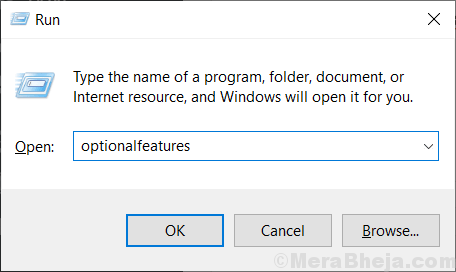
1. Now, press Windows key+R to launch Run and type “optionalfeatures” and hit Enter.
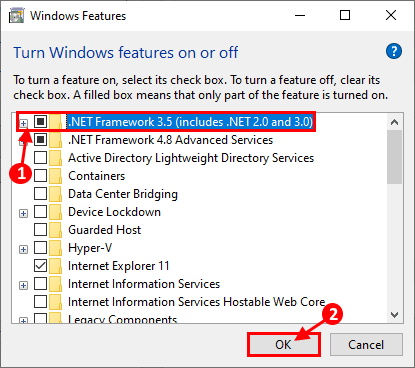
Windows Features window will be opened.

2. Now, in the Windows Feature window, click on “.NET Framework 3.5 (includes .NET 2.0 and 3.0)” and then click on “OK“.

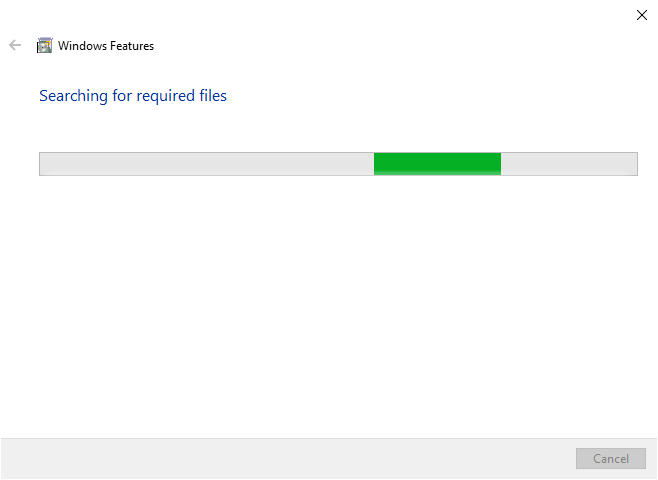
3. Windows will download the .NET Framework on your computer, and install it. Restart your computer to save the changes.

If you still face the same message go for the next fix.
Fix-2 Clean Boot your computer
1. Press Windows key and type “System Configuration“.
2. In the search result, click on the “System Configuration“.

3. Click on “General” tab and then uncheck the box beside the “Load startup items“.
4. Then, make sure the “Load system services” is checked.

5. Now, click on the “Services” tab.
6. After that, check the “Hide all Microsoft services” and then click on the “Disable all“.
7. Finally, click on “Apply” and then on “OK” will save the changes on your computer.

Reboot your computer, it will be booted in clean mode.
Further, install the .NET Framework on your computer. If you still face any error go for the next fix.
Fix 3 Use Registry Editor-
1. Press the Windows key and the ‘R‘ key. This will open the Run terminal.
2. Write “regedit” in the Run window and then click on “OK“.

NOTE–
In the Registry Editor window, click on “File” and then you have to click on “Export“. Save the exported registry to a favorable location of your choice to take backup.
If anything goes wrong you can just “Import” it to your original Registry directory.

2. Now, on the left pane of the registry window, navigate to this location-
Computer\HKEY_LOCAL_MACHINE\SOFTWARE\Policies\Microsoft\Windows\WindowsUpdate\AU
Find out the “UseWUServer” on the right pane of “AU“. Double click on it.

[If you don’t find “UseWUServer” on the right pane, right click on the empty space, and then click on “New>DWORD (32-bit) Value“. Rename the value as “UseWUServer“.]

3. Now, change the value data to “0” and then click on “OK” to save the changes on your computer.

Reboot your computer.
After rebooting, try installing the feature on your computer.
Fix-5 Install .NET Framework from Windows 10 Installation Media-
[NOTE– For trying this fix on your device, you need a bootable installation media (or the Windows 10 DVD from which you had installed Windows 10). If you don’t have one, you have to create a bootable installation media. After you have created the bootable installation media for your device, go ahead for this fix.]
1. Press Windows Key+E to open File Explorer.
Go to the Local Disk (C:) and create a folder named “Temp“.

2. Mount the bootable installation media (or your Windows 10 installation DVD).
3. Now, browse to the installation disk and copy the “SxS” folder.
4. Paste the folder in the Temp of your C drive you created a while ago.

5. Press Windows Key+R to launch Run and type “Powershell” and Ctrl+Shift+Enter. Powershell will be opened with Administrative Rights.

6. Now, copy and paste this command in Powershell hit Enter.
dism.exe /online /enable-feature /featurename:NetFX3 /All /Source:c:\temp\sxs /LimitAccess

7. Wait for few minutes. You should see “The operation completed successfully” message on the Powershell window.
Reboot your computer and check if your problem still persists or not.
Fix- 6 Use .NET Framework Repair Tool-
1. Download the .NET Framework Repair Tool.
2. Now, double click on “netfxrepairtool” and accept the agreement.

3. It will detect any kind of issues with .NET Framework.

4. Now, click on “Next” to make the changes on your computer.

Reboot your computer.
The problem with .NET Framework installation should be solved.
Fix-7 Use Local Group Policy Editor-
[NOTE– This fix will not work on Windows 10 HOME. This fix will only work for you if you are using a Windows 10 PRO]
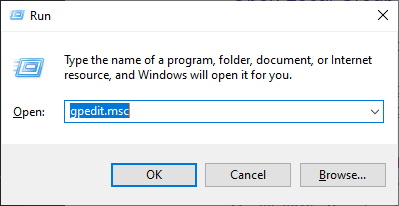
1. Press Windows key+R to launch Run, and type “gpedit.msc” and hit Enter.

2. Now, on the left pane, navigate to this location-
Computer Configuration > Administrative Templates > System
Now, double click on “Specify settings for optional component installation and component repair“.

3. Now, click on “Enabled” and click on “Apply” and “OK“.

Reboot your computer.
After rebooting, you should be able to install the.NET Framework on your computer without any further error.
Fix-8 Try Windows 10 Update troubleshooter-
1. Press Windows key+S and then type “Troubleshoot settings“.
2. Click on the “Troubleshoot settings“.

3. Now, on the right side of your Settings window, scroll down to find Get up and running. Click on “Windows Update“.
4. Then, click on “Run the troubleshooter“.

3. Follow the on-screen instructions and let the Windows Update Troubleshooter complete the process.
Reboot your computer.
After rebooting your computer, try to install .NET Framework again.
Fix-9 Use .NET Framework Cleanup Tool-
If any of these above-mentioned solutions didn’t work out for you, you can try these .NET Framework Cleanup Tool.
1. Download .NET Framework Cleanup Tool. A zip file will be downloaded. Extract the folder to a favorable location.
2. Double click on “cleanup_tool” to run the application.

3. In the .NET Framework Setup Cleanup Utility window, click on “Cleanup Now“.

Wait for a while till you it cleans all of the .NET Framework versions from your computer.
Now, install the specific .NET Framework version on your computer. You should be able to install .NET Framework without any further error.