While installing Windows 11 on your old system, you may have seen this error message “Windows cannot be installed to this disk. The selected disk is of the GPT partition style.” This is a case of partition-style and motherboard firmware types. Enact these solutions in the middle of the installation process, and convert the hard disk to a distinct partition style.
NOTE –
There are two distinct partition styles. Like MBR and GPT partition styles, there are two BIOS types – UEFI and Legacy BIOS modes. Now, both these partitions and BIOS enjoy compatibility with only one style of BIOS.
UEFI → GPT
Legacy BIOS → MBR
So, you have to end the compatibility issue yourself by either converting the MBR to GPT partition or using Legacy/ UEFI mode. MBR is kind of old and supports only up to 2 TB storage. So, you should use GPT. But, only Windows 8 and later supports GPT. Consider your specific requirements and then use the solutions accordingly.
Fix 1 – Convert the GPT partition
You have to convert your existing MBR partition to a GPT one. You can even do it within the Windows installer itself.
Step 1 – Boot from CD/DVD
1. At first, switch off the system.
2. Now, plug in the Windows 11 installation disk/ bootable USB drive in your system.
3. Now, just restart the computer.
4. When your system is starting back up, keep pressing the boot key* to access the BIOS setup.
*Boot key may change system to system. So, carefully notice which key is allotted to your system. It can be any one of these keys –
F2, Del, F12, F1, F9, F2, Esc

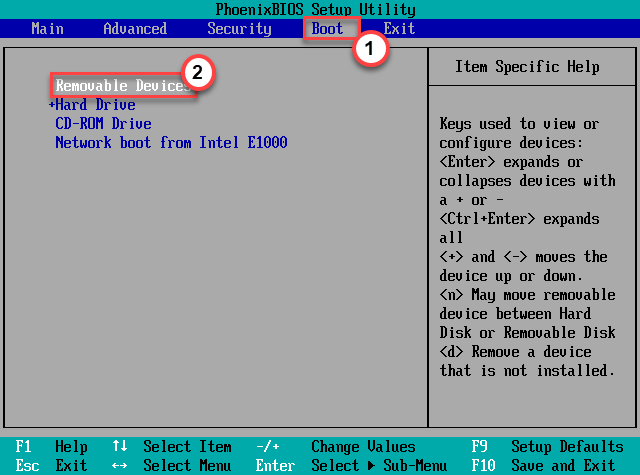
5. Once Booting Menu opens up, go to the “Boot” section.
6. This will open up the booting order on the screen.
Now, if you are using a USB device, select the “Removable devices” option and hit Enter to directly boot using the device.
Otherwise, if you are using a DVD for the installation, you have to select the “CD-ROM Drive” and hit the Enter button.
Let your computer boot up the OOBE on your system.
Step 2 – Convert the partition
Now, you can easily convert the MBR partition to GPT.
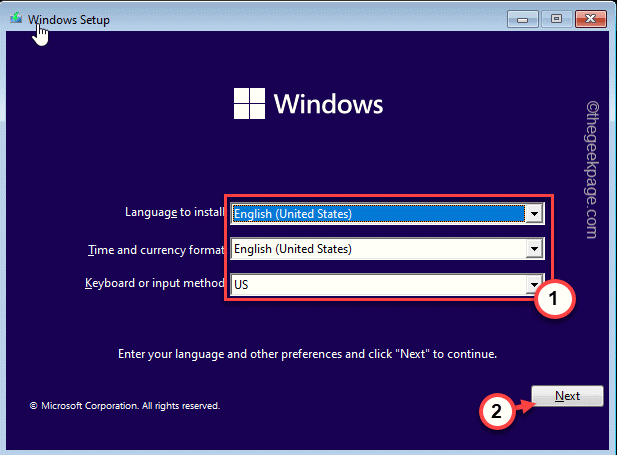
1. Once the system boots up using the installation media, select your keyboard and language and tap “Next“.
2. Now, on the installation page, press the Shift+F10 keys together to open the terminal.
3. When the terminal opens up, type these codes one-by-one and press the Enter key to access the Diskpart tool and enlist the drives on your system.
diskpart
list disk
4. Now, you have to select the disk where you are trying to install it. To do that, execute this code*.
select disk drive number
Replace the “drive number” with the number that you have noted before.
Example – The disk is “Disk 0“. So, the code is –
select disk 0
5. Now it is time to clean any residual files created by the unsuccessful installation.
Just execute this code –
clean
This will clean the drive completely.
6. Finally, you can convert this disk into GPT style. Just input this code in the terminal and hit Enter.
convert GPT
7. Once you are done converting the drive into a GPT partition, type “exit” on the screen and hit Enter to exit the console.
8. Next to the installation page, tap “Install Now” to install Windows on your system.
Now, this time Windows will be installed successfully on your computer.
Fix 2 – Change the Boot Mode
As we have mentioned, you can either convert the disk into another partition type or you can opt for another boot mode.
1. You have to make sure the computer is switched off.
2. Turn on the system. Now, while the system is booting up
When the computer is booting up, press the “Delete“* key from your keyboard to open the bios setup on your computer.
* NOTE– Generally this key varies from manufacturer to manufacturer. These are the variety of keys-
Esc, F1, F2, F10, F11, F12 or Delete

3. When the BIOS setup opens up, go to the “Boot” tab by arrow key.
4. After that, navigate to the “Boot List Option” using the keyboard and then press Enter.

5. Then, choose “Legacy” from the list and then hit Enter to select “UEFI” mode.
6. Now, press “F10” to save the settings on your computer.

This will load your computer in UEFI mode where you can easily install the new Windows.
Check whether you can install Windows on your system or not. This should have solved your problem.

