If your Windows 10 is continuously freezing or rebooting on its own, that is not a matter to neglect. If you are experiencing this problem on a continuous basis, then there is a high chance that one of the essential hardware has gone out of order. For majority of the users, the hardware has given up due to prolong usage and that is the reason they are facing this debacle. So, in this article we are going to discuss about various tests and fixes for various components of your computer. But, before going ahead, attempt these workarounds on your computer to try out some simpler solutions for the problem.
NOTE-
Before trying these solutions, if your computer still is in the warranty period, we strongly suggests that you to go the authorized service center of the provider. In majority of the cases, opening the cabinet on your computer will lead to breach of warranty of your device. Attempting some of these fixes is going to void the warranty.
Workarounds–
1. Check the power connection on your computer. Further check the Power Supply Unit (PSU) for any loose connection.
2. If you haven’t cleaned the dust in a while, you should consult a professional to clear the dust settled on the CPU, GPU fans, motherboard, RAM slots, vents etc. After clearing the dusts check if you are still facing the freezing or automatic restarts on your computer.
3. Check if there is any Windows Update is pending or not. If there are any updates pending, install them on your computer.
4. Disable the Firewall and Antivirus on your computer. Check if there is any improvement of your situation.
Go for these fixes at first, if your problem still continues to bother you then attempt these tests on your hardware to check which of the hardware is causing this problem-
Fix-1 Clean boot your device-
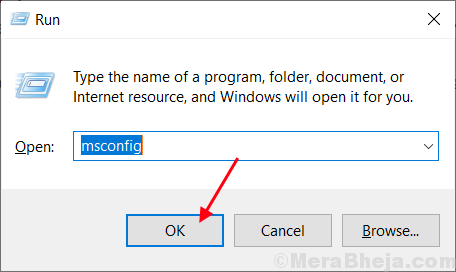
1. Press Windows Key+R to launch Run. Now, type “msconfig” and then click on “OK“. System Configuration will be opened.

2. Now, click on “General” tab and then uncheck the box beside the “Load startup items“. After that, make sure the “Load system services” is checked.

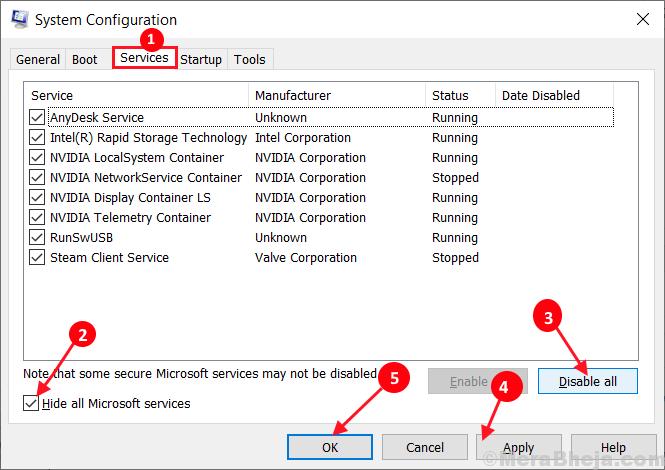
3.Now, click on the “Services” tab. After that, check the “Hide all Microsoft services” and then click on”Disable all” on System Configuration window. Now, click on “Apply” and “OK” to save the changes.

4. Reboot your computer, it will be booted in clean mode.
Fix-2 Disable Automatic Restart-
Disable automatic restart which is a part of Windows 10 itself. To disable automatic restart feature on your device follow these easy steps-
1. Press Windows Key+R to launch Run, and copy-paste this command and hit Enter. System Properties window will be opened.
sysdm.cpl SystemProperties

2. In System Properties window, under the section Startup and Recovery click on “Settings…“.

3. Now in Startup and Recovery window, uncheck “Automatically restart” and click on “OK“. Now, click on “Apply” and “OK” to save the changes in the System Properties.

Restart your computer and after rebooting check if your computer is automatically restarting or freezing.
Fix-3 Run Sfc and Chkdsk through Command Prompt-
1.. Press Windows Key+R. Type “cmd” and press “Ctrl+Shift+Enter“. This will open Command prompt with Administrative rights.

2. In Command Prompt window, type ” sfc /scannow” and hit Enter. This process will take some time.

Wait till the process is complete.
3. Type “sfc /scannow /offbootdir=c:\ /offwindir=c:\windows” and hit Enter.
[Replace “C:” with the drive letter of the Windows installation drive on your copmputer]

Wait till the process is completed.
4. Type “CHKDSK /f /r” and hit Enter. Press “Y” and hit Enter. The disk checkup will be done when your computer restarts again.

After rebooting your computer, check if your computer is still restarting or freezing.
Test-1 : Test your Ram-
If your Windows 10 is continuously rebooting, then there probability of a faulty ram is very much higher. Testing your Ram can make sure if there is any problem with the ram or not-
Use Windows Memory Diagnostic tool-
Follow these easy steps to check for errors with Windows Memory Diagnostic tool.
1. Copy and paste this in the search box just beside the Windows icon, and hit Enter.
mdsched.exe
![]()
2. In Windows Memory Diagnostic window, click on “Restart now and check for problems (recommended)“.

Your computer will be rebooted and at the time of booting up Windows Memory Diagnostic tool will check for any errors in the memory and will fix it.
In the next test your are going to use MemTest86+ to test the memory on your computer.
Use Memtest86+ –
Memtest86+ is a memory testing tool which scans your device memory at the time of booting up. Just follow these steps to check if your memory is corrupted or not-
1. Insert a flash drive (You should make a backup of the files present on the USB drive).
2. Now, Download the Memtest86 tool. After downloading extract the “memtest86+-5.01.usb.installer” zip file in a favorable location of your choice.
3.Now,double click on “Memtest86+ USB Installer” to launch it. After Memtest86+ is launched, click on “I agree” in the Memtest86+ 5.01 USB Installer window.

4. Now, choose the USB flash drive by clicking on the drop down in the option USB Flash Drive. Don’t forget to check the box “We will format F:/ as Fat32” and then click on “Create“.

6. Now, click on “Next” to finalize the installation of boot files in USB device. Keep the USB plugged in.

5. Now, reboot your computer and at the time of restarting, set your boot preference to USB drive (where you have Memtest86+ burnt to).

6. Then at the time of booting your computer Memtest86+ will start to analyze the memory of your device. Do not restart or switch off your device during the test.
Now, if your memory clears all the tests, then your Memory is working fine. But, if your memory fails any of the tests, then your memory is bad/corrupted. You should replace the faulty memory on your system.
After rebooting check if you are still facing the same kind of error or not.
Tips-
1. It is possible that the slot in which memory was installed. Try changing the slot of memory on your computer.
Test-2 : Overheating issue of CPU-
Extreme Overheating of CPUs of your system for a prolong period of time take of huge toll on the lifetime of CPUs. Attempt these test on your computer to check the operating temperature of the CPUs-
Use HWMonitor PRO-
1. Download HWMONITOR-PRO and install it on your device.

2. Now, double click on “CPUID HWMonitorPro” to run it in your computer. Now, expand the processor name on your device and note down the readings of the CPU in “Temperature” section. Minimize the application.
3. Now, run a game or run a heavy application (which calls for huge amount of processor power). Minimize the game or application. Now, maximize the CPUID HWMonitorPro again. In the CPUID HWMonitorPro window, expand the processor name on your device and check the readings of the “Temperature” section.

If you notice huge amount of difference in the temperature readings then consider that there is a problem with the CPUs on your system. Visit the nearest authorized service center as soon as possible to have a look into it.
Test-3 Check the GPU for any fault-
Like CPUs on your computer, a faulty GPU can lead to the problem you are experiencing on your computer. This may happen due to an old or incompatible GPU driver installed on your system.
Use GPU-Z to test the temperature-
1. Download the GPU-Z on your computer.
2. Now, to install the GPU-Z on your computer, click on the downloaded “GPU-Z.2.28.exe“. Click on “Yes” to start the installation process.

3. Now, in TechPowerUp GPU-z Setup window, check “Create Desktop Shortcut” and then click on “Next“.

4. Now, set the installation directory of CPU-Z, and then click on ” Install” to start the installation process. After the installation is done, click on “Close” to complete the installation process.

5. After the installation of CPU-Z, CPU-Z should be started automatically. If it is not, open it from the desktop icon or Start menu.
6. In TechPowerUp GPU-z windows, go to “Advanced” tab, and then take a note of “Maximum” under “Temperature limit“. Minimize the application.

7. Now, run a heavy application (like a game or Video editing application). Minimize the application. Come back to the CPU-Z on your computer.
8. In CPU-Z window, go to “Sensors” tab, and then note down the readings of “GPU temperature” and “GPU Load”.

Now, compare the temperature readings in general state and on close to 90% load. If you see that temperature is exceeded the maximum temperature you noted in Step-6, then there is a problem with the GPU which is causing the bottleneck. Our suggestion will be to visit a nearest service center and concern them about the GPU issue.