If you are facing ‘The Installation Failed in First Boot Phase Error’ when you are trying to install Windows 10 or trying to update your existing Windows, you are not alone. Many of Windows 10 users are reporting to face the same issue. If you are seeing this message on your computer, Windows installation on your computer will be stopped with a message “We couldn’t install Windows 10”. This problem is similar if you are facing these errors-
0x80070004 – 0x3000D
The installation failed in the FIRST_BOOT phase with an error during the MIGRATE_DATE operation.
0xC1900101 – 0x30018
The installation failed in the FIRST_BOOT phase with the error during the SYSPREP operation.
0xC1900101-0x30017
The installation failed in the FIRST_BOOT phase with an error during the BOOT operation.
These errors are generated due to a misconfigured registry on your computer or due to a shortage of space on your hard drive. You can solve these errors by following these fixes-
Make sure you create a restore point for your computer. In case anything goes wrong you can perform a system restore.
Fix 1 – Temporarily disable your Firewall
NOTE-
[THIS FIX IS FOR USERS WHO ARE USING A PRIVATE NETWORK]
Windows Firewall can be the cause of the error you are facing during the installation of Windows on your computer. You can disable the Windows Firewall by following these steps-
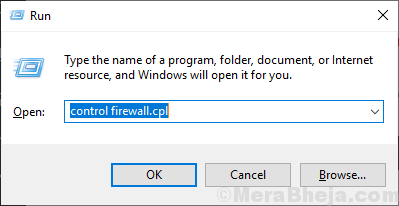
1. Press Windows key+ R to launch Run, and type “control firewall.cpl” and hit Enter.

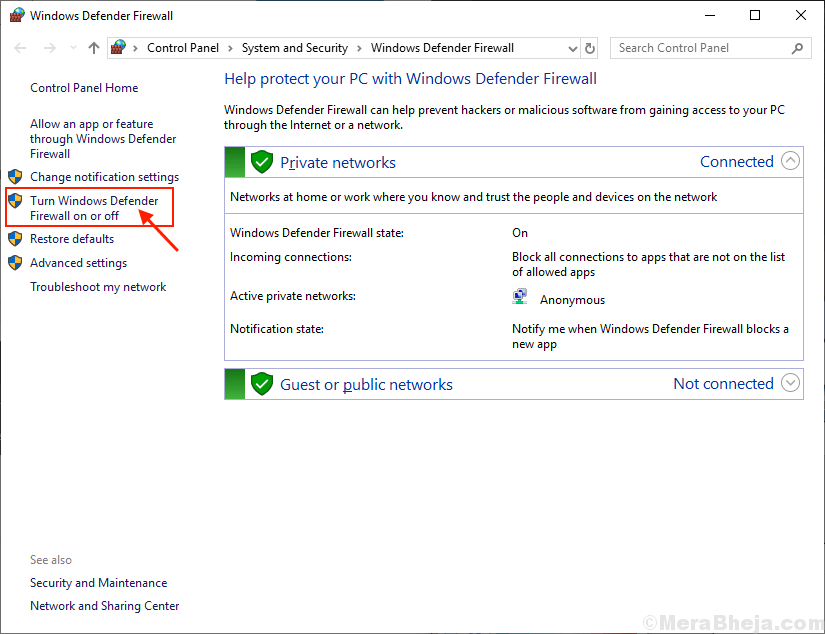
This will open firewall settings in Control Panel.
2. Now, in the control panel, in the left pane, click on “Turn Windows Defender Firewall on or off“.

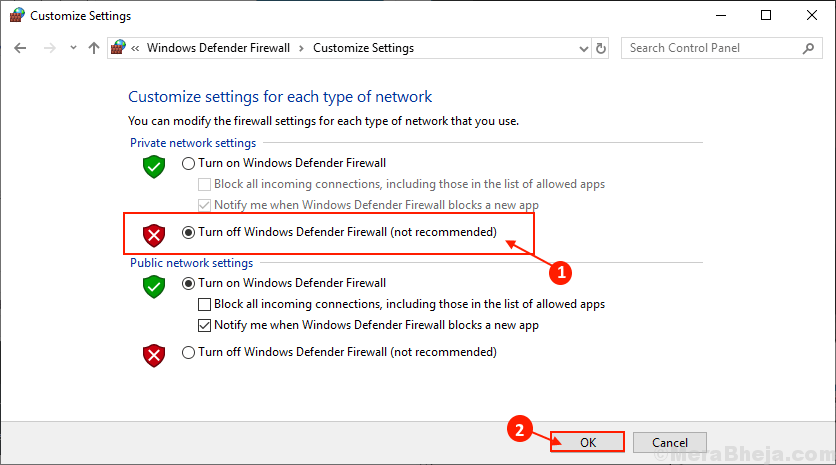
3. Now, under the Private network settings, click on “Turn off Windows Defender Firewall (not recommended)” and click on “OK” to turn your Firewall off.

Restart your computer and start the Windows installation process, check any of the above-mentioned errors are happening or not.
Also , disable any third party anti virus like malwarebytes etc. and try again.
If the error is still there then go for the next fix.
Fix-2 Disable Secure boot in BIOS
1. Shutdown your PC completely.
2. Now, start it with power button and start pressing BIOS key repeatedly to enter BIOS mode
Below are the BIOS keys for different Laptop manufacturers.

3. Locate the Secure boot option and disable it.

Its either in Boot Options, or at Authentication settings.
Fix-3 Check for Windows Update
This problem you are facing may be because some important update is pending on your computer. In order to check for Windows Updates, follow these next steps-
1. Press Windows key+I to open Settings on your computer.
2. Click on “Update & Security” settings.
3. On, the right pane, click on “Check for Updates“.

Windows will check for updates, and then it will download the update and let you choose a time to restart your computer to complete the update procedure.
Check if any of the errors are still there or not. If the error is still causing problems, go for the next fix.
Fix-4 Update your Windows in Clean Boot
Clean booting your computer ensures that your computer is booting with a minimal set of drivers and fewer startup programs. This can solve the problem with ‘The installation failed in first boot phase error’. In order to clean boot, your computer follow these steps-
1. You can open the Run window by pressing Windows key+R.
2. Then, type “msconfig” and then click on “OK“.

System Configuration will open.
3. At first, you have to go to the “General” tab and
4. Then, uncheck the box beside the “Load startup items“.
5. Make sure the “Load system services” is checked.

6. Then, go to the “Services” tab.
7. After that, check the “Hide all Microsoft services” and then click on the “Disable all” .
8. Finally, click on “Apply” and “OK“.

Reboot your computer, it will be booted in clean mode.
Try again and Check if the error is still happening or not. If the error is still there then go for the next fix.
Fix-5 Download and run Official Windows Update Troubleshooter
You can run Windows Update Troubleshooter from the official Microsoft forum, and it can troubleshoot your problem. In order to download and run Windows Update Troubleshooter follow these steps-
1. Download Windows Update Troubleshooter. Go to the download location and double click on “wu10” to open it.
![]()
2. Now, click on “Next” in the troubleshooter window.

3. Now, this process will take some time as Windows will detect any kind of problem with your pending Update.
4. Now, click on “Next” to apply the fix.

As you reboot your computer, Windows Update Troubleshooter will fix the issue.
Check if you are facing the same issue again or not. If the issue is still there, then go for the next fix.
Fix-6 Rename the Software Distribution Folder
You can rename the Software Distribution folder on your computer, and look if renaming it has worked for your problem. Follow these steps to rename the folder-
1. The first step to open the CMD terminal is to type “cmd” in the Search box.
2. Then, right-click on the “Command Prompt” in the search result and then choose “Run as administrator“.

2. Simply, copy and paste these commands in the terminal and then you need to press Enter after pasting each of them.
net stop wuauserv
net stop cryptSvc
net stop bits
net stop msiserver

3. Now, in order to rename the Software Distribution folder, just copy and paste these two commands and hit Enter after each command-
ren C:\Windows\SoftwareDistribution SoftwareDistribution.old ren C:\Windows\System32\catroot2 catroot2.old

4. Now, all it is left to start the stopped services again. Copy these commands in the Command Prompt and hit Enter to initiate the services again.
net start wuauserv
net start cryptSvc
net start bits
net start msiserver

Reboot your computer.
Try to update your Windows 10 again, if the error is still happening then go for the next fix.
Fix-7 Run System File Checker on your computer
System File Checker (SFC) is a tool that can detect and repair corrupted files of Windows installed on your computer. You can run SFC with following commands-
1. Press Windows Key+R to launch Run. Type “cmd” and press “Ctrl+Shift+Enter“. This will open Command prompt with Administrative rights.

2. Type this command and hit Enter. This will take some time.
sfc /scannow

Wait till the process is complete.
OR, If this fails on computer follow this step-
2.Type this command in command prompt and hit Enter.
sfc /scannow /offbootdir=c:\ /offwindir=c:\windows

Wait till the process is completed.
3. Now, in the command prompt window, type these commands and hit Enter after each command.
Dism /Online /Cleanup-Image /CheckHealth
Dism /Online /Cleanup-Image /ScanHealth
Dism /Online /Cleanup-Image /RestoreHealth

Wait for these commands to complete the checkup on your computer.
NOTE-
If these commands did not work out for you then repeat the step 3 with following commands-
Dism /Image:C:\offline /Cleanup-Image /RestoreHealth /Source:c:\test\mount\windows Dism /Online /Cleanup-Image /RestoreHealth /Source:c:\test\mount\windows /LimitAccess

Wait for the process to be completed.
Reboot your computer. Check if the problem with ‘The Installation failed in first boot phase error’.
Fix-8 Attempt a Registry Fix
It is possible that you are facing this error is triggered by a registry error. You can solve the problem with your registry by following these things-
1. Press Windows Key+R to launch Run. Type “regedit” and hit Enter.

2. Now, on the left pane of the registry window, navigate to this location-
Computer\HKEY_LOCAL_MACHINE\SOFTWARE\Microsoft\Windows\CurrentVersion\WindowsUpdate\
Now, click on “OSUpgrade“.
[NOTE- If you can’t find “OSUpgrade” then follow this step-
2(a). Click on Windows Update. Now, right click on an empty space. Click on “New” and click on “Key“. Name it “OSUpgrade“.

3. Now, select “OSUpgrade” and right click on any empty space on right pane. Click on “New“. Then, click on “DWORD (32-bit) Value“. Name the registry key as “AllowOSUpgrade”.

4. Double click on “AllowOSUpgrade” and change the ‘Value Data‘ to “1“.

Restart your computer.
Check if you are facing the issue at the time of upgrading the Windows or not. If the same issue still persists, go for the next fix.
Fix-9 Check your disk
If you are installing Windows in a drive with a low disk space, the installation process may fail. Always check the free disk space on your hard drive. There should be at least 30 GB free space available on your computer before installing Windows on your computer. To check disk space on your computer follow these easy steps-
1. Press Windows key+E to open File Explorer window. Now, on the left pane, click on “This PC” (OR, < the name of your computer>).

2. Now, Look at the drive you want to install/upgrade Windows 10. If the drive has at least 30 GB free space then, go for the installation. Otherwise, delete or move some folders.

Your problem with ‘The Installation Failed in First Boot Phase Error’ should be solved.