System Restore is the best way to recover your computer if your system encounters crashes/ faces infinite boot loop/ fatal crash problem. At times, this becomes the last resort for you to recover the system. But what if the system restores process crashes midway restoring your PC with an error code – 0x80070005? Don’t worry. Just follow these methods to fix the problem.
Fix 1 – Run the system restore in Safe Mode
If running the system restore in a regular way fails, you can just run the system restore in Safe Mode.
STEP 1 – BOOT INTO THE SAFE MODE
Steps to boot your computer to Windows Recovery Environment –
a. At first, you have to shut down your computer.
b. Simply press the power button to boot up your system.
c. Then, when your system boots up, press-hold the power button again to force shutdown your system as soon as you have seen the manufacturer’s logo.
d. Continue this for 2-3 more times and it will automatically reach the startup repair screen.
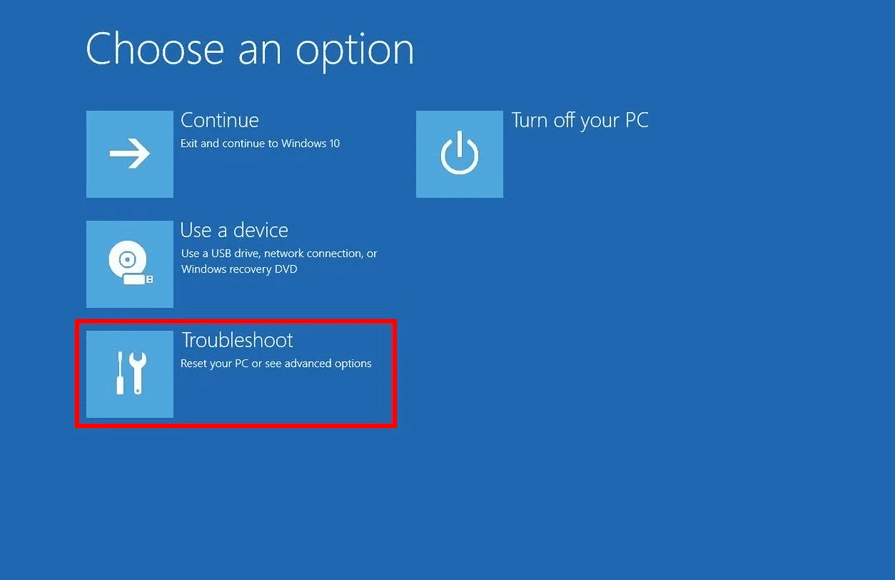
When your computer boots up, you will be in Recovery Environment mode.
1. Then, click on the “Advanced options“.

2. Next, click on the “Troubleshoot” to troubleshoot this issue.

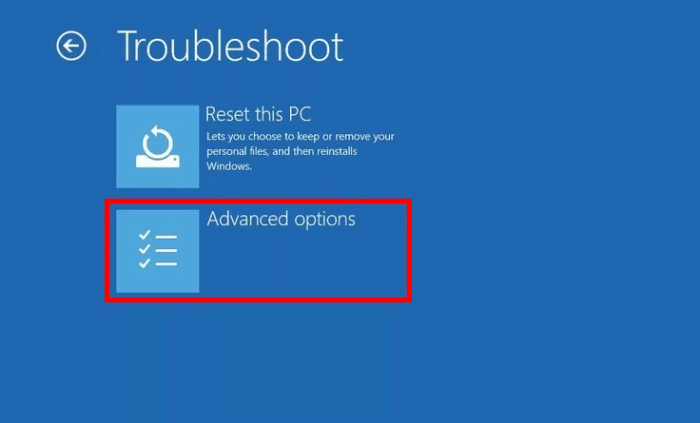
3. Then, tap on the “Advanced options” to proceed further.

4. Next, tap on the “Startup Settings” to open up various startup options.

8. Finally to restart your device correctly, click on “Restart” to restart the system.

9. Here you will see 9 various possibilities of startup types.
10. Then, press F4 from your keyboard to select the “Enable Safe Mode” option.

When your computer boots up in the Safe Mode, your desktop screen will appear black with ‘Safe Mode’ written at the four corners of the screen.
Step 2 – Use System Restore
Now, try using the system restore process to restore your computer back to the restore point.
1. At first, press the Windows key+R keys together.
2. Write “rstrui” in the box and hit Enter to open the System Restore directly.

3. When the System Restore window appears, you can use the “Recommended restore:” option.
4. Select the “Choose a different restore point“.

5. After that, tick the “Show more restore points” box.
This will show additional restore points on your system.

6. Now, choose your most preferred restore point.
7. Click on “Next” to proceed.

7. Finally, tap on “Finish” to finish up the process.

Your computer will restart and the system restoration process will commence. Check this solves your problem.
Fix 2 – Use the System Restore in Windows RE
Instead of using the System Restore in a regular way, you can use the System Restore directly from the Windows Recovery Environment.
1. Open the computer in Windows Recovery Environment.
2. Once you are in, tap on the “Advanced Options“.

3. Then, head this way –
Troubleshoot > Advanced Options
4. Now, click on “System Restore“.

Now, your computer will boot up the same System Restore screen you use regularly.
From here, follow the on-screen instructions and restore your device to your preferred restore point. This way, you won’t face any further errors.
Fix 3 – Check the permissions in the Volume Info folder
If the System Volume Information folder lacks proper permissions, you can adjust it easily.
STEP – 1 Show the HIDDEN FILES, FOLDERS
1. Open the File Explorer screen.
2. In the menu bar, click on the three-dot in the menu bar.
3. Then tap on “Options” from the drop-down list.

4. Once the Folder Options window appears, click on the “View” tab.
5. Here, click on the radio button beside the “Show hidden files, folders, and drives” option.

6. Finally, click on “Apply” and “OK” to save the changes.

You can see the hidden items in your folder.
STEP – 2 ADJUST PERMISSION
You have to adjust the advanced permission of the System Volume Information folder.
1. Again open the File Explorer window, if one isn’t opened yet.
2. After that, go to this location-
C:/System Volume Information
3. Then, right-click on the “System Volume Information” and tap on “Properties“.

4. Now, go to the “Security” section.
5. Then, click on “Advanced” to open the advanced settings.

6. Now, check if the “SYSTEM” account has “Full control” of the folder.
7. If that is not the case, tap on the “Change” option in the ‘Owner:‘ option.

8. After that, click on “Advanced…“.

7. Now, click on “Find Now” to see the full list of user groups.
8. From this list of user groups, select your account name. (In this computer, it is ‘sambit koley‘.)
9. After that, click on “OK” to select it.

10. Finally, tap on “OK” to save it.

11. In the next step, you need to check the option “Replace owner on subcontainers and objects“.
12. Getting back to the Advanced Security settings, click on “Apply“.

13. You will be warned with a message on your screen. Just, click on “OK“.

14. Further, click on “Apply” and “OK” to save it.

The Advanced Security settings will close.
Step 3 – Give Full Control
1. Again, right-click on the “System Volume Information” directory and then click on “Properties“.
2. Next, you have to click on the “Security” section, and there, click on “Advanced“.

3. When the Advanced Settings window appears, click on “Add“.

5. In the ‘Principal’ section, click on “Select a principal“.

6. Then, type “SYSTEM” in the box.
7. Click on “Check Names“. Click on “OK“.

8. As the next step, check the box beside the option “Full control“.

9. Finally, click on “OK” to save it.
10. If a warning message appears, just click on “OK“.

Once you have saved the settings, close the Security settings window.
Restart your system once and further try to run the system restore again.
This time system restore should be working just fine.