Microsoft releases various updates, for their Windows 10 devices to keep those systems updated. Windows continues to provide two major updates in a year and services those updates with monthly quality updates regularly. But, what if you want to view the Update History on your Windows machine? There are many ways you can view the Update History of your system.
6 Ways to check the Update History in Windows 10, 11
There are many ways you can check the update history on your computer.
Process 1 – Using the Settings
The best way to check the Windows Update History is using Settings.
1. At first, press the Windows key+I keys together.
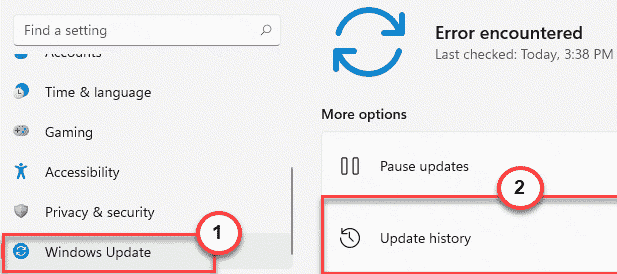
2. Once the Settings window opens up, tap on “Windows Update” on the left-hand pane.
3. On the right-hand side, click on the “Update History“.

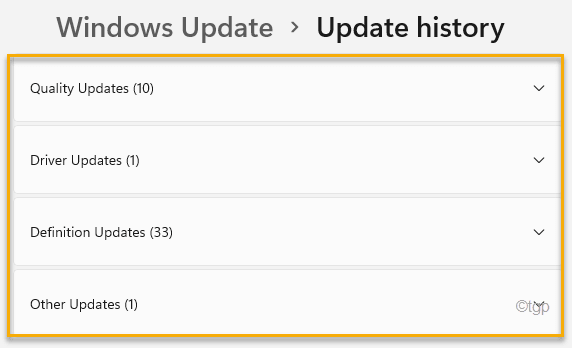
4. Here you will see all the installed updates on your computer.
- Quality Updates
- Driver Updates
- Definition Updates
- Other Updates

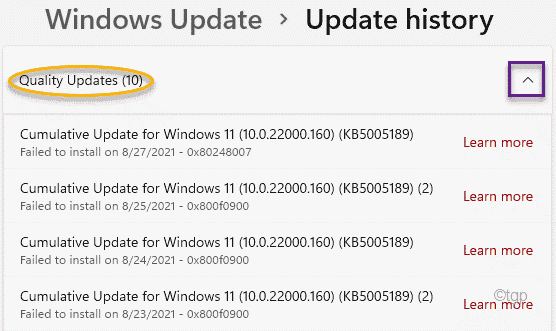
5. Then, expand any particular update section you want to check.
This will open up the list of installed updates in that section.

Process 2 – Using the Control Panel
There is another place you can find the list of installed updates with an additional option of uninstalling them.
1. At first, press the Windows key+R keys together to open up the Run window.
2. Once the Run opens up, type this command and hit Enter.
appwiz.cpl

This will open the Programs and Features window.
3. Now, on the left-hand pane, tap on “View Installed Updates“.

Now, you will see the list of installed updates with divisions of ‘Quality Updates’, ‘Driver Updates’, ‘Definition Updates’, and ‘Other Updates’.
You can even uninstall any of the installed updates from the same screen. To do so, follow these steps –
a. Right-click on the update you want to uninstall and click on “Uninstall” to uninstall the update.

Now, Windows will roll back the specified update from your computer.
Process 3 – Using Run cmdlet or shortcut
There is a simple Run command that you can use to open the Windows Update history on the Settings page.
1. Press the Windows key+R keys together.
2. Then, copy-paste this command and click on “OK“.
ms-settings:windowsupdate-history

This will open the Update History in the Settings window.
Process 4 – Using THE CMD terminal
You can use the CMD terminal to analyze the installed updates on your computer. This is very useful if you can’t access the CMD terminal.
1. At first, tap on “cmd” in the search box.
2. Then, right-click on the “Command Prompt” and tap on “Run as administrator” to access the Command Prompt.

3. When the Command Prompt opens up, type this command and hit Enter.
wmic qfe list brief
This will let you see the brief information (like the ‘KB number’, ‘Installed Date’, ‘Installed By’, and ‘Name’).

4. If you want to see the list of installed updates, execute this command.
wmic qfe list full

5. Now, if you prefer the list of updates in a tabular format, paste this command in the terminal and hit Enter.
wmic qfe list full /format:table

6. If you want to export the list of updates in HTML format, you can also do it with this command –
wmic qfe list full /format:table > C:\WindowsUpdatesReport.html

Close the Command Prompt terminal after this. You can access the WindowsUpdatesReport in HTML format in the C: drive.
Process 5 – Using Windows PowerShell
You can use Windows PowerShell to view the list of installed updates on the system.
1. At first, right-click on the Windows key and click on “Run“.
2. Then, type “powershell” and press Ctrl+Shift+Enter keys together.

2. Once the Windows PowerShell opens up, type this command and hit Enter.
Get-Hotfix
This will show you the hotfix IDs on your PowerShell terminal.

Close the PowerShell once you are done.
Process 6 – Find “KB” number
There is another trick you can use to find the KB number or the Knowledge Base number.
1. At first, right-click on the Windows key and tap on the “Run“.

2. When the Run opens up, type this command and click on “OK“.
systeminfo | find "KB"

This will open the list of installed Windows updates in Windows PowerShell.