Many Windows users have reported seeing an error when they try to run some applications developed in Visual Basic. The complete error message is s follows :
Error
Runtime Error 271 at 0041AC0D
Potential reasons to see this error are –
- Corrupt System Files.
- Third-party programs interfering with the operation of these applications.
- If these apps are not completely installed in the system
If you are noticing this error, don’t panic. In this article, we have listed few fixes that will help you resolve this Runtime error.
Fix 1: Uninstall and Re-install the Application
Step 1: Open the Run window using Windows+R
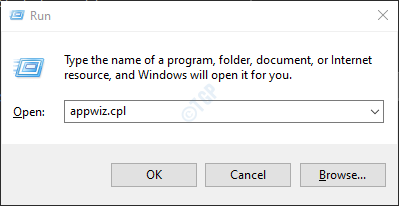
Step 2: Type appwiz.cpl and hit Enter.

Step 3: In the Program and Features window that opens, locate the problematic application.
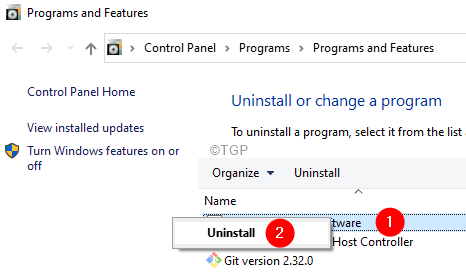
Step 4: Right-click on that application and choose Uninstall as shown below.
Step 5: Follow the onscreen instructions and complete the uninstallation process.
Step 6: Restart the computer.
Step 7: Now, try re-installing the application again. Preferably through the official means.
Fix 2: Run SFC and DISM Scans
NOTE: Make sure you have a steady Internet connection before proceeding
Step 1: Open Run Dialog. Use the shortcut Window+r
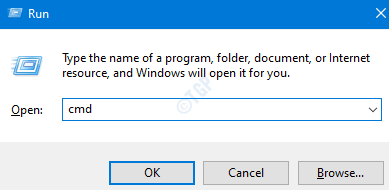
Step 2: In the Dialog, type cmd and press Ctrl+Shift+Enter. This would open the Elevated command prompt window.

Step 3: If you see a User Access Control window showing up, click on Yes.
Step 4: In the command prompt window that opens, Enter the following commands. Please don’t forget to hit Enter after each command.
Dism /Online /Cleanup-Image /ScanHealth

Dism /Online /Cleanup-Image /RestoreHealth

sfc /SCANNOW
Please be patient as the scan might take some time to finish.
Step 5: Restart your system
Check if this helps. If not try the next fix.
Fix 3: Perform a Clean Boot of the System
Step 1: Open the Run Dialog.
Step 2: Type msconfig and hit Enter

Step 3: In the General tab, choose Selective startup
Step 4: Ensure that Load system services and Load startup items are checked.

Step 5: Go to the Services tab
Step 6: Tick on Hide all Microsoft services and then click on Disable All button
Step 7: Click on Apply and then click on OK
Step 8: Restart your computer.
Fix 4:Re-register ChilkatCrypt2.dll
Many users have reported seeing the issue while launching Autodata. In that case, this fix should help.
Step 1: Open Run Dialog using Windows+R.
Step 2: Type cmd and hold the keys Ctrl+Shift+Enter to open a command prompt in Admin mode.
Step 3: In the UAC that shows up, click on Yes.
Step 4: In the Elevated Command Prompt window, enter the below commands. Make sure to hit Enter after every command.
cd c:\adcda2
regsvr32 ChilkatCrypt2.dll
Step 5: Restart your Computer.
Fix 5: Repair Install Windows in your System
NOTE:
- You should have the Windows bootable installation DVD ready.
- Make sure you have taken a backup of all the files from the system.
Step 1: Insert the Windows bootable installation DVD into your System.
Step 2: You will be asked if you want to continue booting from CD or DVD. Press Enter.
Step 3: Choose your Language Preference and hit the Next button.
Step 4: In the bottom left corner of the window, click on Repair your computer.

Step 5: In the blue window that you see, click on the Troubleshoot option.

Step 6: Now, click on the Advanced options

Step 7: Finally, click on either Automatic Repair or Startup Repair

Step 8: Sit back and wait patiently till the Automatic Repair finishes.
Step 9: Restart the System.
Fix 6: Perform a Clean Install of Windows
NOTE:
- You should have the Windows bootable installation DVD ready.
- Make sure you have taken a backup of all the files from the system.
Step 1: Insert the Bootable Disk into the system
Step 2: Restart your System.
Step 3: When you see the logo of the manufacturer, start pressing the key that takes you to the Boot Menu.
NOTE: Every manufacturer uses a different key to enter the boot menu. Visit your manufacturer’s page and check the key
For Lenovo users, it is either Fn+F12 or just F12.
Step 4: Once, you enter the Boot Menu, you will see the name of your Bootable device listed.
Step 5: Navigate using the arrow keys to your Bootable Media and hit Enter.
Step 6: You should see a windows logo, and the Windows installation process starts.
Step 7: Choose the language and click on Next.
Step 8: Click on the Install Now button.
Step 9: In Activate Windows window, enter your product key.
Step 10: Follow the on-screen instructions and complete the setup.
That’s All.
We hope this article has been informative. Thank you for Reading.
Kindly comment and let us know the fix that helped you resolve the runtime error.
