Mostly, all of us have a definite schedule to work on our laptops. When we are not using the PC, we usually Shut it down and turn it On when we want to use it. As we know, it takes some time to Boot Up Windows. We can avoid this by putting our laptops on Sleep or Hibernate Mode. These two modes are used to conserve power in the PCs.
In order to wake the system up from these modes, one has to press the power button. But you can even opt to wake up the system automatically. This provides an added advantage. One can wake up the system and then schedule the time-consuming tasks like scanning for the viruses, running system scans, etc while one is not in front of the system. This will help you save time and also resources.
In this article, we have covered the different ways to Schedule your system to wake up automatically.
Steps to be followed to wake up the PC Automatically Using Task Scheduler
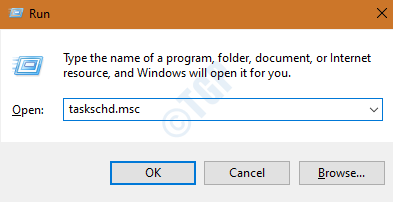
Step 1: Open the Run window by holding Windows+r keys.
Step 2: Write taskschd.msc and press Enter.

Step 3: In the Task Scheduler window, Under Actions on the right-hand side, click on Create Task

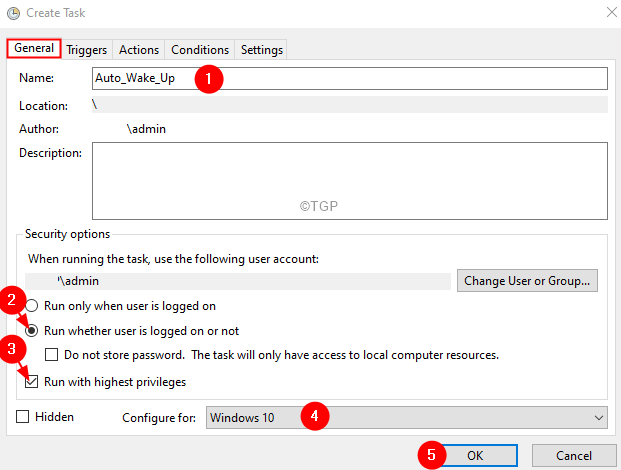
Step 4: In the Create Task window that opens, in the General Tab, give a Name to the Task
Step 5: Check the option Run whether the user is logged on or not
Step 6: Check the option Run with highest privileges
Step 7: In the Configure for drop-down choose Windows 10/11.
Step 8: Click on the Trigger tab
Step 9: Click on the New button at the bottom left corner.
Step 10: A New Trigger Windows shows up.
Step 11: From Begin the task drop-down, choose On a schedule.
Step 12: Check the Daily option.
Step 13: Under the Start section, choose an appropriate date.
Step 14: Choose a time.
Step 15: Click on OK.
Step 16: Click on the Action tab.
Step 17: A new Action window will pop up.
Step 18: From the Action drop-down, choose Start a program.
Step 19: Under Program/script, enter the path of the program of your choice. For demonstration purposes, we have used cmd.exe
Step 20: In the Add arguments passing /c “exit” will automatically close the opened window. This is optional.
Step 21: Click on the Ok button.
Step 22: Click on the Conditions tab
Step 23: Under the Power section, uncheck the Start the task only if the computer is on AC power.
Step 24: Check the Wake the computer to run this task.
Step 25: Click on the Ok button.
Step 26: For the above-scheduled task to run, the power plan settings should be configured such that wake timers are allowed.
Step 27: Open Run Dialog using Windows+R.
Step 28: Type the command control.exe powercfg.cpl,,3 and Press OK as shown below

Step 29: In the Power Options window, scroll down and locate the Sleep option.
Step 30: Double-click on the Sleep option.
Step 31: Within Sleep, double-click on Allow wake timers.
Step 32: Choose Enable for both On battery and Plugged in.
Step 33: Click on Apply and then click on OK.
Thank you for Reading.
