Another Adobe update, another evening gone. This time Premiere Pro 2026 either refuses to open with an “App is damaged and can’t be opened” message, or Creative Cloud sits on the update bar forever. Sometimes both. Of course.
Here’s what’s actually going on. On a Mac, Safari tends to mangle the installer on the way down (yes, the browser, not Adobe). macOS then slaps a quarantine flag on the app and calls it damaged. And on both Mac and Windows, Creative Cloud keeps a small update cache that gets stuck mid-write. Once that happens, every retry picks up the same broken cache. So the update never finishes.
Start with Fix 1. It takes about a minute.
Fix 1 – Kill Creative Cloud and Start It Fresh
Creative Cloud leaves helper processes running in the background. They hold onto the stuck update. So the app restart you already tried did nothing.
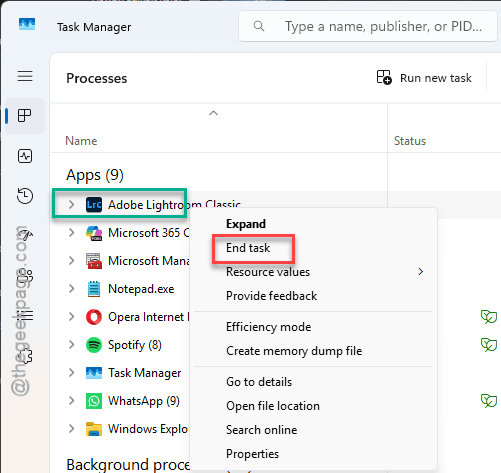
1 – At first, hit the Ctrl + Shift + Esc on Windows to open Task Manager.
2 – Type Adobe in the search box at the top.
3 – End every Adobe process you see, one at a time. On Windows, right-click it and pick End task. On a Mac, select it and click the X button at the top.
4 – Open the Creative Cloud desktop app again.
5 – Click Updates in the left sidebar and run the Premiere update once more.
Did it move past the stuck spot? Then you’re done. If not, keep going. And the cache is probably the real problem now.
Fix 2 – Download It With a Different Browser (Mac)
If you’re on a Mac and grabbed the installer straight from Adobe’s site, this is the one. Safari has been corrupting the download packet. Not a typo. The browser.
1 – Open Chrome or Firefox (install one if you have to).
2 – Set it as your default browser for now. The Adobe site hands the download to whichever browser is the default.
3 – Go back to Adobe’s site and click the Premiere Pro 2026 download link again.
4 – Install from the fresh download.
Annoying extra step. But the second copy usually opens just fine.
Fix 3 – Delete the OOBE Folder
This is the stuck update cache. Creative Cloud rebuilds it on the next launch. So deleting it is safe.
First, close Creative Cloud and its helpers like in Fix 1.
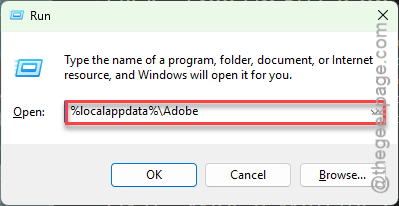
1 – On Windows, press Windows + R,
2 – Then, type this address, and press Enter.
%localappdata%\Adobe
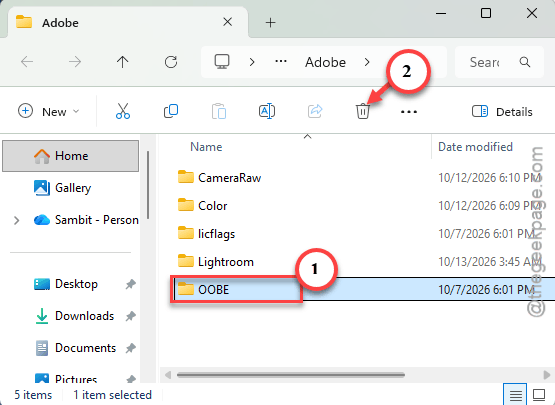
2 – Find the folder named OOBE.
3 – Delete it (or drag it to your desktop if you’d rather keep a copy).
4 – Open Creative Cloud and run the update again.
The update starts from zero this time. Watch the progress bar move this time.
Fix 4 – Free Up 50 GB on Your System Drive
Here’s one nobody expects. Creative Cloud quietly hangs during the 2026 update if your main Windows or macOS drive has under 50 GB free. It does not matter that you’re installing Premiere to a big second drive. It stages the update on the system drive first, and it won’t tell you it ran out of room. So check your C: drive (or Macintosh HD). Under 50 GB? Clear out downloads, empty the recycle bin, move some footage. Then run the update again.
Fix 6 – Wipe It With the Creative Cloud Cleaner Tool
Last resort. If Creative Cloud will not even cancel the stuck update, the install records are tangled. Adobe’s own Cleaner Tool is built for exactly this.
1 – Open Creative Cloud and uninstall Premiere Pro from the All apps list.
2 – Download the Creative Cloud Cleaner Tool from Adobe’s webpage. This will offer a standalone app. So, you don’t have to install it manually.
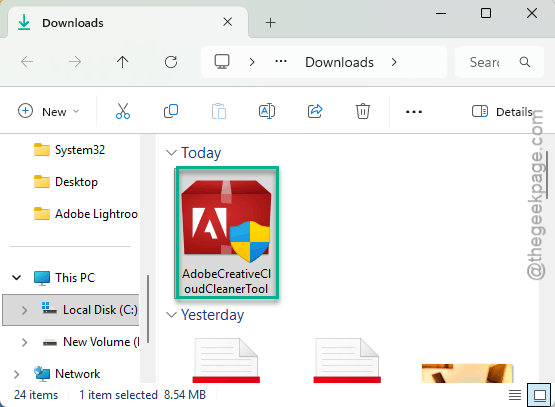
3 – Run it and choose Premiere Pro 2026 from the list.
4 – Restart your computer.
5 – Open Creative Cloud and install Premiere Pro 2026 fresh.
Takes about fifteen minutes end to end.
People Also Ask
Why does my Premiere Pro update keep failing?
Almost always a stuck cache. Creative Cloud stores update files in a folder called OOBE, and once a download breaks halfway, every retry reuses the broken bits. Close all Adobe processes, delete that OOBE folder, and run the update again. Low disk space on the system drive does it too.
How do I fix an app that is “damaged and can’t be opened” on a Mac?
That message means macOS flagged the app with a quarantine tag, usually because the download got mangled. For Premiere 2026, open Terminal and run xattr -cr on the app bundle to clear the tag. If it still complains, redownload the installer using Chrome or Firefox instead of Safari.