You open Point-in-Time Restore in Windows 11 and half the options are greyed out. Can’t click them. Can’t change a thing. And it feels broken. But most of the time? It isn’t. There’s just a switch you haven’t flipped yet.
Why This Happens
Basically? Most greyed-out cases here aren’t a bug.
The big one: the sub-settings stay locked until the main switch is on. So people click through the greyed-out options without noticing the master toggle sitting right at the top, still off.
And there’s a size rule. Your C: drive needs to be at least 200GB, or the feature disables itself to avoid filling your disk with snapshots.
Some options are Enterprise-only, too. On Home and Windows 11 Pro, a couple of dropdowns are locked by design — not broken, just not part of your edition. And on a work laptop? Your IT department may have switched the whole thing off.
Fix 1 – Flip the Main Switch On First
This fixes it for most people, so try it before anything else. Those greyed-out options only wake up once the master toggle above them is on.
1 – Press Windows + I to open Settings.
2 – Click System in the left sidebar.
3 – Click Recovery on the right.
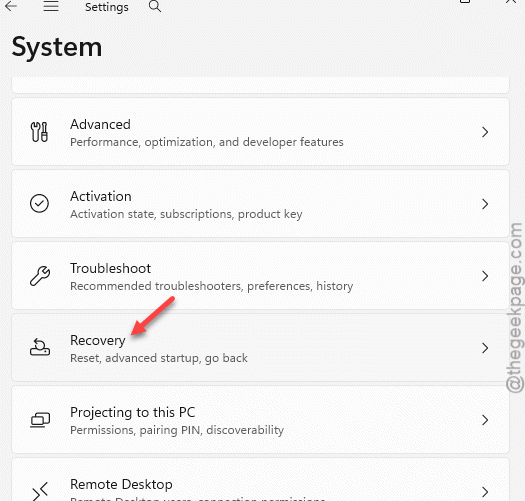
4 – Find Point-in-time restore and turn its switch On (it’s right at the top of that group).
5 – Now look at the settings underneath. They should be clickable.
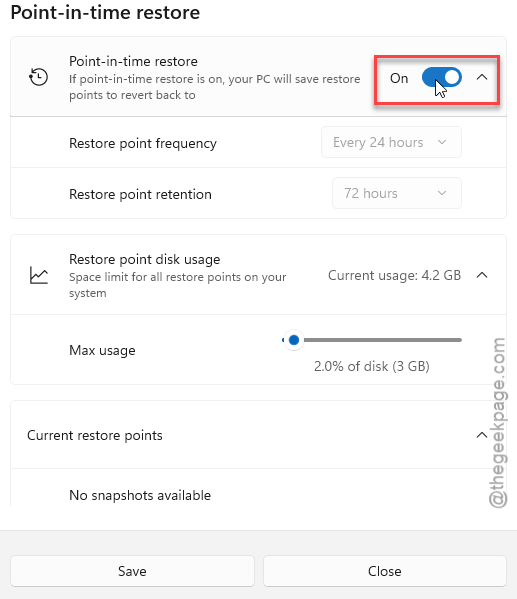
If they lit up, you’re set. If they’re still grey, it’s one of the reasons below — keep going.
Fix 2 – Check Your Drive Is Big Enough
Windows switches this feature off automatically when your C: drive is too small. The cutoff is 200GB total.
1 – Press Windows + E to open File Explorer.
2 – Click This PC on the left.
3 – Then, right-click your C: drive and choose Properties.
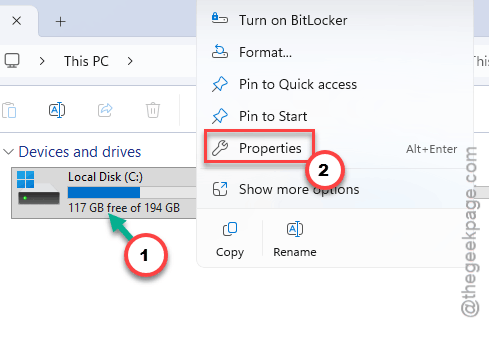
4 – Look at the total capacity (the full size of the drive, not just the free space).
Under 200GB? That’s your answer. The setting won’t ungrey on its own — but Fix 3 forces it anyway.
Fix 3 – Force It On With a Command
If your C drive is limited to 200 GB,
1 – Click Start, type cmd, right-click Command Prompt, and choose Run as administrator.
2 – Type this line and press Enter:
vssadmin resize shadowstorage /for=C: /on=C: /maxsize=5%
3 – That sets aside 5% of your drive for snapshots. Bump the number up if you want more history.
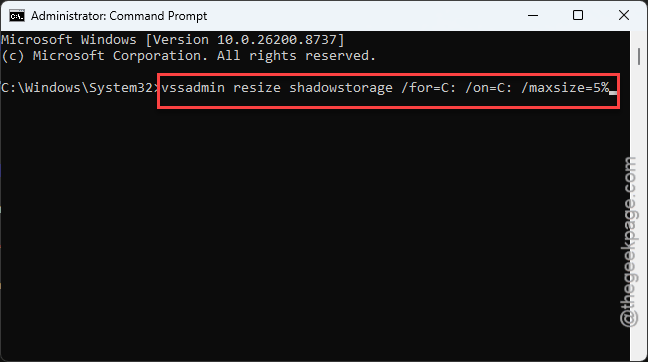
No confirmation box pops up. A line of text saying it succeeded is all you get. That means it worked.
Fix 4 – Know Which Options Are Greyed On Purpose
Here’s the part nobody tells you. If it’s only the frequency and retention dropdowns that are locked (how often snapshots run and how long they’re kept), that’s not a bug. Microsoft limits those two to the Enterprise edition of Windows. On Home and Pro, they’re greyed out by design.
But the Maximum usage limit slider, the one for disk space, should still work on every edition. If that one’s locked too, you’re back to Fix 1 — the main switch isn’t on yet.
There’s an unofficial registry tweak floating around to unlock frequency on Home and Pro. Honestly, skip it. It’s undocumented, Microsoft could pull it in any update, and you’d be poking at your registry for a small gain.
Fix 5 – Work Laptop? It’s Probably IT
Quick reality check. If the entire panel is greyed out on a company or school PC, it’s not something you can fix yourself.
Point-in-Time Restore ships turned off on managed and domain-joined machines, and IT can lock every option from their end. Ask whoever runs your IT to enable it through their management tool. And there’s no local switch that’ll override them.
Fix 6 – Personal PC Still Stuck?
If it’s your own PC, not a work one, and the master switch still won’t turn on after all this — that’s the rare case where it might genuinely be a bug.
1 – Press Windows + I, go to Windows Update, and install anything pending. A fix may already be waiting.
2 – Restart and check the toggle again.
3 – Still dead? Press Windows + F to open the Feedback Hub and report it.
Chasing registry hacks won’t help a real bug, but a logged report gets it in front of the people who can patch it.
How to Prevent This
– Keep your C: drive above 200GB if you want this feature on. It’s the single most common blocker.
– Turn the master switch on before you go hunting through the sub-settings. Saves a lot of confusion.
– On Home or Pro, don’t expect the Enterprise-only options. They’re not coming back with a tweak.
– Leave a few percent of your drive free for snapshots. Cram the disk full and the feature quietly backs off.
– On a work machine, sort it out with IT once instead of fighting the greyed screen every time.