Some Windows 11 / Windows 10 users who are trying to import batch of photos from their computer to their iPhone are complaining about a problem of the ‘Photos app being freezing on their devices‘. If you are experiencing the same situation at your end, no need to worry. In this article we are going to discuss about few tricks and workarounds which will be able to fix the problem on your computer. But before attempting the fixes on your computer, you may want to try these workarounds and check if they offers any simpler solution to your problem.
Initial Workarounds–
1. If this is the first time you are encountering this kind of situation, reboot the computer and the iPhone. After rebooting them both, connect them with usb cable and try to import the photos again.
2. In case if you are importing a huge number of photos at a time to your iPhone, then consider importing those in a lower number at a time( 100 -150 photos at a time).
3. Try connecting the iPhone to another usb port on your computer and try to import the photos.
4. Keep the iPhone unlocked. If a prompt appears “Trust this computer?” on your iPhone, just tap on “Trust“.
5. Check if any updates are pending on your computer or on the iPhone. If there are any updates are pending, let Windows update the computer. After updating, try to import the photos again.
If any of these fixes didn’t work out for you, go for these solutions-
Fix-1 Keep the original size-
Sometimes the automatic decompression of the images can cause this problem. Simply tweaking Settings of your iPhone may solve this problem-
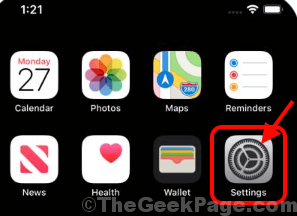
1. In the list of installed applications on your iPhone, find and tap on “Settings“.

2. In Settings window, scroll down and tap on “Photos“.

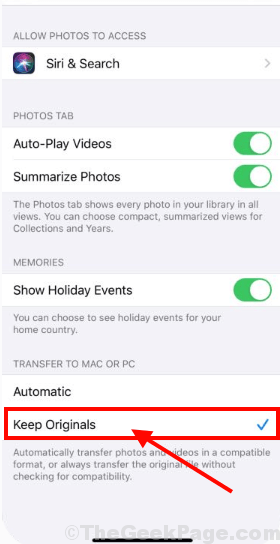
3. In Photos settings, in the option of “Transfer to MAC or PC” and then select “Keep Originals” to keep the images intact.

Now, re-attempt transferring some pictures from Windows to your iPhone. Your problem should be solved.
Fix-2 Restart Apple Mobile Device Service (AMDS)-
Restarting Apple Mobile Device Service may solve this issue on your computer.
1. Press Windows key+R to launch Run window. Now, press “services.msc” and hit Enter. Services window will be opened.

2. In Services window, scroll down to find “Apple Mobile Device Service” and double click on it.
3. In Apple Mobile Device Service Properties window, click on “Stop” to stop the service on your computer.

4. Now, click on “Start” to start the service. Then, click on “Startup type:” to choose “Automatic” from the drop-down menu. Now, finally click on “Apply” and “OK” to save the changes on your computer.

Try to send some images again from Windows. Check if you are still encountering the problem or not.
Fix-3 Import the photos from drive-
If you are facing this issue when you are using iTunes on your Windows try transferring the photos from your computer to the phone storage directly as a drive.
1. Connect your iPhone with your computer.
2. Press Windows key+E to open File Explorer on your computer. Go to the “Pictures” location and select and copy the images you want to transfer.
3. Now, on the left hand side of File Explorer, click on “This PC” to visualize the iPhone as a drive on your computer. Double click on the “iPhone” drive to access the files.

If a prompt appears “Trust this computer?” on your iPhone, you may need to permit the computer. Just tap on “Trust“.
3. Again double click on the “Internal Shared Storage” to visualize the files and folders on your iPhone.

4. In Internal Shared Storage scroll down to find the “DCIM” folder. Paste the pictures in this folder.

This process may take a while depending upon the files size. You should be able to move the pictures from your computer to iPhone.
Fix-4 Take ownership of Picture folder-
You may face this error if your account name is not included as an owner of the Picture folder on your computer.
1. Open File Explorer by pressing Windows key+E. Now, right click on the “Pictures” and then click on “Properties“.

2. In Picture Properties window, go to “Security” tab and then click on the “Advanced” option in the lower portion of the Properties window.

3. In Advanced Security Settings for Pictures window click on the “Change” beside “Owner:”. Simply click on “Yes” if you are prompted by User Account Control for permission.

4. In Select User or Groups window, simply click on “Advanced” option.

5. Next, click on “Find Now” tab and in the list of groups and users, look for your administrative account and select your account name and then finally click on “OK“.

6. You should see your account name in the section “Enter the object name to select:“. Then, click on “OK” to save the changes on your computer.

7. In Advanced Sharing Settings window, check both of the options “Replace owner on subcontainers and objects” and “Replace all child object permission entries with inheritable permissions entries from this object“. Finally, click on “Apply” and “OK” to save the changes on your computer.

8. Again, in Picture Properties window, go to the “Security” tab and then click on the “Advanced” option.

9. In Advanced Sharing Settings window, click on “Add” to enter and select a principle for the folder.

10. In Permissions Entry window, click on “Select a principal” to add some control parameters to the account.

11. In Select User or Groups window, again click on “Advanced” option.

12. Click on the “Find Now” tab and look for your user name. Select the account name and click on “OK“.

13. Your account should be seen in the section “Enter the object name to select:“. Click on “OK” to save the changes on your computer.

14. Coming back to the Permissions Entry window, check “Full control” in ‘Basic Permissions:‘ tab. Then check “Only apply these permissions to objects and/or containers within this container“. Finally, click on “OK” to save the changes on your computer.

If you receive an warning message, simply overrule it by clicking on “Yes“.
15. Finally, at the last step, in Advanced Sharing Settings window click on “Apply” and “OK” to save the changes on your computer.

Reboot your computer to save the changes on your computer.
Fix-5 Repair or Reset Photos-
Repairing or resetting the Photos application may fix this issue.
1. Press Windows key+I to open Settings window. Click on “Apps“.

2. Click on “Apps & features” on the left pane of the Settings window, and then on the right hand side , scroll down through the list of applications and click on “Photos” and then finally click on “Advanced options“.

3. Now, click on the “Reset” to reset the Photos to default state.

Reboot your computer to save the changes on your computer.
Fix-6 Run System Restore on your computer-
Are you experiencing this issue for just for a few days? Before was it working fine? If the answer is affirmative then you should try running a system restore from a earlier date when the problem didn’t occur.
1. Press Windows Key+R to launch Run, and now type “sysdm.cpl“, and hit Enter. System Properties window will be opened.

2. In System Properties window, click on “System Protection” tab and then click on “System Restore” . Then click on “Choose a different restore point“. Then, click on “Next“.

3.In the next window, choose a System Restore point when the error wasn’t there. Then, click on the “Next“.

6. Finally, click on “Finish” to finish the process. This will reboot your system and once your system boots up, it will be restored to an earlier date.

After rebooting, your computer try to transfer the photos from Windows to your iPhone. Your problem should be solved.