Whether it is a photo or a video, Google Photos can back those up and show them on your phone. But, what if the Google Photos doesn’t show all the images on your device? This is well known issue, and but you will be glad to know that there are several solutions that you can apply to fix this Photos issue on your phone.
Workarounds –
1. Close the Google Photos app and restart your phone.
2. Test the internet connection on your phone. Google Photos won’t sync the photos from your other device unless you are connected to a WiFi. Sync doesn’t work in mobile data.
Fix 1 – Turn the Backup and sync settings
Check whether the automatic synchronization settings is enabled on your phone.
Step 1 – Open the Google Photos app on your phone.
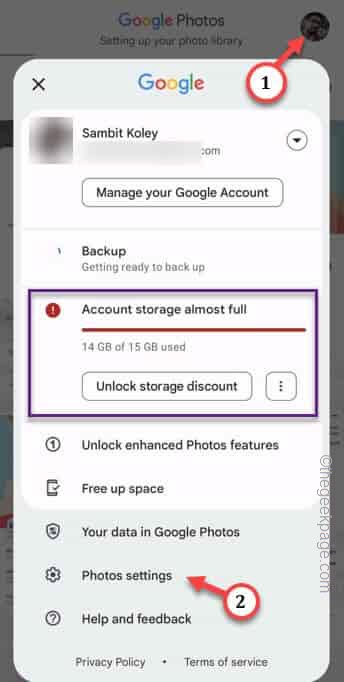
Step 2 – After opening that, you can find the profile picture on the top-right corner.
Step 3 – Afterwards, open the “Photos settings” to open the Photos settings.
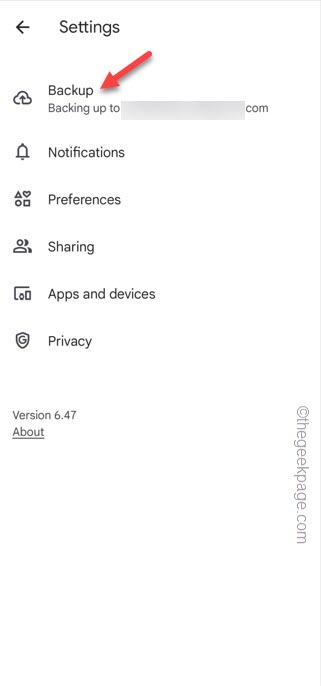
Step 4 – In the Photos settings screen, open the “Backup” settings to open that.
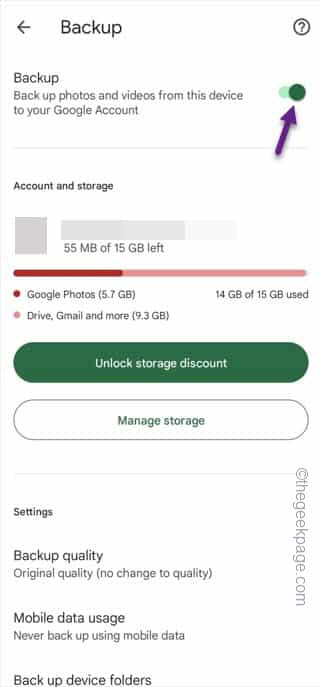
Step 5 – This will take you to the Back up and sync page. Just set the “Backup” mode to “On” mode.
This way, all the photos and videos will start getting synced into the new device as soon as you connect the phone to the WiFi.
Fix 2 – Clear the Google Photos cache
The corrupted Google Photos cache can cause this problem on your phone.
Step 1 – Look for the Google folder on the left-hand corner on your screen. If you can’t find that, use the search box to find the “Photos” app.
Step 2 – Once you have found it, press & hold the “Photos” app and tap the “ⓘ” to open that up.
Step 3 – Once you have opened it, scroll down slowly until you reach the “Storage” folder. Open that up.
Step 4 – In the Storage settings of Photos app, tap “Clear cache“.
This will clear out the temporarily-stored cache.
Clearing the Photos cache should help you fix the backup and sync issue on your phone.
Connect the phone to WiFi and wait for the Photos app to load in there.
Fix 3 – Check for the Google Photos storage situation
Google Photos won’t back up properly if you don’t have much free up space left in there.
Step 1 – Open the Google Photos.
Step 2 – When it opens up, tap the profile icon to open the context menu.
Step 3 – On the context menu, you will see the current storage of the Photos.
Step 4 – If you want to get a broader view on the storage situation, so open the storage settings.
Google allots 15 GB free space.
Step 5 – You can review and delete some older big files from Photos.
This way, free the space on your Google Photos. Once you have enough free space, all the photos or videos will get synced into your phone.
Fix 4 – Enable the app permission
Google Photos won’t load up any photos or videos from your local files if it doesn’t have the enough permission.
Step 1 – Open the Google folder.
Step 2 – When you see the Photos app, hold that and tap the “ⓘ” to open that.
Step 3 – After this, open the “Permissions” settings to view all the Photos permissions.
Step 4 – Look which permissions Photos currently doesn’t have. It needs the following permissions, at least –
Photos and videos
Music and audio
Step 5 – If you see the “Photos and videos” permission is not allowed, tap to open that up.
Step 6 – Now, set this to “Allow” mode so that the Photos have the permission to the images on your phone.
This way, make sure you have properly permitted the Google Photos.
Once the Google Photos have the proper permission, you will see all the images and videos there on the app.
Fix 5 – Open other folders
Some particular images or videos that you store in the private folders doesn’t get uploaded to the server.
Step 1 – Launch the Photos app.
Step 2 – If you go to the “Library” folder, you can find several folders.
Like Archive and Bin folders store some specific files for separation. The images you may not find in the Google Photos on other device.
Step 3 – Finally, open the “Utilities” folder.
Step 4 – Inside that folder, you will see the “Locked folder“. You can save/ lock some images and videos in this folder.
All the items in this folder won’t get uploaded or synced like the normal photos or videos.
If you want to get these images uploaded to the server, you can move those out of the Locked Folder.
Step 5 – Open the Locked Folder. Input your PIN/password to open that folder.
Step 6 – Select the files you want to sync and tap “Move“.
Step 7 – When it asks for your permission, tap “Move” once more.
As these files get out of the Locked Folder, you just have to wait for a few moments for those to get automatically synced.
Fix 6 – Use the Photos on web
Is the Photos app still not working? Use the Photos on the web version.
Step 1 – Just open the Google Chrome browser on your phone.
Step 2 – When you do open that, paste this link there and hit Enter.
https://photos.google.com
Step 3 – Now, click the small dot button and check the “Desktop view“.
Step 4 – As the desktop view loads up, tap the “Go to Google Photos“.
Step 5 – Permit the Gmail address access to the photos app.
Now, you will see all your synced images on the Google Drive.
NOTE – The photos you store on your phone needs sometime to get uploaded in the server. Your phone does upload these images in the background. So, you may not see all the recent photos in the Google Photos. This is not an anomaly.
Fix 7 – Uninstall the Photos app
Uninstall the Photos app and reinstall it on the same device.
Warning – Before uninstalling the Photos app, make sure to check the Bin and Locked folders. All the images of these folders can get deleted when uninstall the Photos app. Restore/ move those files to a safe place before proceeding.
Step 1 – Reach the location of the Phone app. There, hold the Photos app and tap “Uninstall 🗑️” to uninstall the Photos app.
Step 2 – Open the Play Store and install the Photos app.
Step 3 – After the installation, when you first open it up, you have to allow certain permissions.
Step 4 – Finally, log in using your Google account and wait for a few seconds.
You will get to see all the photos in the Photos app now.


