While using the NVIDIA capture feature to capture your favorite moments on your Windows 10 computer, you may see this annoying error message out of the blue – ‘Could not find C:\windows\system32\nvspcap64.dll‘. This is a problem that occurs due to the NVIDIA Shadow Capture server fails to start up the app. If that is the same case with you, just follow these easy instructions to solve the issue very easily.
Fix 1 – Uninstall GeForce Experience
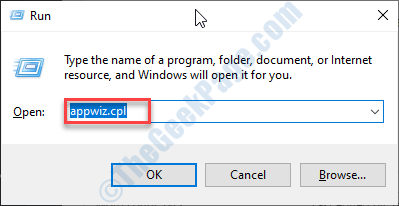
1. You have to press the Windows key+R keys together.
2. Type “appwiz.cpl” and then click on “OK“.

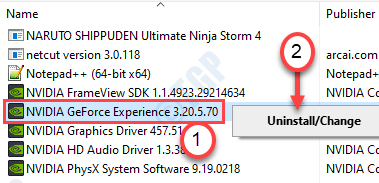
3. In the Program & Features window, check out the list of the NVIDIA drivers.
4. Right-click on the “NVIDIA GeForce Experience” and then click on “Uninstall“.

Follow the on-screen instructions to uninstall the NVIDIA applications from your computer.
After uninstalling the GeForce Experience driver, close the Control Panel window.
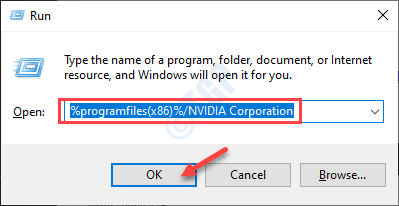
5. Press the Windows key+R.
6. Copy-paste this location and click on “OK“.
%programfiles(x86)%/NVIDIA Corporation

7. After that, locate the GeForce Experience folder.
8. Select it and right-click on the “Delete” to delete the folder.

9. After this, simply download the GeForce Experience package installer on your computer.

10. Run the installer on your computer to install the latest GeForce Experience.
Restart your computer once the installation process is over. Try to capture some in-game footage. Check the error is still there or not.
Fix 2 – Update graphics driver
Trying updating the graphics driver from the Device Manager.
1. Press the Windows key+X.
2. Then, click on the “Device Manager“.

3. When the Device Manager opens up, expand the “Display adapter“.
4. Right-click on your NVIDIA graphics card adapter and click on “Update driver“.

5. To search for the latest build of your graphics driver, click on the “Search for the updated drivers“.

Now let Windows install the latest driver on your device.
Fix 3 – Uninstall the graphics card
Sometimes the corrupted graphics card driver can cause this issue.
1. Press the Windows key+S. Type “Device Manager“.
2. After that, click on the “Device Manager“.

3. Click on the “Display adapters“.
4. Then, right-click on the NVIDIA graphics adapter and click on the “Uninstall device“.

5. Click on “Yes” to uninstall the driver from your computer.

After uninstalling the driver, restart your computer.
For the majority of the cases, a simple restart of your device should re-install the uninstalled graphics driver.
If it doesn’t re-install, follow these steps-
a. Press the Windows key+X keys together.
b. Then, click on the “Device Manager“.
c. Click on the “Action” and click on “Scan for hardware changes“.

This should solve your problem.
Fix 4 – Install the latest NVIDIA drivers
You have to install the latest NVIDIA driver on your computer.
1. Go to the NVIDIA website to download the driver.
2. Just put your display driver specifications in the correct boxes. Like – “Product type“, “Product series“, “Product“, “Operating System“, “Windows Driver Type“, “Download Type” according to your graphics card specifications.
3. After putting in the details, simply click on “Search“.

4. Click on “Download” to download the driver.
5. Once the driver is downloaded, go to the download location, After that, double-click on it to start the installation process of the driver.

6. While installing the driver, check the “Perform a clean installation” option.
7. Then you need to click on “Next“.

This clean installation should fix the problem you are facing.
Fix 5 – Install the graphics driver in Safe mode
Sometimes some 3rd party applications can affect
STEP 1- Download the latest driver
1. Open a browser on your computer.
2. Go to the NVIDIA Downloads section.
3. Just put your graphics driver specifics in the correct places. Click on the “Search driver”.

4. Download the latest driver on your computer.
Remember the location where you are downloading the driver.
STEP 2 – Boot into safe mode With NETWORKING
1. Open the Settings window and click on “Update and Security“.

2. On the left-hand side, click on “Recovery“.
3. After that, under ‘Advanced Startup’, click on “Restart Now“.

4. Your device will boot into the Windows Recovery Environment.
Once it does, simply click on “Advanced options“.

5. Then you have to click on the “Startup Settings“.

6. Then, click on “Restart“.

7. Once you are in the Startup settings, press the F5 key to “Enable Safe Mode with Networking“.

Your machine will boot into Safe Mode with networking.
STEP 3- Install the latest driver
1. Go to the location where you had downloaded the NVIDIA driver.
2. Then, double-click on it to start the installation process of the driver.

3. While installing the driver, check the “Perform a clean installation” option.
4. Then you need to click on “Next“.

Once it is installed, you will receive a prompt to install the driver on your computer.
Fix 6 – Update your Windows
Sometimes these patch fixes are delivered with regular Windows Updates.
1. Press the Windows key+I.
2. Then click on the “Updates & Security“.

3. Then, click on “Check for updates“.

4. Windows will download the updates on your computer.
5. Click on “Restart Now” to restart your computer.

This should update your computer. Your problem should be solved.