Windows defender also called Microsoft defender helps to protect the computer from virus and malware attacks. It uses some security features to defend against threats. If any threat has been found, it will show a pop-up at the bottom right of the screen and inform you. But users face different issues related to Windows defender, one such issue is “Missing Windows Defender Protection History”. If this issue occurs one cannot check the threat information properly and take further steps. This error can occur due to corrupted files, the system not being up to date, etc. In this article, let us see the different solutions to solve this error. Try them!
Method 1 – Check For The Windows Updates And Install Them
Step 1 – Open the Windows settings using Windows + I keys together
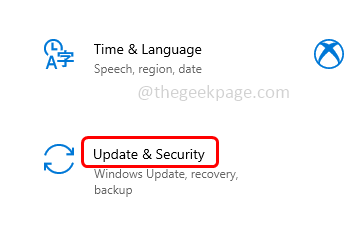
Step 2 – Click on Update & security
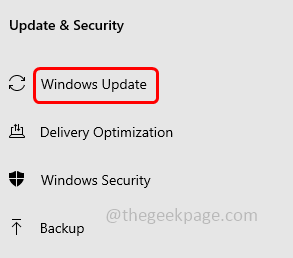
Step 3 – From the left, click on Windows update
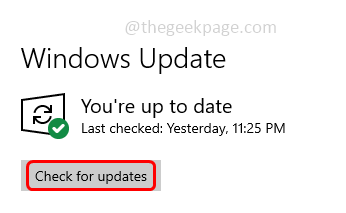
Step 4 – Click on the check for updates button at the right. If there are any updates available, install them else if you do not have any updates it will show you’re up to date
Step 5 – Restart your computer and then check if the issue is solved.
Method 2 – Reset The Windows Defender
Step 1 – In the windows search bar type Windows security
Step 2 – From the search results right click on the Windows security and click on app settings
Step 3 – In the opened page, scroll down and click on terminate button. It will immediately terminate the app and its related processes
Step 4 – Then click on reset button. It will delete this application’s data
Step 5 – Now open the Windows defender app and check if the protection history is back and the issue is solved.
Method 3 – Run The SFC And DISM Commands To Check For The Corrupted System Files
Step 1 – Open the command prompt as an administrator. To do this, type cmd in the windows search then hold Ctrl + Shift keys together then hit enter
Step 2 – A user account control window will appear. Click on yes
Step 3 – Copy and paste the following command in the command prompt and hit enter. It will take a few minutes to complete the execution process wait for it
sfc /scannow
Step 4 – Once done copy and paste the following commands one by one in the command prompt and hit enter
DISM /Online /Cleanup-Image /CheckHealth
DISM /Online /Cleanup-Image /ScanHealth
DISM /Online /Cleanup-Image /RestoreHealth
Step 5 – When all the commands are executed and completed successfully then restart the system and check if the problem is resolved.
Method 4 – Check If Other Installed Security Applications Are Interfering With Windows Defender And Causing The Issue
Step 1 – Open the run prompt using Windows + R keys together
Step 2 – Type control in the run prompt and hit enter
Step 3 – At the top right corner, click on the view by drop down and select category
Step 4 – Then click on the system and security option
Step 5 – Select security and maintenance by clicking on it
Step 6 – Then click on security dropdown and if you see there any other security app apart from Windows defender then uninstall it
Step 7 – Restart the computer and check if the issue is solved.
Method 5 – Delete The Detection History Files
Step 1 – Open the Windows explorer (File explorer) by using Windows + E keys together
Step 2 – At the top click on the View tab
Step 3 – In the view tab at the right side, enable the hidden items by clicking on the checkbox beside it (a tick mark should be present)
Step 4 – Navigate to the following path in the Windows explorer
C:\ProgramData\Microsoft\Windows Defender\Scans\History
Step 5 – Double click on the Service folder to open it
Step 6 – Select all the items that are present in the folder by using Ctrl + A keys together then right click on them and click on delete
Step 7 – Now open the run prompt by using Windows + R keys together
Step 8 – Type windowsdefender: in the run prompt and hit enter. This will open the Windows security page
Step 9 – On the left side click on virus & threat protection
Step 10 – At the right, scroll down and under virus & threat protection settings, click on manage settings
Step 11 – Then disable Real-time protection by clicking on the toggle bar below it ( blue color should disappear from the toggle bar)
Step 12 – A confirmation pop up will appear, click on yes
Step 13 – Also disable Cloud-delivered protection by clicking on the toggle bar below it ( blue color should disappear from the toggle bar)
Step 14 – Then restart your system and check if the issue is solved
Alternatively, for some reasons if you cannot achieve the above steps successfully, you can also execute the below commands in the command prompt
Step 1 – Open the command prompt as an administrator. To do this, type cmd in the windows search then hold Ctrl + Shift keys together then hit enter
Step 2 – A user account control window will appear. Click on yes
Step 3 – Copy and paste the following commands in the command prompt and hit enter. Execute these commands one by one
del “C:\ProgramData\Microsoft\Windows Defender\Scans\mpcache*” /s > NUL 2>&1
del “C:\ProgramData\Microsoft\Windows Defender\Scans\History\Service\DetectionHistory\*”
del “C:\ProgramData\Microsoft\Windows Defender\Scans\mpenginedb.db”
Step 4 – After the execution is completed, close the command prompt window and restart your system.
That’s it! I hope the above provided information is helpful. Let us know which method you applied and worked for you. Thank you and happy reading !!


