Fix Keyboard Not Working Issue In Windows 10:- You are in the middle of typing something important and suddenly your keyboard stops working. Before calling the hardware guys in for help, let’s try solving the problem on our own. Dive into the article to learn about the two most effective solutions for the keyboard not working problem.
Method 1 – Reinstall Driver of Keyboard
1 – Do a Right Click on Start Button.
2 – Click on Device manager from the Menu.

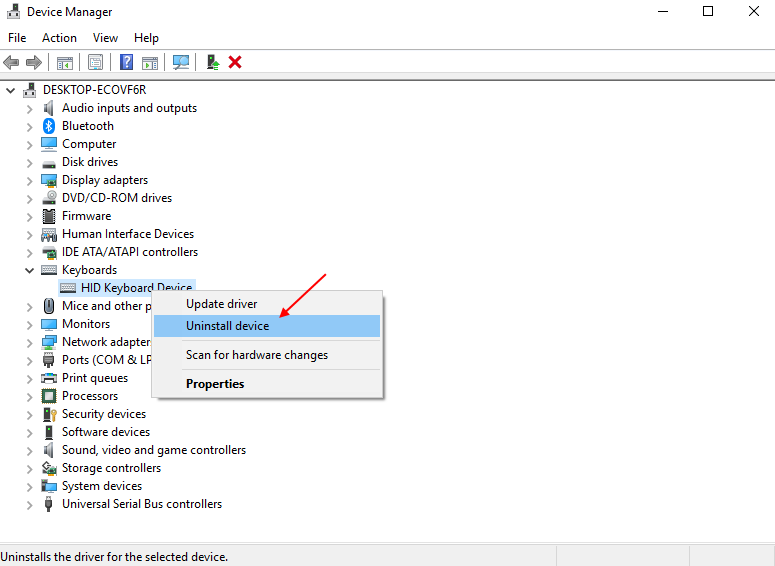
3 – Once the Device manager Opens up, just uninstall Keyboard driver software

Note that in place of HID Keyboard Device, Standard PS/2 Keyboard may be present in list of keyboard drivers.
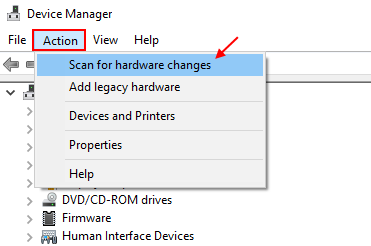
4 – Now, Click on Action and then click on scan for hardware changes.

Your keyboard driver will be reinstalled.
METHOD 2
STEP 1
- First of all, click on the Windows icon to expand it. As next, find and click on Settings app to open it.
STEP 2
- When the Settings app opens up, click on the Ease of Access option.
STEP 3
- Find and click on the option entry Keyboard from the left pane of the EASE OF ACCESS window. Now in the right window pane, find a section named Filter Keys. As next, turn on the toggle button corresponding to Ignore or slow down brief or repeated keystrokes and adjust keyboard repeat rates.

Note:- You can also use On screen keyboard till the time you face problems.
METHOD 2 -Update the Keyboard driver
The above method could solve the issue of keyboard not working. If it’s still not working, you could try updating the hardware for keyboard. You could even use an on-screen keyboard till you get your actual keyboard working. Follow the steps below to turn on the on-screen keyboard and to update the keyboard drivers.
STEP 1
- Now in order to update the keyboard device drivers using the on-screen keyboard, simply right click on the Windows icon and then click on the Run option.
STEP 2
- When the Run dialog window opens up, type in devmgmt.msc using the on-screen keyboard and hit OK button.

STEP 3
- This opens the Device Manager window. Now you need to find the entry named Keyboards and expand it by clicking on the arrow associated with it. Right click on the keyboard that you use and select Update Driver Software option.
STEP 4
- If you have a driver software already installed, you can browse for it and select it or if you do not have one, you can ask Windows to find one by itself by choosing the option Search automatically for updated driver software.
Method 3 – Press Windows key + Esc together
Its weird but many users reported that pressing windows key + Esc together solved the problem on windows 10 laptop. You can go ahead and try this and check if it works for you.
How to use On screen keyboard
STEP 1
- Just like the previous method, navigate to Settings —> Ease of Access —> Keyboard. Now in the right window pane, turn on the toggle button corresponding to Turns on the On-Screen Keyboard as shown in the following screenshot.
STEP 2
- This opens the Virtual keyboard and you can use this keyboard just like you use your normal keyboard. You can control the keyboard using the mouse pointer.