Are you seeing the “It looks like Windows didn’t load correctly” error message on the blue Recovery page? If you have noticed this error message once while starting up your system, don’t worry. Just, tap “Restart my PC” to restart the computer. Then, check whether the error screen re-appears again. If the error returns, try these solutions.
Workaround –
You can try to tap the “Restart My PC” option on the Recovery page directly to restart your computer.
Let your system restart and check if this solves your issue.
Fix 1 – Use the Startup Repair option
Before you try any other solutions, try the Startup Repair.
1. On the Recovery page, down the error message you will find the “See advanced repair options“. Click on this option.
This will directly open the Recovery Environment tools.
2. Just, tap the “troubleshoot” option to proceed.
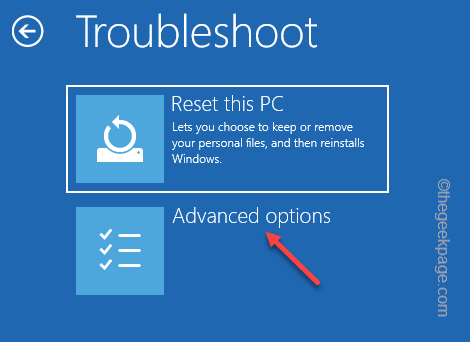
3. On the next screen, tap “Advanced options“.
4. In the Advanced options screen, you will find several options.
5. Look for the “Startup Repair” option. Tap it.
6. Now, you may have to choose your administrative account and enter the correct credentials to access the Startup Repair process.
Windows will automatically restart the computer and start the startup repair process.
Just wait for Windows to repair the corrupted system files and fix the issue for your computer.
Fix 2 – Try the system restore feature
If you have created a system restore point previously, you can use it to restore your system.
1. On the Recovery page, tap “See advanced repair options” to discover the recovery tools.
2. Now, go this way –
Troubleshoot > Advanced options
3. In the Advanced options window, tap on the “System Restore” option.
4. This will open the System Restore window layover. Now, tap on the “Recommended restore:” option.
5. If you prefer another restore point, you can also opt for “Choose a different restore point“.
6. Once you have chosen the point, tap “Next“.
7. You may see the list of restore points on your screen.
8. But, if you want to see more restore points, tap “Show more restore points“.
This way, you will see more restore points on your screen.
9. In this list of restore points, what you have to do is to choose a particular restore point when the error wasn’t there.
10. Then, tap “Next” to proceed further.
11. Finally, you have to click “Finish“.
This will start the System Restore process.
Your system will automatically do the whole thing and may restart a few times to complete all the stages of the restoration process.
Fix 3 – Use the System Image Recovery
If you have a system image, you can use it to recover your system.
1. When you reach the Recovery page, tap “See advanced repair options” to access it.
2. Then, follow this path –
Troubleshoot > Advanced options
3. In the Advanced options screen, try to look if you can find the “System Image Recovery“.
4. If you can’t find it there, tap “See more recovery options“.
5. Next, tap “System Image Recovery“.
6. In System Image Recovery mode, Windows will automatically scan your system for system image files.
7. Otherwise, you can also use the manual option to select an image file. To do that, tap “Select a system image” and tap “Next“.
8. Now, attach the DVD or USB containing the system image for your system.
9. Then, tap “Advanced…“.
10. Now, tap “Search for a system image on the network“.
Now, let Windows use the system image as a backup and fix the issue for you.
Fix 4 – Reset/Refresh the PC
If don’t have a system image file or a restore point, you can reset the PC.
1. When you reach the Recovery page, tap “See advanced repair options” to access it.
2. Then, tap “Troubleshoot” to access it.
3. In the troubleshooting window, you will find two distinct options.
4. Tap on “Reset this PC“.
5. Inside here, there are two more options.
6. Tap “Keep my files” to keep the important files.
In the next step, Windows will automatically reset your system. This should solve your issue.
When you are done, check if this solves your problem or not.

