It’s not very common that you would want to add a diagonal line to a cell in your Excel document. But definitely, there could be occasions where you want to add a diagonal line in the very first cell of an Excel file. You might want to divide the cell into 2 and add 2 different headers inside both the divided halves. Whatever be your requirement, the solution is simple.
Read on, to learn how you can easily add a diagonal line inside a cell in your Excel document and to add text inside the diagonally divided cell.
How to Add a Diagonal Line in a Cell in Microsoft Excel
Step 1: Firstly, click on the cell that you want to add a diagonal line to.
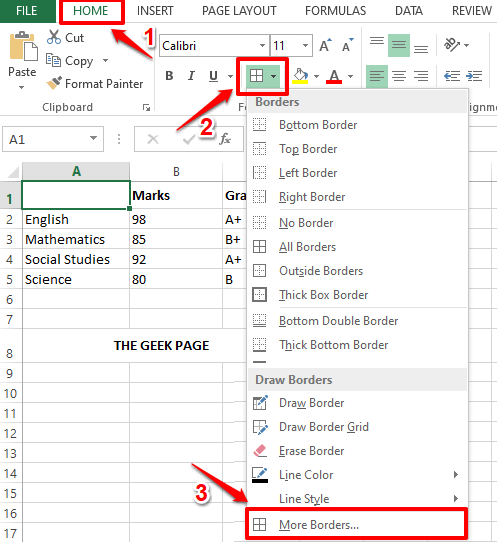
Step 2: Then click on the HOME tab at the top and click on the Borders icon. From the dropdown menu that appears, click on the More Borders option.
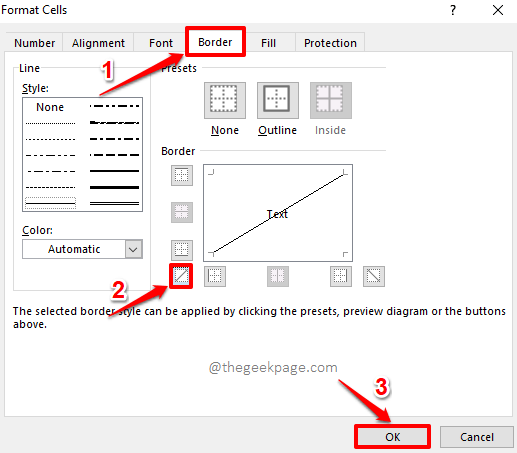
Step 3: You will now have the Format Cells window open before you. Click on the Border tab at the top.
As next, click on the diagonal border button. Click on the OK button once you are done.
Step 4: You can now see that a diagonal line is successfully added to the cell you selected.
If you would like to format this diagonal border a bit, click on the Borders button again under the HOME tab.
From the menu that drops down, click on More Borders option one more time.
Step 5: In the Format Cells window, you can choose the style of the border. You can make your line really thick or thin or dotted. You also have the option to choose a color for your border.
If you would like to add an outline border as well, in addition to your diagonal border, click on the Outline icon.
Finally, click on the diagonal border icon once again to apply all your formatting to the diagonal border.
Once you are all done, hit the OK button.
Step 6: That’s it. If you now look at your cell, you can see that all your formatting are successfully applied to the cell you selected. Enjoy!
How to Add Text Inside a Diagonally Divided Cell in Microsoft Excel
Step 1: Firstly, double click on the cell that is diagonally divided.
Step 2: As next, type in the first header and then press the ALT + ENTER keys together to go to the new line. In the next line, type in the second header.
Step 3: If you press elsewhere, you can see that the second header is struck off. To fix that, double click on the cell again.
Step 4: Now press the SPACE bar before the second header and move it to the right corner.
Step 5: Now if you click elsewhere, you can see that your headers are neatly arranged inside your diagonally divided cell.
Please tell us in the comments section whether you found the article helpful. Stay tuned for more tricks, how-tos, and tips.


