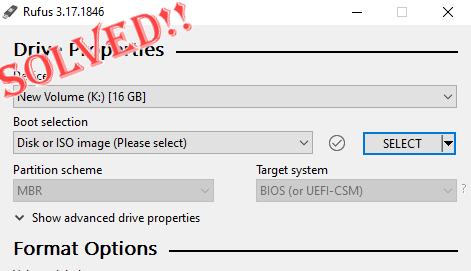
Rufus is an excellent tool to easily create bootable USB drives. The efficiency of this small and sleek tool is amazing and usually offers an error-free operation. But, sometimes the creation of a new bootable USB stick can pop up some error message, stumbling upon the burn process. If you are facing any difficulties with Rufus, you can just follow these steps to find a quick resolution for your problem.
Fix 1 – Run the error checker for drive
Before you retry with Rufus, you can run the error checker tool for the drive to scan the drive for any errors.
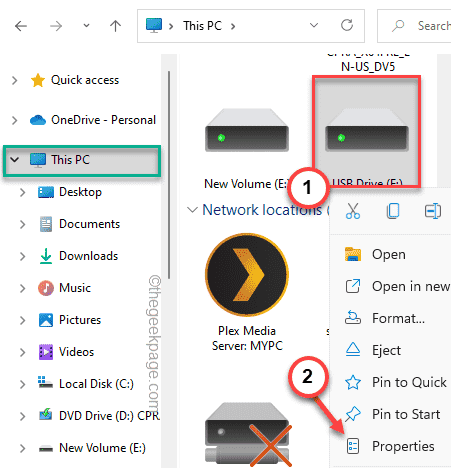
1. Pressing the Windows key+E keys together opens up the File Explorer. Then, tap “This PC“.
2. Try to find your USB drive. Now, just right-tap the drive and tap “Properties“.
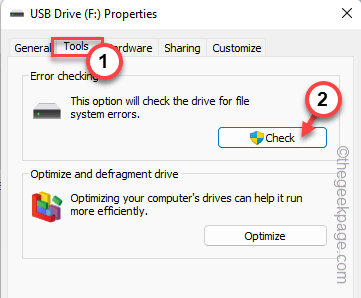
3. When the USB properties open up, head on to the “Tools” section.
4. Here, you will find the ‘Error checking’ section. Just tap “Check“.
6. You may see this message “You don’t need to scan this drive”. But, you have to scan this drive.
7. So, tap “Scan and repair drive” to scan and mend the drive.

Once you are done, retry the burning process with Rufus again. Test if this works.
Fix 2 – Use the Univeral USB installer
You can use the Universal USB installer as a definitive alternative to this issue.
Step 1 – Format the drive
You have to format the drive first.
1. Open the File Explorer page.
2. Now, tap “This PC” on the left-hand pane to view all the drives.
3. Just, right-click on the drive you are trying to use and tap “Format“.
3. You may choose any desirable format for your drive from the ‘File System:’ drop-down menu. Keep in mind the OS iso file you are trying to burn-in.
[ It is usually any of these formats NTFS, FAT32, EXT2, EXT3, EXT4, exFAT. ]
4. To start the formatting process, tap “Start“.
5. You will receive a warning message. Just, click on “OK” to ignore and proceed.
Once you have formatted the drive, you can go to the next step.
Step 2 – Use the Universal USB installer
Now, you can download and use the Universal USB Installer.
1. You have to download the USB Installer on your system.
2. Tap “Latest version” and then, click “Download” on the second page.
3. Once it is downloaded, double tap on the “universal-usb-installer” to start the tool directly.
4. Click on “I agree” to proceed.
5. In the first step, select the OS you want to load on the USB from the drop-down menu. (Example – Windows 10).
If you are loading up an OS that is not listed in the drop-down, you can choose the “Try unlisted Linux ISO” option.
6. Once you have done this, tap on the “Browse” option.
7. Now, navigate through your files and select the ISO file that you want to burn.
8. Once you have selected it, tap “Open“.
9. Now you have selected your ISO file. The next step is to choose the USB device in which you are burning the OS.
10. Select the USB drive from the drop-down in “Step 3“. Now, depending upon the specific OS requirement, you can opt for NTFS format or FAT32 format.
11. Finally, it is time to start the burning process. Tap “Create” to let it begin.
12. You will see another warning message.
Tap “Yes” to proceed.
Now, all you have to do is to wait for the entire burning process to be complete.
Fix 3 – Revoke the Controlled folder access
Revoking Controlled folder access over the USB drive may solve this issue.
1. Press the Windows key and type “Security“.
2. Then, tap “Windows Security” to access it.
3. When the Windows Security page opens up, tap on the “Virus & threat protection” in the home menu.
4. In here, if you scroll down you will find a particular setting called Ransomeware Protection.
5. Tap “Manage ransomware protection” to access it.
6. Inside this page, you will notice the “Controlled folder access“.
7. Just turn it “Off“, if it is On.
Once you have done that, close the Windows Security screen. Restart the system. After you have done that, try to burn in the OS once again. Check if this works out for you or not.


