Some Windows 10 users are complaining about an error they are facing in Microsoft Edge where they are receiving ‘Hmm, we can’t reach this page‘ message when they are trying to access a web page. If you are facing the same error at your end, follow the fixes of this article and the problem will be solved very quickly. But before attempting these solutions, try these simpler workarounds-
Workarounds–
1. Check if the network connection is working or not. Try to browse any other page in the Edge browser or using any other browser.
2. Try to check if any updates are pending for Microsoft Edge or not.
If any of these workarounds didn’t work out, go for these solutions
Fix-1 Set Auto detect settings
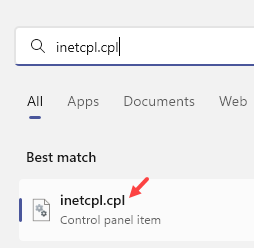
1 – Search INETCPL.CPL in the search box and click on it.

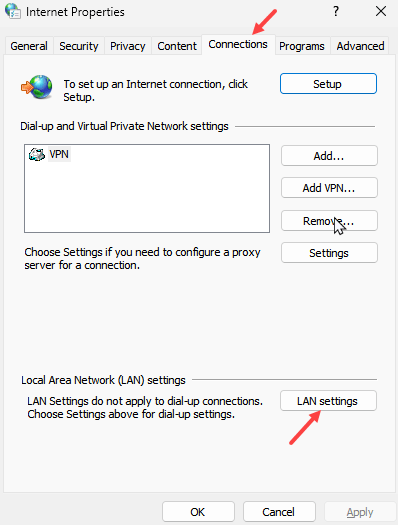
2 – Click on Connections Tab.
3 – Now, Click Lan settings

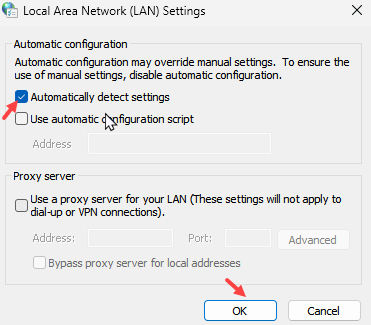
4 – Now, Check Automatically detect setttings
5 – Click OK.

Fix-2 Change network properties
1 – Search View Network Connections in the search box and then click on it

2 – Right click on your network adapter with which you are connected to the internet (WiFi or Internet)

3 – Now, double click on Internet Protocol Version 4 (TCP / IPV4)

4 – Select , Obtain an IP address automatically
5 – Select , Obtain DNS server address automatically
6 – Click OK.

Fix-3 Flush DNS
1 -Open search and type CMD in it.
2 -Right click on CMD icon and click run as administrator

3 – Now, type the command given below.
ipconfig /flushdns
4 -Close the cmd window.
Fix-4 Use Google DNS
1. At first, you need to click on the box which says ‘Type here to search‘ and then type “Network Connections“.
2. Then, click on the “Network Connections“.

3. In Network Connections window, you will see many network connections available on your computer.
4. Right-click on the network adapter you are using and then click on “Properties“.

5. In WiFi Properties window, scroll down and double click on “Internet Protocol Version 4 (TCP/IPv4)“.

6. Next, click on to choose “Use the following DNS server addresses:” and then edit the DNS server as mentioned below-
Preferred DNS server: 8.8.8.8
Alternate DNS server: 8.8.4.4
7. Now, click on “OK” to save the changes on your computer.

Close Network Connections window.
Close Microsoft Edge window and then open it again on your computer. Check if you are still facing the error on your computer.
Fix-5 Disable IPv6 settings
1. Press Windows key+R to launch Run window on your computer.
2. In the Run window, type this command and then hit Enter.
ncpa.cpl

3. In the Network Connections window, right-click on the network adapter you are using and then click on “Properties“.

4. Now, what you need to do is to uncheck the “Internet Protocol Version 6 (TCP/IPv6)” and then click on “OK“.

Restart your computer to save the changes. After rebooting, open the Edge browser and try to search for something. Your problem should be fixed.
Fix 6 – Change Network Profile of your WiFi
Change the network profile from public to private. Most of the time it worked for users.
Case 1 – For Windows 10
1. Press Windows key+R to launch Run window on your computer. Copy-paste the command given below and hit Enter.
ms-settings:network-wifi

Note: If you are using Ethernet use the command given below instead of the above command.
ms-settings:network-ethernet
2. Simply click on the WiFi you are using.

3. Change the network profile to “Private” if it is “Public” or vice-versa.

Close Settings window. Check if you can access any web page with Edge.
Case 1 – For Windows 10
1. Press Windows key+R to launch Run window on your computer. Copy-paste the command given below and hit Enter.
- If you are using WiFi then type ms-settings:network-wifi in it and click OK.
- If you are using WiFi then type ms-settings:network-ethernet in it and click OK.

2 – Now, change the network profile to private

Fix-7 Modify Registry to change the Network Profile-
1. By pressing Windows key+R key you can open the Run window.
2. In the Run window, you need to type “regedit” and then click on “OK“.

3. Once the Registry Editor window opens up, click on “File” and then click on “Export” to create a backup of registry on your computer.

3. You need to name the backup as “Original Registry“.
4. Then, click on “Save” to save the backup on your computer.

5. Now, in Registry Editor window, simply go to this location-
HKEY_LOCAL_MACHINE\SOFTWARE\Microsoft\Windows NT\CurrentVersion\NetworkList\Profiles
6. Now, on the left pane, you shall see many keys listed under ‘Profiles‘. Click on the first of those keys and on the right-hand side of the Registry Editor window, notice the “Description” of the key. Check if it is the network you are currently using or not.
If it is not, go to the next key on the left pane and check again.
7. Repeat this until you see the name of your internet connection in the “Description“.
(Example– For us, in the last key of the left pane we have found the right network which our computer is currently using).
8. Now, double click on “Category“.

9. Now, if the Value Data is set to “1” change it to “0“. Otherwise, if it is set to “0“, change it to “1“.
“0” indicates ‘Public‘.
“1” indicates ‘Private‘.
10. Click on “OK” to save the changes on your computer.

Reboot your computer to save the changes. After rebooting, check if you are still facing the issue with Edge or not. Your problem should be solved.
In case if the network profile is not changed, follow these steps instead