If your FPS keeps dropping while gaming in windows 10 computer, just use the simple fix given below to fix this annoying problem. It is really annoying if FPS keeps dropping while playing any game and the users are reporting this problem with high end PC also. So, here is the simple fix for this.
Fix 1 – Edit Gamedvr settings in Registry
1. Search regedit in the windows 10 Search bar.
2. Click on the Regsitry Editor Icon to Open Registry editor
3. Now, Browse to the following Location in the Registry Editor.
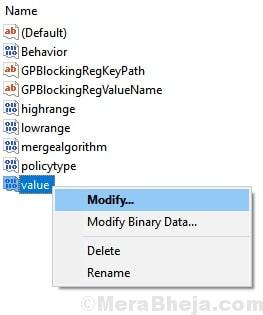
Computer\HKEY_LOCAL_MACHINE\SOFTWARE\Microsoft\PolicyManager\default\ApplicationManagement\AllowGameDVR

4. Now, Locate value in the right side.
5. Right click on value and Choose Modify.
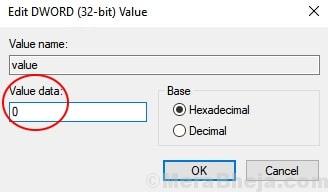
6. Now, Set value data to 0.

7. Now, Browse to the following Location in the Registry Editor.
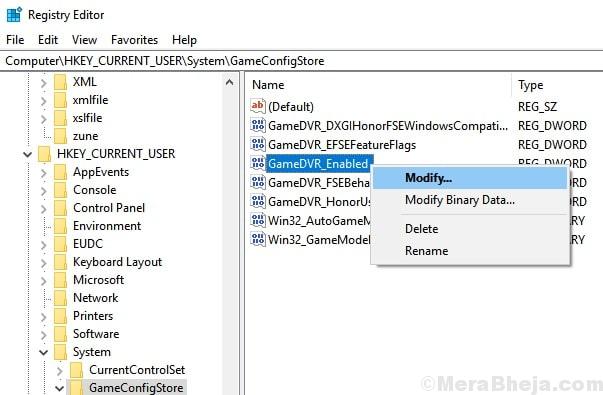
Computer\HKEY_CURRENT_USER\System\GameConfigStore
8. Now, in the right side locate GameDVR_Enabled.
9. Right Click and Choose Modify.

10. Change the value data to 0.

11. Close registry Editor and Reboot your PC.
If the problem still don’t get fixed, try the Fix given below.
12 – Reboot computer
Fix 2 – Change Nvidia Graphics card settings
1 – Right click on empty desktop and click on Nvidia control panel to open Nvidia control panel
2 – Tweak the following settings in Nvidia.
Vertical Sync
First of all Click on Manage 3D settings in left and then click on Global Settings Tab. Now, Choose On for Vertical sync.

Maximum Performance
1 – Click on Manage 3D settings
2 – Click on program settings Tab
3 – Select your game from dropdown
4 – Set Power management mode to Prefer maximum performance.

Set PhysX Processor from CPU to GPU
Go to Manage 3D Settings -> Configure Surround, PhysX -> PhysX settings -> from the drop down menu of Processor choose your GPU.
Fix 3 – Set Processor power management to max
1 – Search Edit Power plan in Taskbar search box
2 – Click on Edit Power plan

3 – Now, Click on change advanced power settings

4 – Click on Processor power management
5 – Click on maximum power state. Set 99% for bot on battery and plugged in
6 -Click on apply and close the window

Fix 4 – Uncheck Full screen Optimizations
1 – Locate the exe file of the game, do a right click and choose properties
2 – Click on compatibility Tab
3 – Now, select Disable full screen optimizations
4 – Click on apply and OK

Fix 5 : – Create Ultimate performance plan in your PC for gaming
The Ultimate power performance plan was introduced by Microsoft in 2018 and it can be obtained by running a simple command in Elevated Powershell window.
For this Just Follow the steps below:-
1. Search powershell in Search box of taskbar.
2. Right click on the powershell and click on run as administrator

3. Now, copy and paste the command given below in the powershell window.
powercfg -duplicatescheme e9a42b02-d5df-448d-aa00-03f14749eb61
4. Now, press windows key + R together to open RUN.
5. Write powercfg.cpl in it and click OK.

6. Now, select ultimate performance plan.
