Are you stuck with the error code 80090016 when using the Microsoft Teams Desktop application on your Windows PC? Recently, many users have reported seeing this error code that stops them from joining Teams and performing any operation. The error message that is displayed to the user is
Your computer’s trusted Platform Module has malfunctioned. If this error persists, contact your system administrator with the error code 80090016.
In this article, we have detailed some troubleshooting strategies that can help you overcome this Microsoft Teams error code 80090016 on your system. We recommend you perform a system restart, or log out and log in back into Teams to check if the issue can be resolved before moving ahead with the fixes.
Fix 1 – Delete .AAD.BrokerPlugin Folder
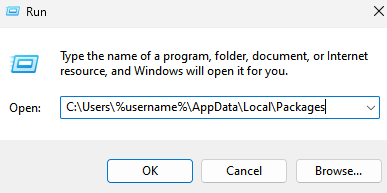
1. Press the Windows and R key combination to open Run.
2. Type the path below and hit Enter.
C:\Users\%username%\AppData\Local\Packages

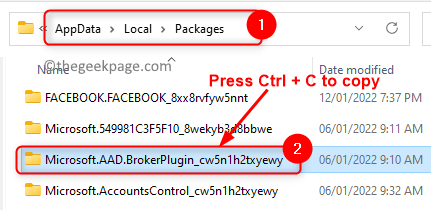
3. Locate a folder named Microsoft.AAD.BrokerPlugin_cw5n1h2txyewy in Packages.
4. Select this folder and press Ctrl + C to copy it.
5. Go to the desktop or any other location and press Ctrl + V to paste this folder. This is a backup if there are any issues later.
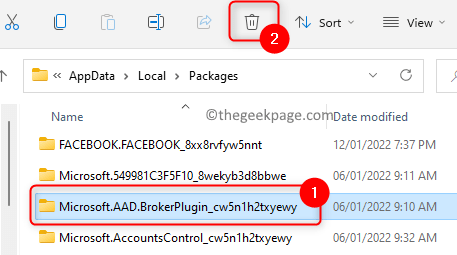
6. Come back to the Packages folder. Select Microsoft.AAD.BrokerPlugin_cw5n1h2txyewy folder and click on the Delete (trash icon) at the top.
7. Click on Yes if prompted for confirmation of folder deletion.
8. At times you might see an error You might need permission to perform this action while trying to delete the folder.
9. Hit the Windows key and click on your profile icon. Click on Sign out to log off this account.
10. Once you are back to the login screen, choose another administrator account in the list and log in.
11. If there are no other accounts, then create another user account from this article.
12. Once you have logged in as a different user, perform Steps 1 and 2 above.
Note: Replace <username> in the path with the original user account and not the new one. For example, if your original username was Test and the new user account name is Test1, then use Test in the path.
13. Select the folder named Microsoft.AAD.BrokerPlugin_cw5n1h2txyewy and press Delete to remove this folder.
14. Sign out of this new user account and login back into your original user account.
15. Launch Microsoft Teams. While trying to log in, select the link No only want to login to this App.
16. Your problem must be resolved and Teams will load without any error.
Fix 2 – Remove the Credentials Using the Credential Manager
1. Open the Run dialog using the Windows and R key combination.
2. Type control and hit Enter to open the Control Panel.
3. Click on the downward arrow next to the View by option and select Small icons.
4. In the list of options, click on Credential Manager.
5. In the Credential Manager, select Windows Credentials.
6. Now scroll and locate the Generic Credentials section.
7. Here identify the entry with your Microsoft Account. Click on this particular entry to expand and see the details.
8. Click on the Remove option.
9. When the confirmation dialog for deletion pops up, click on Yes.
Note: Once this credential is deleted, you must sign in again in all the applications that are using the Microsoft account.
10. Reboot your computer.
11. Open Microsoft Teams and log in using your credentials to check if the problem is solved.
Fix 3 – Turn On Compatibility Mode
1. Locate the Microsoft Teams shortcut on your Desktop. Right-click on the shortcut and select Properties.
2. In the Properties window, go to the Compatibility tab.
3. Check the box next to Run this program in compatibility mode for in the Compatibility section.
4. In the dropdown below, select the option Windows 8.
5. Click on Apply and then on OK to save the changes.
6. Launch Microsoft Teams and check if the issue is fixed.
Fix 4 – Repair PIN & Picture Password
To perform this fix make sure that you are logged in to the system using an administrator account.
1. Press Windows + E to open the File Explorer.
2. In your File Explorer, click on the View tab. Select the option Show and check the option next to Hidden items.
3. Now navigate to the location mentioned below
C:\Windows\ServiceProfiles\LocalService\AppData\Local\Microsoft\Ngc
Note: If it is the first time you are accessing these folders, don’t directly copy-paste this location as it requires permission to access the folders. Go one folder at a time and you see a window with a message You don’t currently have permission to access this folder. Click on Continue here.
If you are not able to open the Ngc folder, then continue with the steps below else go to Step 15.
4. When you try to open the Ngc folder you see a warning message saying You have been denied permission to access this folder. Click on the Security tab link in the error message to gain access to the folder.
5. In the Security tab for the Folder Properties, click on Advanced.
6. Click on the Change link at the top in the Advanced Security Settings window.
7. Click on the Advanced button to select a user or group.
8. Now, click on Find Now to see a list of users. Select the current user at the bottom in the search results. Click on OK.
9. Now you will see the user added in the Select User or Group window. Click on OK.
10. You will see the user name next to Owner. Check the box next to Replace owner on subcontainers and objects.
11. Click on Apply.
12. In the Windows Security warning, click on Yes to replace the directory permissions to grant you full control.
13. Click on OK in the information message saying to close and reopen the object properties to change permissions.
14. Click on OK in the Advanced Security Settings window. Now you will have full control over this folder.
15. Double-click and open the Ngc folder. Select all the files (Ctrl + A) in the Ngc folder. Press the Delete (trash icon) at the top to remove all files from here.
Note: In case you are not able to delete all the files, then right-click on this folder Ngc and click on Rename icon. Give it some other name like Ngc_old.
16. Once you delete the files, you will be asked to enter your windows password to log in.
17. Press Windows + I to open Settings.
18. Select the Accounts tab in the left pane.
19. On the right side, click on the Sign-in options.
20. In the different ways to sign in, click on PIN (Windows Hello) to expand it.
21. Click on the Set up button to start the process.
22. In the Set up a PIN window, enter the New PIN and Confirm the PIN and click on OK.
Check if the issue with the Teams app is resolved.
Fix 5 – Clear Teams App Cache
1. Right-click on the Teams app icon in the icon tray and choose Quit to exit the application completely.
2. Press the Windows + R key.
3. Type %appdata%\Microsoft\Teams in the Run dialog and then hit Enter.
4. Once you are in the Teams folder, select each folder mentioned below and delete it to clear the applications cache.
- application cache\cache
- blob_storage
- Cache
- databases
- GPUcache
- Indexed DB
- Local Storage
- tmp
5. Reboot your computer. Open Teams and check if the error 80090016 still appears or not.
Fix 6 – Disable ADAL
1. Quit Teams using the icon in the system tray.
2. Press Windows + R to open Run.
3. Type regedit and click on OK to open the Registry editor.
4. Copy and paste the path in the Registry’s navigation bar.
HKEY_CURRENT_USER\Software\Microsoft\Office.0\Common\Identity
5. Once the Identity key is selected, move over to the right side.
6. Right-click on the empty space and choose New –> DWORD (32-bit) Value.
7. Name this DWORD as EnableADAL.
8. Double-click on EnableADAL to change its value.
9. In the Edit window, set the Value data field for EnableADAL to 0 (zero). Click on OK.
Check if the problem is solved.
Fix 7 – Uninstall and Reinstall Teams
1. Open Run (Windows + R).
2. Type ms-settings:appsfeatures to open the Apps & features settings page.
3. Locate Microsoft Teams in the list of apps.
4. Click on the three vertical dots associated with Microsoft Teams and click on Uninstall.
5. In the confirmation message, click on Uninstall again.
6. Wait for the Teams app uninstallation to complete.
7. Reboot your PC.
8. Download Microsoft Teams installer. Click on the Download for desktop.
9. Now, click on the version that you want to download either for home or work or school and also the OS Windows 10 / 11.
10. Double-click on the downloaded file and follow the on-screen instructions to complete the installation.
11. Launch Teams and log in with your credentials. Check if the issue is resolved.
That’s it!
Microsoft Teams must now be working properly without displaying the error code 80090016. Comment and let us know the fix that worked for you.


