Do you want to create a new guest account on your Windows 11? You can’t do it because the settings menu has been altered? Don’t worry. In this article, we will describe how to create a guest account in the easiest way possible. Just follow these simple instructions to create a guest account ready to use immediately.
What is a guest account?
A guest account is an account with limited permissions for users who will not enjoy any administrative privileges. So, such accounts are prohibited from installing any application or making any system settings changes. This is a temporary profile. So, whenever a guest logs in, the guest can use it until he/she shuts down the system, because after the shut down the profile data gets erased.
How to create a guest account in Windows 11
There are two ways you can create a guest account. Follow any of the methods you want.
A. Creating a guest account using the Settings
B. Creating a guest account using the CMD
A. Create a guest account using the Settings –
These are the steps to create a guest account using Settings.
1. At first, press the Windows key+I keys together.
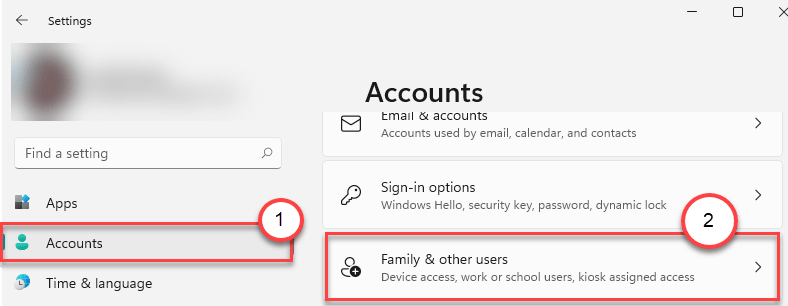
2. When the Settngs appear, tap on “Accounts” on the left-hand side.
3. Then, on the right-hand side, tap on the “Family & other users“.

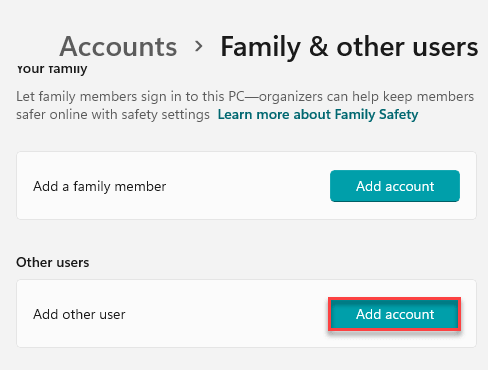
4. On the right-hand side, scroll down the ‘Other users‘ section.
5. Then, click on “Add account“.

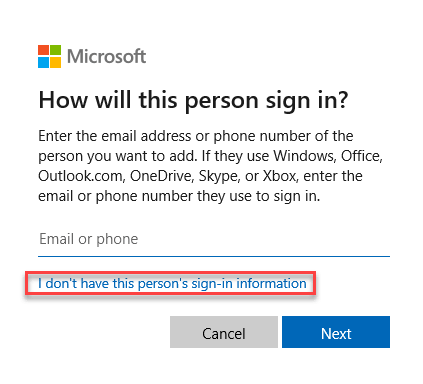
6. Once the Microsoft Sign-in panel opens up, tap on the “I don’t have this person’s sign-in information“.

7. Next, click on “Add a user without a Microsoft account“.

8. Type the name of the guest account you want in the particular box.
9. Enter and re-enter a password in the box.
10. Finally, click on “Next“.

Don’t forget to properly choose all three security questions and answers.
You will notice that the new guest account has appeared on the Settings window.

Close the Settings window. Restart your computer and the guest account will be ready to use.
B. Creating a guest account using the CMD –
Follow these steps to create a guest account using the CMD terminal.
1. At first, click on the search icon and type “cmd“.
2. Then, right-click on “Command Prompt” and click on “Run as administrator” to open the terminal with administrative rights.

3. When the Command Prompt opens up, type this command and hit Enter.
net user Guest1 /add /active:yes
[
NOTE –
Replace the ‘Guest1’ with any guest name you prefer. You can’t put “Guest” as the name of the account as it is reserved by Windows.
Example – If you want to create a guest account named “Deb”, the command will be –
net user Deb /add /active:yes
]

This will create a new guest account on your system.
Now, below we have mentioned some optional steps you can do with this guest account.
a. To add a password for the account, type this command and hit Enter.
net user Guest1 *
b. Same way, if you want to remove this account from the current user’s group, execute this command.
net localgroup users Guest1 /delete
[
NOTE – Don’t forget to replace the “Guest1” with the name you have specified as before.
]

c. In case, if you want to add this account to the existing current accounts group, just execute this command.
net localgroup guests Guest1 /add
[
NOTE – Don’t forget to replace the “Guest1” with the name you have specified as before.
]

Close the Command Prompt. Now, you can log in to the guest account anytime you want.