The printers shared over an office network usually works efficiently irrespective of the OS used in the system. But, sometimes while printing some documents, you may see the error prompt ‘Operation could not be completed (error 0x0000011b)‘. The reason behind this issue is quite complicated, but the main issue lies in the conflict between the windows update with the TPC authentication level for the printer. You can easily solve this issue with a registry hack.
Fix 1 – Add a new registry value
You have to add a new value to the registry to fix this issue.
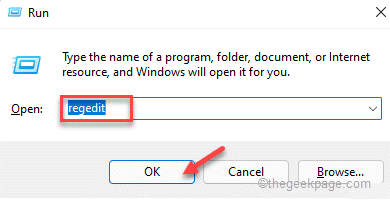
1. At first, press the Windows key+R keys together.
2. Then, type “regedit” and click on “OK” to access the Registry Editor.

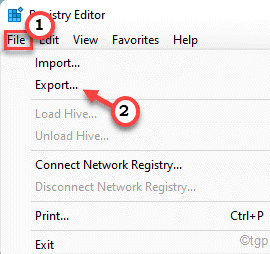
Warning – Before modifying the registry on your computer, you should create a registry backup on your system. So, pay close attention to these instructions.
When the Registry Editor opens up, click on “File“. Then tap on “Export” to create a new registry backup on your system.

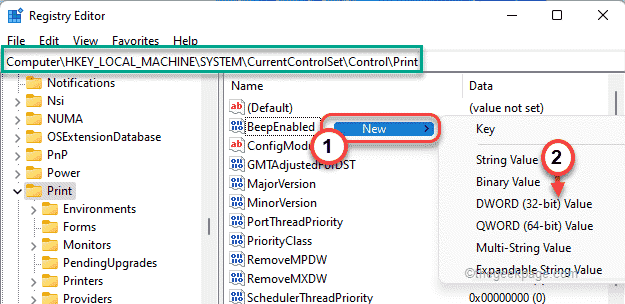
3. On the left-hand side, expand the left-hand side this way ~
HKEY_LOCAL_MACHINE\System\CurrentControlSet\Control\Print
4. Then, on the right-hand pane, right-click on the space and tap on “New>” and click on “DWORD (32-bit) Value“.
5. Now, name this value as “RpcAuthnLevelPrivacyEnabled“.

6. Next, double click on the value to edit it.

7. Then, set the value to “0“.
8. Finally, click on “OK” to save the changes.

After that, close the Registry Editor screen.
9 – Now, Open run by pressing Windows and R key together
10 – Now, type services.msc in it and click OK

11 – Now, Right click on Print Spooler and click on Restart

Check whether this works for you.
Fix 2 – Use the local printer driver for the local port
You can add a new printer using the local port from Control Panel.
1. At first, press the Windows key+R keys together.
2. Then, type this code and click on “OK“.
control printers

3. When Devices and Printers opens up, tap on “Add a printer“.

4. Wait for Windows to scan for new printer devices. Once it does, tap on the “The printer that I want isn’t listed“.

5. Then, select the “Add a local printer or network printer with manual settings“.
6. After that, click on “Next“.

7. Then, click on the radio button beside “Create a new port:“.
8. After that, select the “Local Port” from the drop-down list.
9. Next, click on “Next” to proceed further.

10. Now, just paste your file path followed by the name of the network printer in the box.
11. Finally, tap on “OK“.

Now, Windows will find the printer on your network.
12. On the left-hand side, tap on the printer manufacturer.
13. Then, select the correct printer driver in the right-hand pane.
14. Finally, tap on “Next” to proceed with the installation.

You will see the printer has appeared in the list of devices.
Close the Devices and Printer window. Try to print anything using the printer and check whether this works.
Fix 3 – Uninstall the recent Windows Update
It seems that the recent Windows Update is causing this issue.
1. At first, press the Windows key+R keys together.
2. Then, type “appwiz.cpl” and click on “OK“.

3. In the Program & Features window, tap on “View installed updates“.

4. Now, you shall see the list of installed updates on your system.
5. Now, right-click on the most latest update and click on “Uninstall“.

Follow the on-screen instructions to uninstall the update from your system.