Is the mouse pointer flickering too much in your new Windows 11? A handful of users have reported facing a similar kind of problem on their system and it is evident that it is occurring after they have upgraded to Windows 11. This problem occurs only once in a while and there are some quick resolutions you can use to solve this issue.
Fix 1 – Restart the Windows Explorer process
The easiest way to fix the problem is to restart Windows Explorer on your computer.
1. At first, press the Windows key+E keys together. This will open up File Explorer. Just minimize it.
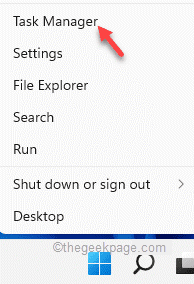
2. Then, press the Windows key and X keys together.
3. Next, tap on “Task Manager” to access the Task Manager on your computer.

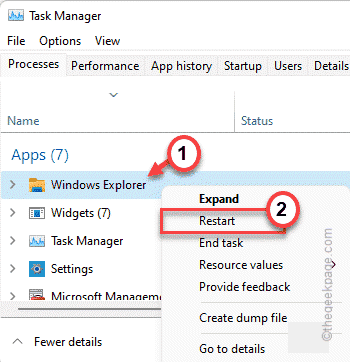
4. When the Task Manager opens up, right-click on the “Windows Explorer” and tap on “Restart“.

This will restart Windows Explorer and fix the cursor flickering issue on your computer.
Fix 2 – Run SFC command
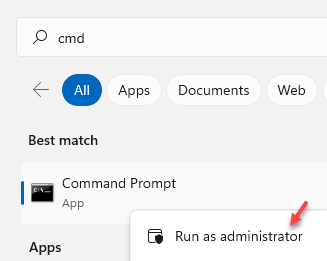
1 – Search cmd in Windows taskbar search box
2 – Now, Right click on command prompt icon and select run as admin.

3 – Now, run the code given below in cmd and hit Enter key
SFC /SCANNOW
4 – Once the code execution ends, close the window.
Fix 3 – Disable Either Touchscreen or Touchpad driver
It has been seen that devices with touchscreen supports are facing this issue sometimes. So, if your laptop is also touchscreen, try disabling the touchscreen or touchpad driver and check again.
1 – Open RUN command box by Jointly pressing Windows and R key.
2 – Type devmgmt.msc in the box and click OK

3 – Expand Human Interface device
4 -Now, Right-click on the HID-compliant touch screen driver and select Disable device.
If you want to use the Touchscreen , then you can choose to disable the touchpad option also.
Fix 4 – Disconnect and reconnect the display driver
Sometimes the display itself can cause the cursor flickering issue. Follow these steps to solve this issue.
1. At first, disconnect the display from your computer.
2. Then, wait for a minute or so.
3. Then, replug the display back to your system once again and check whether this stops.
This should revert your cursor back to normal again.
Fix 5 – Uninstall drivers
A misconfigured display and/or mouse driver can create this pointer flickering.
1. At first, press the Windows key+R keys together.
2. Then, type “devmgmt.msc” and hit Enter to open the Device Manager on your computer.

3. In the Device Manager window, expand the “Display adapters” section.
4. Then, right-click on the display adapter and tap on “Uninstall device” to uninstall it.

5. Next, tap on “Uninstall” to uninstall the device from your computer.

If you want to install a new display driver for your device, you can download it from the display driver manufacturer’s website and install it easily. After installing the driver, follow these steps.
6. Open the Device Manager window, if it isn’t opened yet.
7. Now, expand the “Mice and other pointing devices” section.
8. Then, right-click on your mouse and tap on “Uninstall device” to uninstall it from your computer.

9. Again, tap on “Uninstall” to confirm the action.

After uninstalling the mouse device, you may not be able to use the mouse briefly. Press the Alt+F4 keys together to close the Device Manager.
Then, press the Alt+F4 keys and restart the computer.

After rebooting the system,
Fix 6 – Clean boot your device
If a third-party application is causing this issue on your computer, clean booting your system should work.
1. At first, press the Windows key+R keys together.
2. Then, type this command and hit the Enter key.
msconfig

3. Just, click on the “General” tab.
4. After that, go to the General section, click on the “Selective startup” option to check it.
5. Now, finally you can check the “Load system services” option.

6. After that, go to the “Services” section.
7. Next, you have to check the “Hide all Microsoft services” box.
8. You will notice that only third-party apps are selected. Then, click on the “Disable all“.

This way, all the services affecting the pointer flickering issue will be stopped.
9. Then, you have to go to the “Startup” section.
10. Here, you have to tap on the “Open Task Manager“.

Task Manager will open up.
11. Here, you will notice all the services that can autostart automatically.
12. Then, right-click on the service and tap on “Disable“.

When you have disabled all the startup of unnecessary applications, close the Task Manager window.
13. Just, click on “Apply” and then on “OK“.

System Configuration will prompt you to restart the system.
14. Just, tap on “Restart” to reboot your system immediately.

When your computer boots up, check whether the mouse pointer is still flickering or not.