While running a network diagnostics to solve a non-connectivity issue, troubleshooter may throw up a “Computer appears to be correctly configured but the device or resource is not responding” error message. To solve this issue, follow these easy fixes on your computer.
Initial Workarounds: –
1 – Disable any third party anti virus you are using and try again.
2 – Restart your computer as well as your router
Fix-1 Flush the DNS configuration
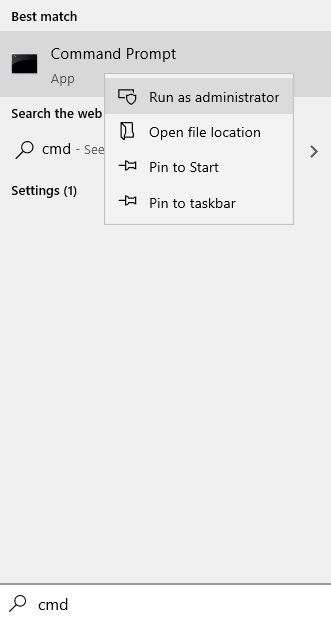
1 – Search cmd in search box.
2. Do a right click on the search result and then click on run as administrator.

2. Now, run the command given below in the command prompt window.
netsh int ip reset reset.log
3. To flush the DNS and re-register it again copy-paste these two commands in the Command Prompt window and then hit Enter.
ipconfig /flushdns
ipconfig /registerdns

4. To release and renew the IP configuration data, execute commands given below in the terminal.
netsh winsock reset
ipconfig /renew
Wait for a few minutes to complete the process.

Try to connect to the website, check the problem is still there or not.
Fix-2 Set the IPv4 settings to automatic-
Setting IPv4 settings to automatic will solve this issue.
1. Click on the Windows icon and type “Network connections“.
2. Then, you need to click on “View network connections” to access it.

4. You will see the list of adapters available.
5. To access the adapter properties, right-click on the network adapter you are facing trouble with and then click on “Properties“.

4. To access the IPv4 settings, you need to double click on “Internet Protocol Version 4 (TCP/IPv4)“.

5. At first, click on the radio button beside the option “Obtain an IP address automatically“.
6. Similarly, select the “Obtain DNS server address automatically” option.
7. Finally, click on “OK“.

8. Now, double click on the “Internet Protocol Version 6 (IPv6)” settings.

9. After that, check these two options.
Obtain an IPv6 address automatically
Obtain DNS server address automatically
10. Then, check the option “Validate settings upon exit“.

Click on “OK” to save the settings.
The settings will be verified by your system. Close the Network Connections window.
Reboot your computer to save the changes on your computer.
Note: – For Windows 11 users
If you are a Windows 11 user, read this article to know how to change the DNS on Windows 11
Fix 3 – Change DNS settings
1. Click on the Windows icon and type “Network connections“.
2. Then, you need to click on “View network connections” to access it.

4. You will see the list of adapters available.
5. To access the adapter properties, right-click on the network adapter you are facing trouble with and then click on “Properties“.

4. To access the IPv4 settings, you need to double click on “Internet Protocol Version 4 (TCP/IPv4)“.

Note: If the above method does not work, change the DNS settings for IPv4 settings to Google DNS.
a. To do this, just click on Use the following DNS server address.
b. Then type 8.8.8.8 in a preferred DNS server and 8.8.4.4 in an Alternate DNS server.

After that, click on OK and try again.
Note: – For Windows 11 users
If you are a Windows 11 user, read this article to know how to change the DNS on Windows 11
Fix – 4 Update or Rollback the adapter driver
Update the driver if you are using an old driver.
1. Simply press the Windows key+R keys.
2. Then type “ncpa.cpl” and then hit Enter.

3. Look closely for the network adapter you are trying to use on your computer.

4. Press Windows key+R to launch Run.
5. Then, write “devmgmt.msc” and hit Enter.

6. Click on the “Network adapters” drop-down to list the available adapter drivers.
7. After that, right-click on the network adapter driver and then click on “Update driver“.

8. To let Windows search for drivers itself, choose the option “Search automatically for drivers“.

Restart once the update process is complete.
In case if you have recently received an update for the network driver, consider rolling back the update.
1. Access the Device Manager again on your computer.
2. Just the same way, expand the network adapter section and double click on the adapter you are using.

3. Then, go to the “Driver” tab.
4. After that, click on “Rollback Driver“.

The driver update will be rollbacked from your device.
Fix 4 – Disable proxy settings
According to some users, this problem is occurring due to misconfigured proxy settings in IE.
1. Right-click on the Windows icon and then click on “Run“.
2. When the Run appears, type “inetcpl.cpl“. Click on “OK“.

3. On the Internet Options window, you need to click on the “Connections” tab.
4. After that, you have to click on “LAN Settings“.

5. Simply, check the box beside the option “Automatically detect settings“.
6. To save the settings, click on “OK“.

7. Finally, click on “Apply” and then click on “OK” to save the changes.

Now, try to check the connection again.
Fix 5 – Modify the power settings
Modifying the power settings should allow the adapter to use power all the time.
1. Just type “devmgmt” in the search box.
2. A simple hit on the Enter key and to open the Device Manager.

3. Again double click on the network adapter you are using.

4. Go to the “Power Management” tab.
5. Here just uncheck the option “Allow the computer to turn off this device to save power:‘.

Then click on “OK” to save the settings on your computer.
Restart the device.