DNS is Domain Name System, that manages to resolute the name to IP address and vice versa. Computers / Systems work best with the IP address to locate and load any website but for users it is really difficult to remember the ip address of most of the websites. That is where the DNS server address comes into the picture. DNS server tries to map the website domain name you entered in the browser and its IP address and allows the system to locate and load it back to your browser. Therefore, there are usually 2 DNS server addresses provided by the internet service provider. In any case, either one of the DNS server addresses will work for sure. You might have DNS server addresses ready with you but wondering how and where you can assign it on your windows system right? Don’t worry, this article will guide you on how to do it.
Case 1 -If you are Using WiFi for Internet
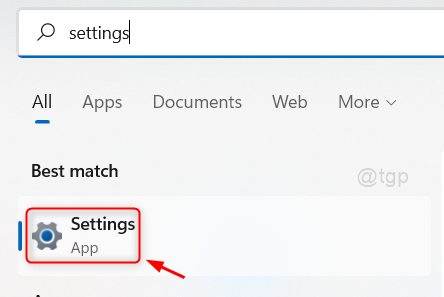
Step 1: Press Windows key on your keyboard and type settings.
Step 2: Then, Click Settings app from the search results as shown below.

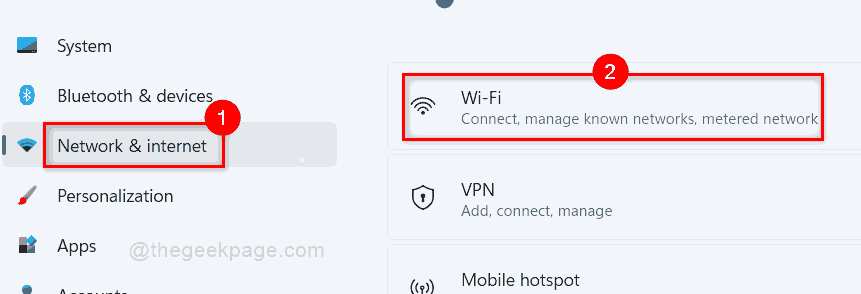
Step 3: Select Network & internet option on the left menu of the Settings app window.
Step 4: Then, Click Wi-Fi on the right side of the window as shown in the below screenshot.

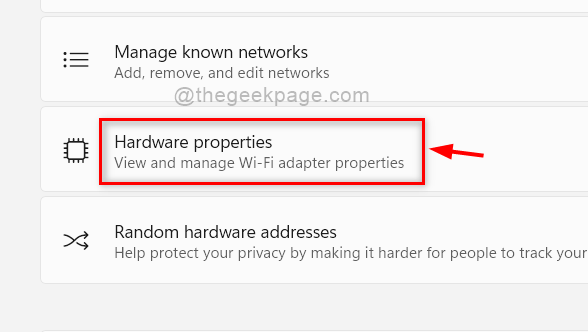
Step 5: Click Hardware properties in the Wi-Fi page as shown below.

Step 6: In the Wi-Fi properties page, Click Edit button in front of DNS server assignment as shown below.

Step 7: Then, Select Manual from the dropdown list in the Edit DNS settings window.

Step 8: After selecting Manual option, you will find two toggle buttons, IPv4 and IPv6.
Step 9: Click on IPv4 toggle button to turn it On.
Step 10: Then, Enter the DNS server address in the Preferred DNS textbox.
Step 11: Enter the Alternate DNS server address in the Alternate DNS textbox.
Step 12: Leave all the other fields as it is and directly click Save button as shown below.

Step 13: Then, Close the Settings app window.
This is how one can assign / set the DNS server address in the windows 11 system.
Case 2 – If you are Using Ethernet for Internet
1 -Press Windows Key + I to open settings.
2 -Now, in the left Menu, Click on Network & Internet
3 -In the right side, click on Ethernet

4 – Scroll down and Click edit near DNS server assignment

5 – Then, Select Manual from the dropdown list in the Edit DNS settings window.

6 – After selecting Manual option, you will find two toggle buttons, IPv4 and IPv6.
7 – Click on IPv4 toggle button to turn it On.
8: Then, Enter the DNS server address in the Preferred DNS textbox.
9: Enter the Alternate DNS server address in the Alternate DNS textbox.
10: Leave all the other fields as it is and directly click Save button as shown below.

11: Then, Close the Settings app window.
That’s it guys. Hope you found this article interesting. Please leave us comments below.
Thank you for reading!