Some Windows 10 users are experiencing some difficulties printing pdf files directly from Adobe Acrobat Reader. Now, if you are experiencing the same problem on your end, no need to worry. Typically the wrong file format or incompatible printer driver is the main reason for this problem. Follow these fixes to fix this error on your computer. But before going ahead, first, go through these workarounds to try out some simpler solutions on your device.
Initial Workarounds–
1. Check the printer for any kind of problems (like hardware faults, connection issues, cartridge dislocation, etc ). Disconnect your printer and reconnect it with the computer and try to print something from Adobe Acrobat Reader again.
2. Reboot your computer. After rebooting, open the file with Adobe Acrobat Reader. Try to print the document again.
3. Make sure that you are using an administrative account when you are printing. If you are not using one, log in with your administrative account and try to print again.
4. Check if any Windows Update is pending. If there is any update pending, update your computer. After updating your computer, check if your problem is solved.
If these workarounds didn’t work out for you, attempt these fixes on your computer.
First, we will be discussing solutions for the printer problem and after that, we are going to discuss how to solve problems with Adobe Acrobat Reader.
Solution for Printer problem–
Fix-1 Update your Printer driver-
If you are receiving an error when you are trying to print something with Adobe Acrobat Reader DC that may be happening because of old/incompatible driver. You can update your printer driver by following these steps-
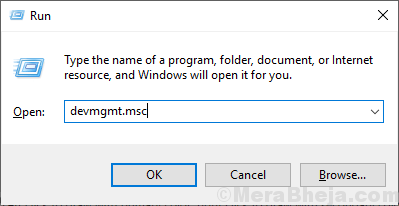
1. Press Windows key+ R to open Run. Now, type “devmgmt.msc” and hit Enter. Device Manager utility will open.

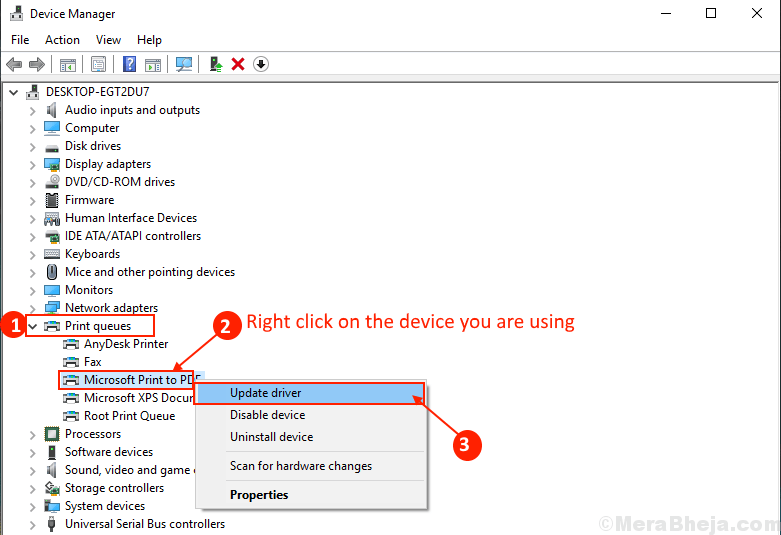
2. In the Device Manager window, find “Print queues“, expand it.
3. Now, from the drop-down of the devices, right-click on the printer device and click on “Update driver”.

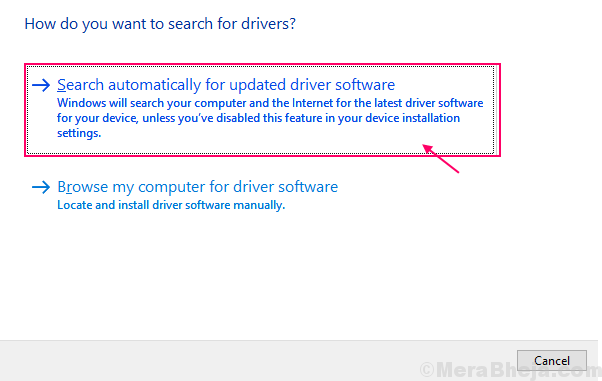
3. When you are asked, “How do you want to search for the drivers?“, choose the option “Search automatically for updated driver software“.

Wait till Windows searches for the compatible driver for your printer driver, downloads it and installs it. Then, reboot your computer.
Check if your problem has solved. If the problem persists then go for the next fix.
Fix-2 Set the printer device as default
You are facing this issue on your computer may be because the printer device you are using is not set as the default printing device on your computer. To set your printer device as your default printing device on your computer just follow these steps.
1. Type “Printers & scanners” in the search box beside the Windows icon.
2. Click on the “Printers & scanners“.

3. Now, on the right side of the Settings window, you will see the list of printers & scanners. Uncheck the box beside “Let Windows manage my default printer” option.
4. Now, from the list of the printers click on the printer which you are using.
5. After doing that, click on “Manage“.

Reboot your computer and after rebooting your computer, open the file with Adobe Acrobat Reader on your computer.
Try to print it again and check if you are still facing the issue or not
Fix-3 Install the printer drivers again-
Removing the problematic printer from your computer, and adding it again can solve your problem.
1. Press Windows key+R to launch Run, and type “control printers” and hit Enter.
Device and Printers window will be opened.

2. Now, in the list of the printers, right-click on the problematic printer. Then click on the “Remove Device“. This printer device will be removed from your computer.

3. Now, click on “Yes” to confirm the removal of the device.

Close the Devices and Printers window. Reboot your computer.
4. Press Windows key+R to launch Run, and type “control printers” and hit Enter. Device and Printers window will be opened.

5. Now, in the Devices and Printers window, click on “Add a printer“.

6. Windows should automatically detect the printer. Click on “Next“.
7. Now, check the “Set as the default printer” and then click on “Finish“.
Try to print the document from Adobe Acrobat Reader. Now, check if you are facing the same printer driver issue on your computer. Your problem should be solved.
Fix-4 Restart Print Spooler service-
1. On your keyboard, press ‘Windows key+R’.
2. Then, copy-paste this run command and hit Enter to access Services window.
services.msc

3. In the Services window, find the “Print Spooler” service in the list of services.
4. Right-click on the “Print Spooler” service and click on “Restart” this will restart the Print Spooler service.

Close Services window. Reboot your computer.
After rebooting open the document with Adobe Acrobat Reader. Try to print again. Check if you are still facing the previous error.
Fix-5 Clear printing queue-
1. Press ‘Windows key+R‘ to open access to the Run terminal.
2. Here, type “services.msc” and then click on “OK” to open the Services window.

3. In the Services window, find the “Print Spooler” service in the list of services.
4. Right-click on the “Print Spooler” service and click on “Stop” to stop the Print Spooler service.

Minimize the Services window.
5. Press Windows key+E to open the File Explorer window.
6. Navigate to this location-
C:\Windows\System32\spool\PRINTERS
[Change “C:” with the drive letter of your Windows installation directory]

NOTE–
If you are denied access with a prompt “You don’t currently have permission to access this folder“, simply click on “Continue“.

7. Delete all the files of the “PRINTERS” folder.
Maximize the Services window.
8. Now, in the list of services, find the “Print Spooler” service.
9. Right-click on the “Print Spooler” and then click on “Start” to again start the Print Spooler service.

Reboot your computer.
Check if you are facing the same issue again at your end or not.
Solutions for the problem related to Adobe Acrobat Reader –
Try these solutions to solve the problem with Adobe Acrobat Reader.
Fix-1 Print pdf file as Image-
1. Open the pdf file with Adobe Acrobat Reader.

2. Now, press Ctrl+P to initiate the printing process.
3. Now, in the Print window, click on “Advanced” at the top. Advanced Print Setup window will be opened.

4. In the Advanced Print Setup window, check the option “Print as Image” and then click on “OK“.

5. In the Print window, click on “Print” to finally start the printing process.

You should be able to print the document without any further error.
Fix-2 Check for Updates Adobe Acrobat Reader DC-
You are experiencing this problem may be because a vital upgrade is due for Adobe Acrobat Reader DC.
1. Open the Adobe Acrobat Reader by double-clicking on the Adobe Acrobat Reader icon on Desktop or in the Start menu.
2. In the Adobe Acrobat Reader window, click on “Help” and then click on “Check for Updates…“.

3. In the Adobe Acrobat Reader DC Updater window, you will notice the up-gradation process is searching for an upgrade.

The latest version of Adobe Reader DC will be downloaded. Update the Adobe Acrobat Reader DC.
After updating, open the document with Adobe Reader DC again. You should be able to print the document again.
Fix-3 Save the pdf with a new name-
Saving the pdf file with another name may solve the problem for you.
1. Open the pdf file in Adobe Acrobat Reader DC. Now, press Ctrl+Shift+S. Save As window will be opened.

2. Now, navigate to a favorable location of your choice to save the file. Save the file with a new name. Click on “Save” to save the file. Close Adobe Acrobat Reader DC.
3. Go to the location where you have just saved the new file. Open the pdf file with Adobe Acrobat Reader DC. Now, try to print this new file. You should be able to print the file without any error.
Fix-4 Re-install Adobe Acrobat Reader-
Some bugs in Adobe Reader can cause this error on your end, so re-installing it will clear any kind of software bugs.
1. Press the Windows key and start to type “Programs and Features“.
2. Then, click on the “Programs and Features” in the search result.

2. In Programs and Features window, scroll down to find “Adobe Acrobat Reader” in the list of installed applications.

3. In the dialog box, click on “Yes” to confirm the uninstallation of “Adobe Acrobat Reader DC“.

Wait for a while as the uninstallation process may take a while.
4. After that, download the latest version of Adobe Acrobat Reader DC from the official website.
5. Install the latest version of Adobe Acrobat Reader DC on your device.
Now, open the file to print it within Adobe Acrobat Reader DC. You should be able to do it without further error.
Tips:
Do a full power cycle for your printer.
1. Reboot your computer. Now, disconnect the printer from your computer. Switch off the printer from the electrical unit and detach the power cable of the printer.
2. Press the Power button on Printer for 10 seconds.
3. Now, connect the printer to the computer and turn the computer ON. Once the computer reboots, turn the printer ON.
Now, try to print the document from Adobe Acrobat Reader.